WARNING: Manufacturer cannot be held responsble for any ncdent
or ts consequences that may arse durng the use of an applance not
lnked to the earth, or lnked to an earth whose contnuty s defectve.
Before any electrcal operaton, please check the supply tenson
shown on the electrcty meter, the adjustment of the crcut- breaker,
the contnuty of the connecton to earth to the nstallaton and that the
fuse s sutable.
The electrcal connecton to the nstallaton should be made accordng
to the rated power of the Applance; ths should be made va an Omn
pole cut-out swtch.
Before makng the connecton, make sure that the nstallaton s
protected by a sutable fuse, and that t s ftted wth wres of a large
enough secton to supply the applance normally.
If the applance has a socket outlet, t must be nstalled so that the
socket outlet s accessble.
For any questons regardng power supply cord refer to After Sales
Servce or a qualfed techncan.
If the hob s ftted wth power supply cord, ths shall be connected only
to a power supply of 220-240 V between phase and neutral.
Manufacturer declnes all responsblty for any damage that
mght be caused by unsutable or unreasonable use.
It s however possble to connect the hob to:
Three Phase 220-240 V3
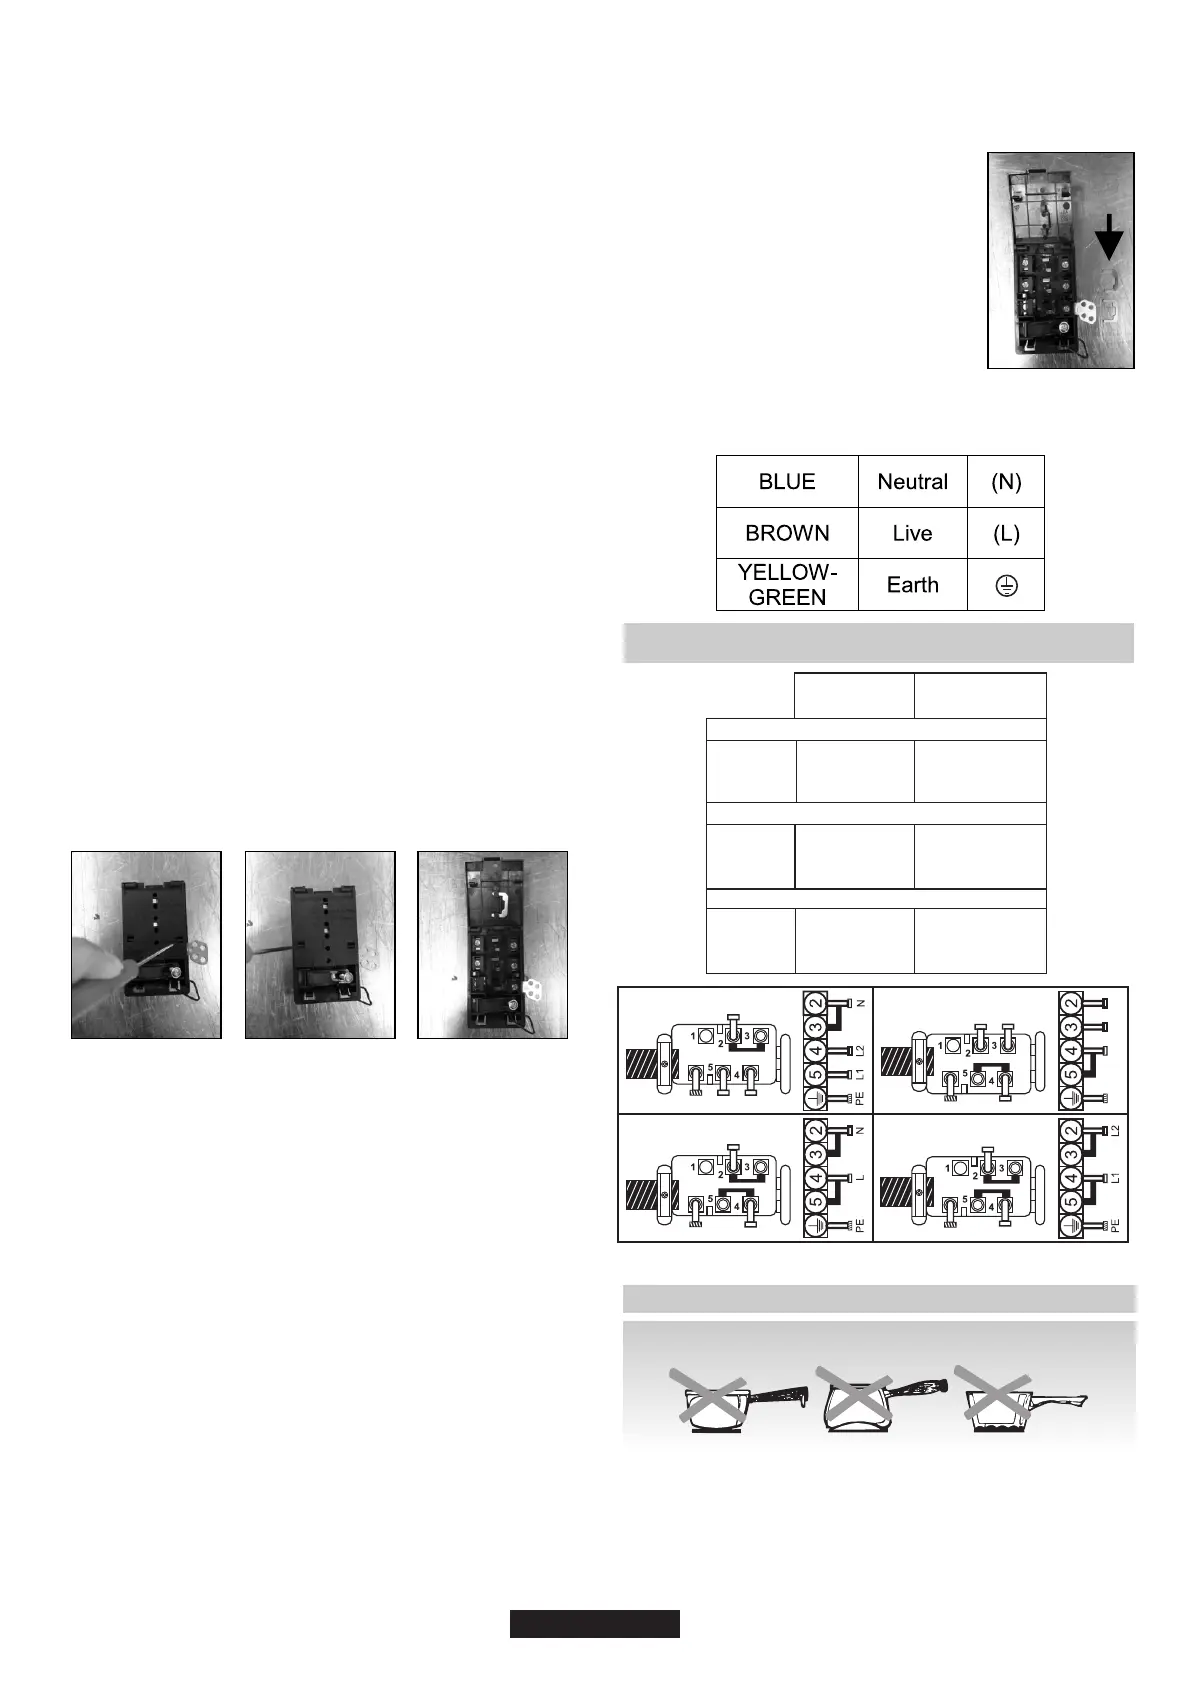
Turn over the hob, glass sde aganst the workng top, takng care to
protect the glass.
Three Phase 380-415 V2N
Open the cover n the followng sequence:
"Installaton must conform to the standards & drectves."
To proceed to the new connecton, please follow below nstructons:
The yellow/green wre of the power supply cable must be connected to
the earth of both power supply and applance termnals.
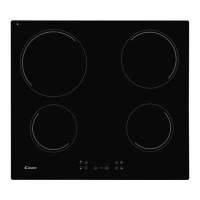
- fnd the two tabs located on the sdes;
- unscrew the cable clamp "1";
- put the blade of a flat screw-drver n front of each tab "2" e
"3", push n and press;
- remove the cover.
To release the power supply cord:
- Remove the screws retanng the termnal block whch
contans the shunt bars and the conductors of the supply cord;
- Pull out the supply cord.
Operatons to be carred out to make a new connecton:
- Choose the power supply cable n accordance wth the
recommendatons n the table;
- Pass the power supply cable nto the clamp;
- Strp the end of each conductor of the supply cord on a 10 mm length,
by takng n account the requested length of the cord for the
connecton to the termnal block;
- Accordng to the nstallaton and wth the help of shunt bars whch you
should have recovered n the frst operaton, fx the conductor as
shown on the chart;
- Fx the cover;
- Screw the cable clamp.
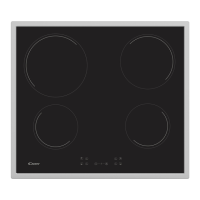
Connection to the terminals on the terminal block
ATTENTION:
If it should be necessary to replace the power supply cord, connect the
wire in accordance with following colors/codes:
LAY OUT
"1-3-5"
LAY OUT
"2-4"
MONOPHASE or TWO PHASES 220-240 V~
Cable
HO5V2V2F
Cable
HO5V2V2F
Cable
HO5V2V2F
2
3x2,5 mm
2
3x4 mm
2
4x1,5 mm
2
4x1,5 mm
2
4x1,5 mm
2
4x1,5 mm
THREE PHASES 220-240 V3~
THREE PHASES 380-415 V2N~
- Pass the power supply cable nto the clamp;
- Accordng to the nstallaton and wth the help of
shunt bars whch you should have recovered n
the frst operaton, fx the conductor as shown on
the chart;
Operatons to be carred out to make a new connecton:
- Strp the end of each conductor of the supply
cord on a 10 mm length, by takng n account the
requested length of the cord for the connecton to
the termnal block;
- Fx the cover;
- Choose the power supply cable n accordance wth the
recommendatons n the table;
Note: make sure the termnal board screws are tght.
- Screw the cable clamp.
07 GB
( )
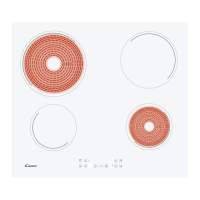
5. HOB COOKWARE ADVICE
Using good quality cookware is critical for setting
the best performance from your hob.
• Always use good quality cookware with perfectly flat and thick
bases : using this type of cookware will prevent hot spots that cause
food to stick. Thick metal pots and pans will provide an even
distribution of heat.
• Ensure that the base of the pot or pan is dry : when filling p a n s
with liquid or using one that has been stored in the r e f r i g e r a t o r ,
ensure that the base of the pan is completely dry before placing it on
the hob. This will help to avoid staining the hob.
2 31
SHUNT
N
=
Neutral
PE
=
EarthL1 / L2 / L3 = Phase
220-240V 3 ~
PE
L1 L2
L3
380-415V 2N ~
N
PE
L1 L2
L3
PE
L1
L2
220-240V ~
N
L
220-240V 2 ~
L2
PE
L1
PE