6
1. Turn system off. To replace the ber cartridge, make sure
the ber is removed from the handpiece and the ber is
fully retracted into the cartridge.
2. Carefully pull the old cartridge sideways away from the
laser until the cartridge is fully removed.
3. Reach into the cartridge bay to disconnect the optical
ber. This is done by unscrewing counterclockwise the
connector from the housing, then pulling the connector
straight out. Set the old cartridge aside.
4. Position the new cartridge adjacent to the open bay.
Carefully remove the dust cap from the end of the
connector. CAUTION: Do not touch the end of the
connector with your nger or with any object. Insert the
connector into the port.
5. Push on the connector while screwing clockwise. Give
a gentle tug on the connector (not the ber cable) to
ensure the connector is locked in place.
6. Position the cartridge to line up with the guide tabs on the
side of the bay.
7. Slowly push the cartridge into the bay until the outside
surface is ush with the side of the unit. Make sure the
optical ber coil is retracting inside the cartridge as you
do so. Turn on the power to the laser system.
8. Press the Extend and Retract buttons to ensure the ber is
moving properly. If it does not, push the cartridge into the
bay further.
9. Don’t look directly at the aiming beam! Make sure the
aiming beam indicator is at a value other than zero (0),
then press the Ready button. DO NOT press the foot
pedal. The aiming beam should be visible from the end of
the ber. If it is not, then remove the cartridge and conrm
that the ber connector is securly attached.
Note: Never re working beam if the ber is fully retracted
in cartridge.
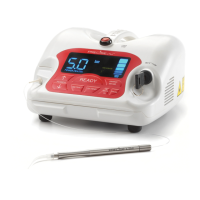
2.2.5 Laser Stop Switch
Before you can activate the laser, you must rst check to see if the
laser stop switch is locked in the “in” or “out” position. The switch is
the red button located on the top of the laser. Engage the switch
by pressing it. The button must be “in” to operate. The display
on the control panel should now be lighted. To interrupt laser
emissions in an emergency, depress the button again to the “out”
position. If you nd that the display is still not operational, check
all attachments, keys and switches to see that they are securely
installed and, that you have an active wall plug for electricity.
(See Troubleshooting Section). If the laser cannot be activated,
please contact your authorized distributor who can help you
troubleshoot. If the control panel does light up when you enable
the laser stop, you should test the switch again by depressing it
to turn the laser off. If the laser stop switch is in the “out” position,
the laser will not turn on.
Note: This is not a power switch.
2.3 FACILITY REQUIREMENTS
In order to insure the safe use of the laser in your facility, please
check to make sure that the proposed location has the following:
2.3.1 Power Requirements
110 -120 VAC ± 10 % at 60 Hz, 1.5 Amps
Frequency Range: 45 - 63 Hz
9 Volt Lithium battery
2.3.2 Heating, Ventilation, and Humidity
The room where the laser is used should have good cooling and
heating system so that the laser can be operated within the
optimum range of 20 - 30ºC (68 - 86ºF). Avoid storing or transporting
the laser in temperatures below 0º Celsius (32º F). Operating and
storage humidity should be 5-95% RH.
2.3.3 Lighting
Overhead lighting and/or dental unit light should provide enough
illumination to allow good operator vision when activating the
laser intra-orally.
2.3.4 Combustible Chemicals and Gases
All gases that are combustible or support combustion and are used
in the operatory area where the laser is in use must be turned off
and ventilated during the procedure. Cleaning supplies or other
ammable chemical compounds should be stored in an area
away from the surgical site in order to avoid possible combustion.
2.3.5 High Speed Vacuum Systems
Plume evacuation is a priority when vaporizing tissues. The clinician
or operator, and their chair-side assistants should keep themselves
and the patient safe by using a high volume vacuum system and
high ltration masks that are suitable for virus and bacterial control.
2.3.6 Access and Visual
Access to the treatment area should allow the dental team to
restrict entry while the laser is in use. There should be a Danger
Laser In Use Safety Sign placed in a designated area adjacent
to the entry into the treatment area. See Figure 40 on page 13.
SECTION 3: OPERATING YOUR LASER
3.0 SAFETY CONSIDERATIONS BEFORE USING
YOUR LASER
The safe use of the Precise LTM® is the responsibility of the entire
dental team including the doctor and the Laser Safety Ofcer
(LSO) appointed from the dental ofce team. Protocols for the safe
use of lasers have been developed by a combination of medical
and dental professionals working in concert with educators at
the university level, scientists and laser manufacturers. Dental
professionals have had to develop protocols and guidelines
for using the laser on oral soft tissues. Sound judgment and the
concern for patient safety should be the basis of all laser care.
The following entities have inuence over laser use.
3.0.1 In-Ofce Safety Issues
•
Lighting & Ventilation: Always use the Precise® LTM in a well
lit and ventilated area. Make certain that chemicals or gases
capable of supporting or causing combustion are not present
when using the laser. Use high volume vacuum to remove
the laser “plume” and provide a high ltration masks for all
Figure 22 - Laser Stop disabled (“IN”)Figure 21 - Laser Stop enabled (“OUT”)