3.3 Funzionalità e caratteristiche del terminale con display
grafico
I font di caratteri sono configurabili dall’utente-programmatore, sia
come stile sia come dimensione. È possibile quindi la rappresentazione
di tutti gli alfabeti. Inoltre si può realizzare la visualizzazione in grande
formato delle grandezze misurate, visibili così anche a distanza.
Sono visualizzabili inoltre:
• oggetti grafici statici (creati dal programmatore);
• oggetti grafici in movimento (creati dal programmatore);
• grafici delle variabili acquisite.
Nel caso si voglia memorizzare l’andamento grafico delle variabili
acquisite è necessario installare a bordo del terminale la scheda orolo-
gio/indirizzamento della rete locale pLAN nella versione dotata di
EPROM da 32 kbyte (cod. PCOCLKMEM0). Tale scheda va inserita
nel connettore a pettine contraddistinto dalla dicitura “CLOCK/MEM”;
effettuarne il montaggio/smontaggio a macchina spenta.
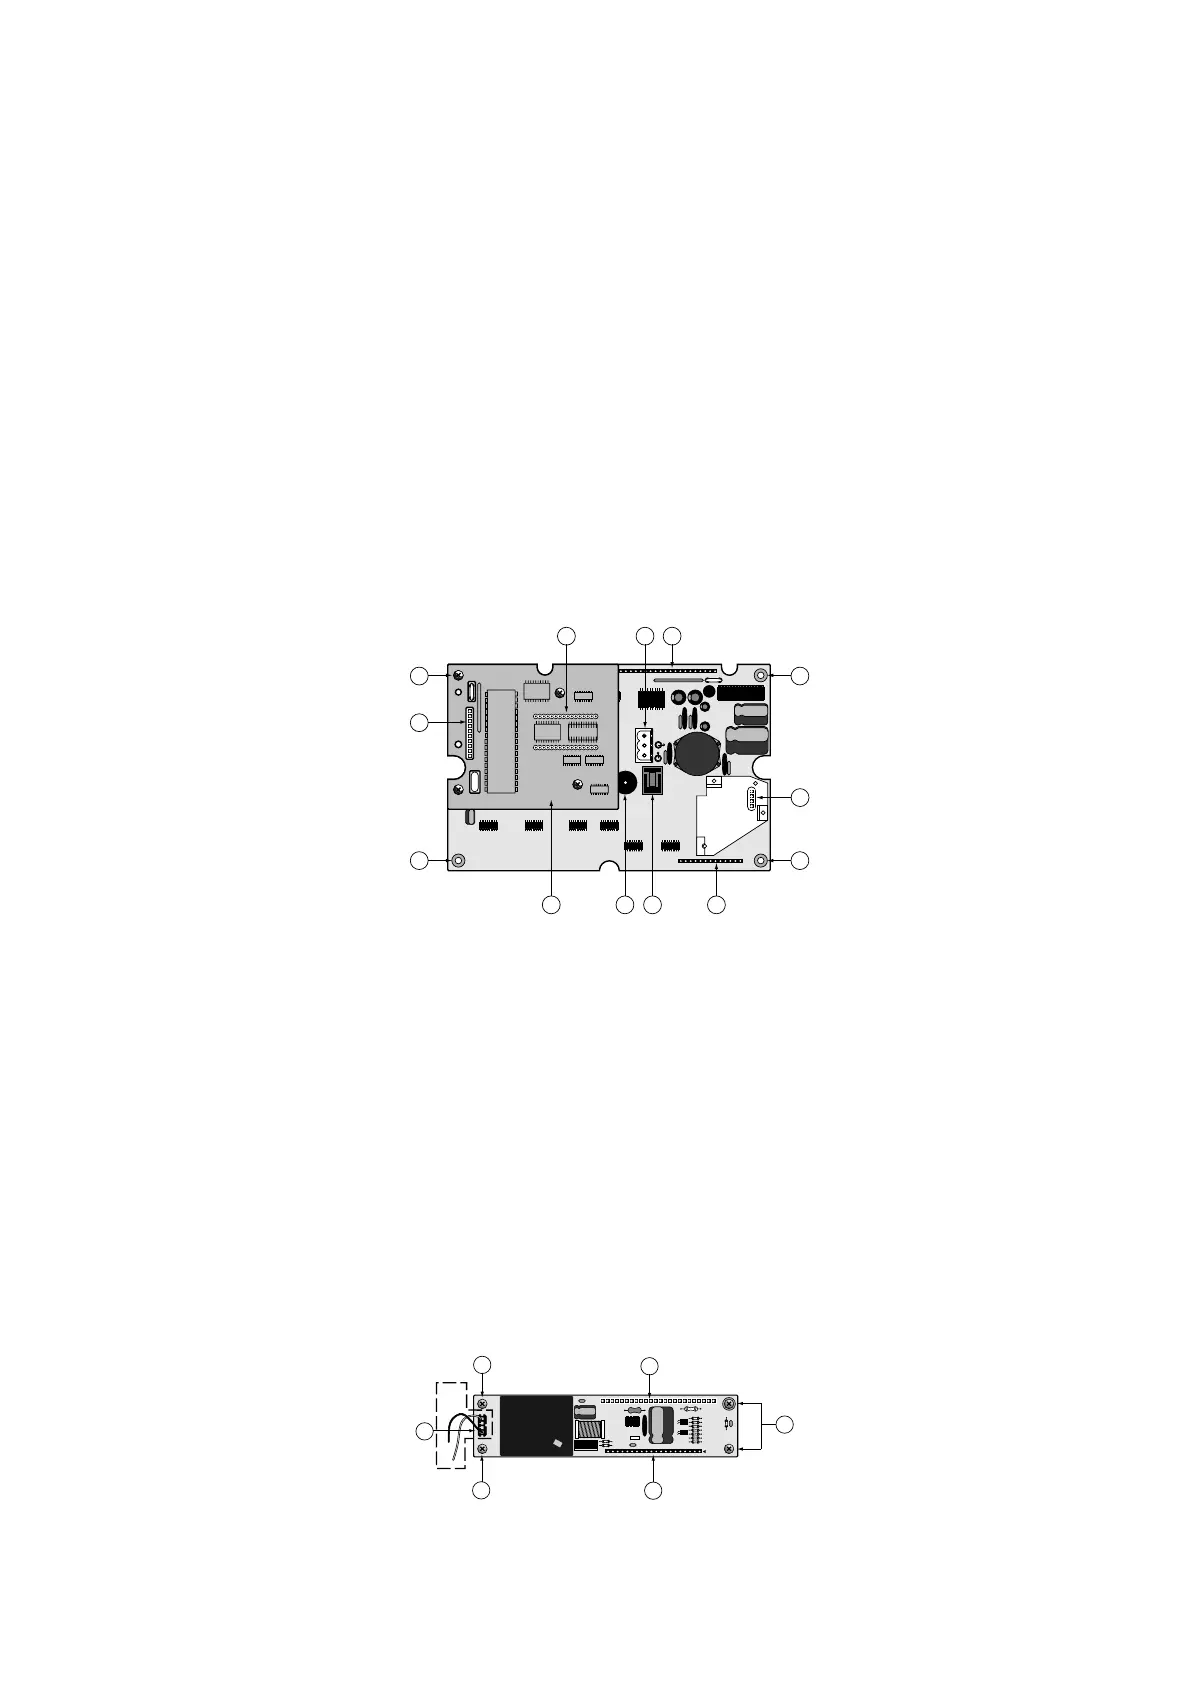
I componenti del terminale con dispay grafico:
Scheda base
La scheda supporta il microprocessore, le memorie e la EPROM che
contiene il programma applicativo di gestione del display e della tastiera.
Include il connettore per la schedina seriale opzionale per gestire la
stampante (cod. PCOSERPRN0) e quello per la schedina contenente
l’orologio e i 32 kByte di EEPROM.
1. Connettore alla scheda inverter e di gestione segnali per il display.
2. Connettore per scheda opzionale stampante.
3. Connettore telefonico per collegamento terminale alla scheda base
pCO (PCOB*21) o al derivatore TCONN6J000.
4. Cicalino per segnalazione acustica degli allarmi.
5. Fori di fissaggio metallizzati.
6. Connettore per collegamento alla scheda tastiera aggiuntiva.
7. EPROM programma e direzione/verso di montaggio.
8. Connettore per scheda orologio tempo reale/32kB EEPROM.
9. Connettore per alimentazione (da utilizzare sempre con
PCOI00PGL0 e per distanze superiori a 50 metri per il
PCOT00PGH0) (da min. 0,5 mm
2
a max. 2,5 mm
2
).
10. Schermo di protezione
Scheda inverter per alimentazione della lampada al neon del
display e connessione alla scheda base
Questa scheda consente di alimentare la lampada fluorescente di
retro-illuminazione del display e permette alla scheda base di pilotare
correttamente il display usato. La lampada al neon è presente solo nel
modello PCOI00PGLO 240x128 pixel.
1. Connessione a scheda base per
il modello PCOI00PGL0.
2. Connessione al display.
3. Connessione alla lampada.
4. Fori di fissaggio.
L’area tratteggiata in figura indica una zona ad alta tensione
(circa 360 Vac); evitare nel modo più assoluto di toccare con le dita o
altri utensili conduttivi tale zona.
3.3 Functions and features of the terminal with graphic
display
The fonts can be configured by the user-programmer, both in terms of
style and dimension. All alphabets can therefore be represented.In
addition, the measured values can be displayed in large format, making
them easily visible from a distance.
Other objects displayed include:
• static graphic objects (created by the programmer).
• moving graphic objects (created by the programmer).
• graphs of the acquired variables.
If saving the graphic progress of the acquired variables is required, it is
necessary to install the clock/addressing card of the local pLAN
network in the terminal (version with 32 kbyte EPROM,
code PCOCLKMEM0).This card should be inserted into the slot
marked “CLOCK/MEM”; all operations involving the mounting/removal
of such cards should be performed when the machine is off.
The components of the terminal with graphic display are:
Main board
The board includes the microprocessor, memory and the EPROM
which holds the application program for managing the display and the
keypad. It also includes a connector for the optional serial card for printer
management (code PCOSERPRN0) and a connector for the clock and
32 kbyte EEPROM card.
1. Connector to the inverter and signal management card for
the display.
2. Connector for the optional printer card.
3. Telephone-type connector card for terminal connection to the pCO
main board (PCOB*21) or junction TCONN6J000.
4. Buzzer for acoustic alarm signals.
5. Metal-plated mounting holes.
6. Connector for connection to the additional keypad card.
7. EPROM program and mounting direction/orientation.
8. Connector for real-time clock/32kB EEPROM card.
9. Power connector (to be used with PCOI00PGL0 and for distances
over 50 metres with PCOT00PGH0) (from. 0.5mm
2
to max. 2.5mm
2
).
10. Protective screen
Inverter card for powering the neon light on the display and
connection to the main board
This card provides power to the fluorescent back-light on the display
and allows the main board to correctly control the display used.The
neon light is only fitted on model PCOI00PGLO, 240x128 pixels.
1. Connection to the main board for
model PCOI00PGL0.
2. Connection to the display.
3. Connection to the light.
4. Mounting holes.
The shaded area in the figure indicates the high-voltage area (around
360Vac); do not in an circumstances touch this area with your fingers
or with conducting tools.
11
.

 Loading...


