58TN0B/58TN1B: Installation, Start–Up, Operating and Service and Maintenance Instructions
Manufacturer reserves the right to change, at any time, specifications and designs without notice and without obligations.
9
c. Other openings are caulked or sealed. These include joints
around window and door frames, between sole plates and floors,
between wall-ceiling joints, between wall panels, at penetrations
for plumbing, electrical and gas lines, etc.
Combination of Indoor and Outdoor Air
1. Indoor openings shall comply with the Indoor Combustion Air
Method below and,
2. Outdoor openings shall be located as required in the Outdoor
Combustion Air Method mentioned previously and,
3. Outdoor openings shall be sized as follows:
a. Calculate the Ratio of all Indoor Space volume divided by
required volume for Indoor Combustion Air Method below.
b. Outdoor opening size reduction Factor is 1 minus the Ratio in a.
above.
c. Minimum size of Outdoor openings shall be the size required in
Outdoor Combustion Air Method above multiplied by reduction
Factor in b. above. The minimum dimension of air openings shall
be not less than 3 in. (80 mm).
INSTALLATION
Upflow Installation
Bottom Return Air Inlet
These furnaces are shipped with bottom closure panel installed in bottom
return-air opening. Remove and discard this panel when bottom return
air is used. To remove bottom closure panel, perform the following:
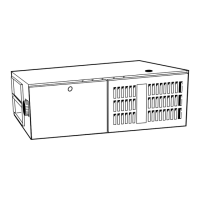
1. Tilt or raise furnace and remove 2 screws holding bottom filler
panel, see Fig. 9.
2. Rotate bottom filler panel downward to release holding tabs.
3. Remove bottom closure panel.
4. Reinstall bottom filler panel and screws.
A10273
Fig. 9 – Removing Bottom Closure Panel
Side Return Air Inlet
These furnaces are shipped with bottom closure panel installed in bottom
return-air opening. This panel MUST be in place when only side return
air is used.
NOTE: Side return-air openings can be used in UPFLOW and most
HORIZONTAL configurations. Do not use side return-air openings in
DOWNFLOW configuration.
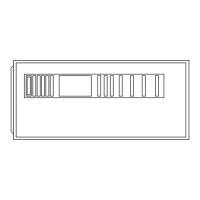
Leveling Legs (If Desired)
In upflow position with side return inlet(s), leveling legs may be used,
see Fig. 10. Install field-supplied, 5/16 X 1-1/2 in. (8 X 38 mm) (max)
corrosion-resistant machine bolts, washers and nuts.
A89014
Fig. 10 – Leveling Legs
NOTE: Bottom closure must be used when leveling legs are used. It
may be necessary to remove and reinstall bottom closure panel to install
leveling legs. To remove bottom closure panel, see Item 1 in “Bottom
Return Air Inlet” section in Step 1 above.
To install leveling legs:
1. Position furnace on its back. Locate and drill a hole in each bottom
corner of furnace, see Fig. 10.
2. For each leg, install nut on bolt and then install bolt with nut in
hole. (Install flat washer if desired.)
3. Install another nut on other side of furnace base. (Install flat washer
if desired.)
4. Adjust outside nut to provide desired height, and tighten inside nut
to secure arrangement.
5. Reinstall bottom closure panel if removed.
Downflow Installation
NOTE: For downflow applications, this furnace is approved for use on
combustible flooring when any one of the following accessories are
used:
• Manufacturer’s approved downflow combustible floor subbase
• Manufacturer’s approved cased evaporator coil
• Manufacturer’s approved evaporator coil casing
1. Determine application being installed from Table 4
2. Construct hole in floor, see Table 4 and Fig. 11.
3. Construct plenum to dimensions specified, see Table 4 and Fig. 11.
Bottom
Closure Panel
Bottom Filler Panel
CAUTION
!
EQUIPMENT OR PROPERTY DAMAGE
Failure to follow this caution could result in equipment or property
damage
When furnace is installed in a downflow application, make sure water
lines and other sources of water cannot drip or fail in such a way that
water can collect on the blower motor, wiring, and furnace control
board.
1
3
/
4
1
3
/
4
1
3/
4
1
3/
4
5/
16
5
/
16
5/
16
5/
16
(44mm)
(8mm)
(44mm)
(8mm)
(8mm)
(8mm)
(44mm)
(44mm)
 Loading...