ENGLISH
35
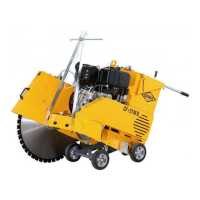
Cutting operation
• CEDIMA
®
• Technical Documentation • All rights reserved as per ISO 16016 • Subject to modications due to progressive development •
5.1 General notes on cutting operation
DANGER!
Danger of injury due to rotating saw
blade!
When acting carelessly the rotating diamond saw blade
might lead to perilous injuries. The joint cutter must only
be operated with a completely mounted blade guard to
limit the danger of injury.
ATTENTION!
As a basic principle the joint cutter has
to be transported directly to the place
of operation with the blade drive switched off.
Transport and displacing beyond the working area
are forbidden with freely rotating saw blade.
Pay attention to the previous chapters, especially
the notes on safety and danger!
As per the accident prevention
regulations it is absolutely necessary to
wear appropriate ear protection.
ATTENTION!
According to the particular cutting
conditions it may be necessary to wear
further personal protection equipment.
ATTENTION!
During cutting other parties have to keep
a safe distance of approx. 10 m. The
operator is at his working place on the joint cutter
(driver’s position, seat).
If the safe distance cannot be kept for constructional
reasons the direct danger area has to be closed off or
to be provided with danger signs.
Pay attention to objects and building parts to be
protected (remove or cover them) and also to the
whereabouts, the discharge (collection) of the cooling
and rinsing water, of the slurry and the materials to be
cut.
5.2 Aligning the joint cutter to the cut
DANGER!
For aligning the joint cutter to the cut the
motor must be shut down!
Raise the saw blade and move the joint cutter manu-
ally to the cutting position with the pointers and the saw
blade in exact alignment to the cutting line.
1. Mount the diamond saw blade (chapter 4).
2. Align the joint cutter (with standing saw blade) via the
pointers to the cutting line (section 4.6).
3. Adjust the cutting depth indicator (section 4.3.4).
4. Raise the diamond saw blade from the ground to be
cut. For this purpose turn the key switch right into the
rst detent (1) (section 4.3.2) and raise the cutting
shaft (saw blade) with the corresponding lever on the
control panel (section 4.3.1).
5.3 Starting cutting operation
1. Move the feed lever in center position (g. 4.11).
2. Move the feed clutch lever in position “disengaged”
(g. 4.14).
3. According to the kind of water supply put the cooling/
rinsing water supply into operation (water pump ON
or ball valve for water supplied under pressure to be
opened, section 4.7).
4. Start the joint cutter’s motor (section 4.4.1).
ATTENTION!
Before starting the motor make sure that
the starting saw blade does not produce
any danger.
5. Bring the motor with the throttle to rated speed “full
load” (g. 4.12).
6. Lower the rotating saw blade slowly to the required
cutting depth (sections 4.3.1 and 4.3.5).
Hold the joint cutter tight at the push rods!
Do not lower the diamond saw blade too fast to
avoid damages to the blade and the joint cutter.
A precise pre-cut of moderate depth facilitates the
subsequent cuts and leads to a clean cutting line.
5.0 Cutting operation