Do you have a question about the Cersanit ASTRA and is the answer not in the manual?
Provides comprehensive instructions for the assembly and maintenance of the ASTRA concealed toilet bowl set.
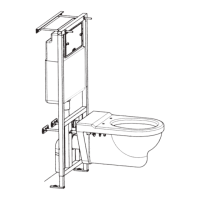
Identifies and lists all components of the ASTRA toilet bowl set with lettered labels.
Lists essential accessories like control plates and flush types for the toilet set.
Details the tools needed for installation, including wrenches and drilling equipment.
Instructions for securely attaching the unit to a wall capable of bearing load.
Details dimensions for frame depth, covering thickness, height, bowl height, and floor thickness.
Guides through measuring, inserting rods, positioning support, attaching lugs, and cutting threads.
Instructions for adjusting the support height to position the bowl correctly.
Procedure for marking and drilling holes for the support and wall plugs.
Steps for attaching the collar, positioning the outlet pipe, and securing the connection.
Final steps for permanently fixing the support structure to the wall.
Instructions for connecting the water inlet pipe to the stopcock and ballcock.
Steps for fitting sleeves, positioning the bowl, and testing water connections.
Checking supply/outlet sealing, draining the tank, and removing the toilet bowl.
Instructions for reinstalling the frame and fitting components for the wall covering.
Guidelines on maximum covering thickness and suitable materials for the casing.
Fitting sleeves to the bowl and adjusting lengths based on wall marks.
Cutting and filing sleeves, measuring bowl ceramic, and adjusting rod extensions.
Fitting supply and outlet sleeves and using soapy water for easier installation.
Steps to attach the bowl to the support using the provided kit, following part order.
Securing the base of the control plate to the frame using screws.
Adjusting screws for plate extension and clipping the plate onto studs.
Instructions for cleaning the filter and replacing the diaphragm in the filling valve.
Steps to close the stopcock, detach it, and remove the filling valve and its tube.
Procedure for servicing the flush mechanism, including removing spacers and the valve.
| Type | toilet |
|---|---|
| Material | ceramic |
| Color | white |
| Seat Included | no |
| Installation Type | wall-mounted |
| Flush Volume | 3/6 liters |