NX700/NX700E
- 13 -
ADJUSTMENTS
When this tool is executed, the VB6.0 run time is necessary.
Please download from web site and install it.
(http://www.vector.co.jp/soft/dl/win95/util/se188840.html)
< Measuring instrument>
* Adjustment software: AtomicAlign_Ver105 for development
* Ce-NET analyzer
* SG
<Setting of the prn file>
1. Install the adjustment software in the personal computer.
2. Connect the unit to the personal computer with the
CeNET analyzer.
3. Open the adjustment software in the computer, and turn
on the unit.
4. It is displayed on the screen " for development ", please
click " OK ". The tool starts.
A-Tomic TUNER section
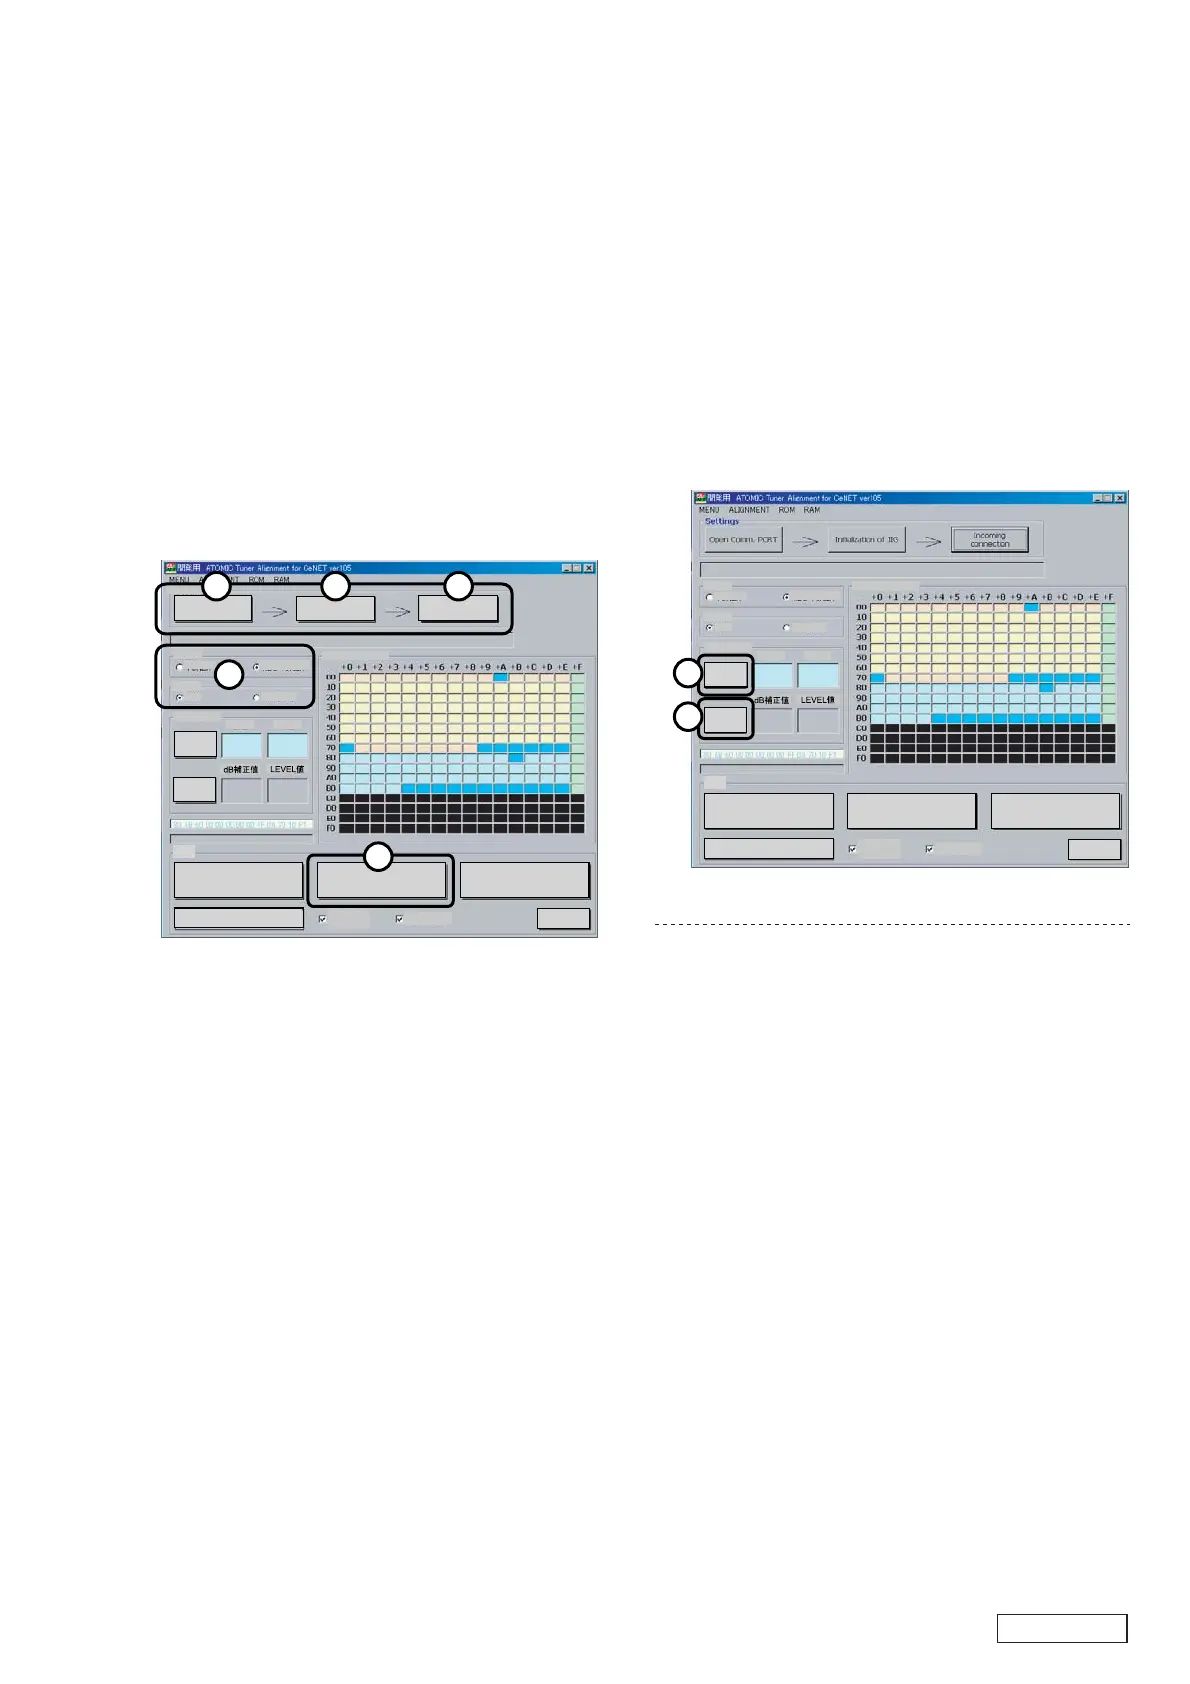
5. Click the " Open Comm.PORT " button of the display. The
communication of the personal computer and the
analyzer starts.
6. Click the " Initialization of JIG " button of the display. The
personal computer sends the command for operation of
the analyzer.
7. Click the " Incoming connection " button of the display.
The unit recognizes the external jig. The preparation
completes.
8. " AREA " and " BAND " are automatically set with the unit
if communicated. It is not necessary to set it.
9. Click the " Data Write(0x00-0xBF) " button, select the prn
file of " V8N9_PRN_eur_ver09 " (for Europe) " ,
V8N9_PRN_usa_ver06 " (for North America). The PRN-
data is written in EEP-ROM of the unit.
When writing EEP-ROM in the unit is the initial setting, "
CS ERROR " is displayed, please continue it.
Confirm the unit or the setting when " CS ERROR " is
displayed excluding initialization.
<FM S-Meter adjustment>
1. Input 98.1MHz/20dBuV(30%MOD,400Hz) signal.
2. Click " Alignment " button, " SG Level 20dBuV " is
displayed.
3. Click " OK " after confirming SG is 20dB.
4. Input 40dBuV signal. Click " Alignment " button, " SG
Level 40dBuV " is displayed.
5. Click " OK " after confirming SG is 40dB.
6. When the adjustment is completed, " COMPLETED " is
displayed. Then click " OK " button.
7. Check the level whether the adjustment is normal. Set SG
to the arbitrary value between 20dB and 40dB, and click "
LV Check " button. If the dB correction value at that time
is +2dB/-2dB of a set value of SG, it is normally adjusted.
<AM S-Meter adjustment>
1. Input 999kHz/30dBuV(30%MOD,400Hz) signal.
2. Click " Alignment " button, " SG Level 30dBuV " is
displayed.
3. Click " OK " after confirming SG is 30dB.
4. Input 50dBuV signal. Click " Alignment " button, " SG
Level 50dBuV " is displayed.
5. Click " OK " after confirming SG is 50dB.
6. When the adjustment is completed, " COMPLETED " is
displayed. Then click " OK " button.
7. Check the level whether the adjustment is normal as well
as FM adjustment. Set SG to the arbitrary value between
30dB and 50dB, and click " LV Check " button. If the dB
correction value at that time is +2dB/-2dB of a set value
of SG, it is normally adjusted.
8. After all the adjustments, select " END" of " MENU". And
press the reset button of the unit to set the data.
Open Comm. POR T
Initialization of JIG
Incoming
connection
Settings
OK
BAND
AREA
FM
MW(AM)
TUNER
RDS TUNER
ROM DATA MAP
FM S-Meter
Alignment
LV Check
20dB
40dB
Data Read ALL Data Write(0x00-0xBF) Data Write(0x80-0xBF)
Alignment
Protect
CheckSUM
All 0xFF
ROM
- Display (1) -
8
5 6 7
9
OK
BAND
AREA
FM
MW(AM)
TUNER
RDS TUNER
ROM DATA MAP
FM S-Meter
Alignment
LV Check
20dB
40dB
Data Read ALL Data Write(0x00-0xBF) Data Write(0x80-0xBF)
Alignment
Protect
CheckSUM
All 0xFF
ROM
- Display (2) -
2
7
 Loading...