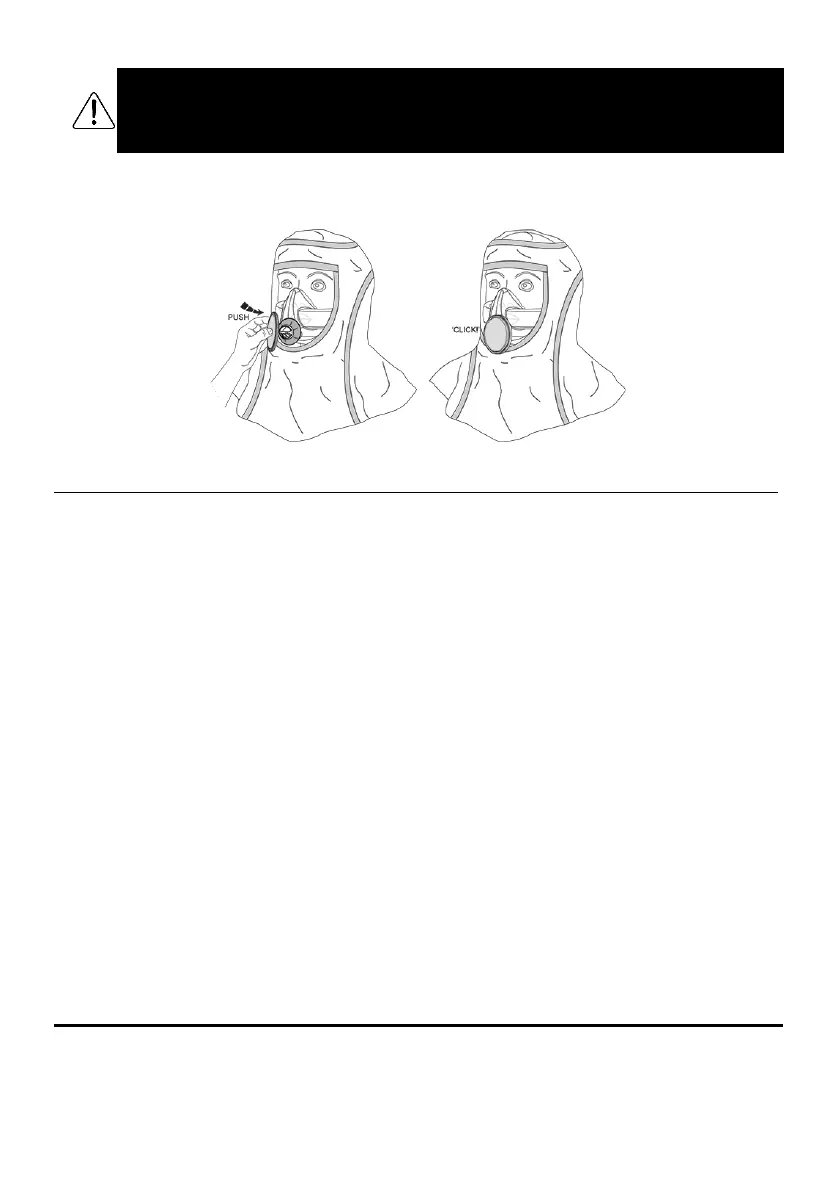
STEP 2 – FIT THE EXHALATION FILTER
If you are using the BIO Exhalation Filter, fit it now by pressing it onto the BIO Exhalation Valve Cover until you hear
a “click”. If necessary, support the BIO Exhalation Valve Cover by reaching up inside the BioHood.
13. Using CleanSpace HALO With Full Face Mask
Complete the following five (5) steps each time you use your respirator with the Full-Face Mask.
STEP 1 - INSPECT
Before each entry into a contaminated area, the following inspections must be performed.
•
Visually check all parts including the power unit, mask, harness and filter. If parts are missing or
damaged replace them only with approved parts before proceeding.
•
Check the POWER UNIT
for cracks, holes or other damage or missing parts. Do not use the device if
there is any damage or misuse.
Check both bellows for splits or holes. Check that the bellows have not
become distorted as this may obstruct the air supply to the mask. Check the neck support (if required).
Check that the battery has enough charge to complete the work period by pressing the Power Button.
The Battery Indicator Light(s) will illuminate to indicate the approximate charge. Refer to Section 9. A full
charge is recommended.
•
Check the FILTER
carefully. The foam seal must be clean and free from damage of any kind. Examine
the visible internal surfaces for any sign that dust has penetrated the media. If dust is found, do not use
the filter. The body of the filter must be free of cracks or signs of damage. If any sign of impact or
scratching is found, discard the filter. Fit the filter to the power unit (see Section 16).
•
Check the FULL-FACE MASK
to ensure that there are no cracks, tears or dirt; Check the mask is not
distorted. Check the mask exhalation valve for damage or dirt build up. If it is dirty,
flip up the rain cover.
Remove any dirt, hairs or anything that could affect the seal of the valve against its seat. Check that the
valve seat is clean. Lower the rain cover. If the valve is damaged, replace it with a new one.
•
Check the HARNESS
is intact and has good elasticity and the fastening clips can be tightened and
loosened. The harness must be adjusted to support the mask to seal comfortably to the face. DO NOT
overtighten. Finally check the AirClips can be clicked/unclicked into the power unit.
STEP 2 – CALIBRATE
This respirator contains a system for synchronising with your breathing and regulating mask pressure. This system
should be re-calibrated if it experiences it experiences a change in temperature of more than 20°C. It is best
practice to also re-calibrate if the unit has been in storage and the storage temperature is unknown.
Steps to re-calibrate: