12
Basic Base Station Setup
This section describes setup and equipment connections for an individual base station.
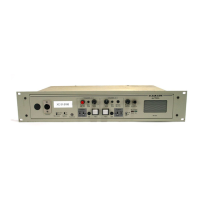
1. Connect the two enclosed antennas to the antenna connectors on the rear panel of the base station, and turn
the sleeves clockwise on the antenna connectors to tighten them securely in place. Position the antennas at
90° angles from each other.
2. Plug the connector at the end of the AC power supply cord into the +12-14VDC power connector on the rear
panel of the base station (as shown above). Turn the locking nut on the cable connector clockwise to secure it
to the base station. Plug the female connector at one end of the AC power cord into the power supply. Plug the
other end of the AC power cord into an electrical outlet.
3. Set the SINGLE/DUAL Channel select switch for the base station to operate in Single or Dual channel mode.
h In Single Channel mode, all wireless users will be able to hear each other. Up to four users can talk
simultaneously.
h In dual channel mode, there are two separate audio channels enabling two groups of users to
independently communicate with each other. Up to three users can talk simultaneously.
NOTE: Any time the mode is changed, the unit must be reset using the RESET button or by power
cycling for the change to take effect.
1. If a local headset will be used, plug it into the HEADSET connector on the front panel of the base station.
NOTE: The connector is keyed, so the headset cable plug cannot be inserted in the wrong direction.
2. Press the POWER switch on the front panel to turn on the base station. A red light on the switch should go on.
Base station rear panel
AC power supply
AC power cord
Headset connectorPower switch
90°
SINGLE/DUAL Channel select switch

 Loading...