GROUP S.p.A.
MT SB 01 40
E N
The switchboard may be SECONDARY or MAIN.
• Set SECONDARY when the switchboard is used as
SECONDARY, on the outgoing line from the LM-LM
terminals of switching device Art. 1424 (Simplebus
TOP system; see diagram SBTOP/001PX, page
80); or when the switchboard is used as MAIN,
in Simplebus systems with switching devices Art.
1224A or in a system with a single riser and no
switching devices.
CAUTION! the SECONDARY switchboard cannot
be congured as a switchboard in PARALLEL.
• Set MAIN when the switchboard is used as MAIN
in SIMPLEBUS TOP systems, then positioned in
the rst section before the switching devices Art.
1424 which mark out the zones/risers (see diagram
SBTOP/002PX, page 82).
The SECONDARY or MAIN switchboard must then
be congured as:
1- SINGLE
2- PARALLEL
3- SERIES.
1- Select SINGLE when the switchboard is the only
one in the system, or the only one serving a specic
riser.
2- If there are 2 main or secondary control
units serving the same riser, the PARALLEL
conguration implies that both switchboards will
be operative with the same functions (see diagram
SBTOP/005PX, page 88).
The rst of the two to answer a call will preclude
the possibility of the other one performing the same
procedure.
If one of the 2 devices is switched on or off, the
other will automatically follow suit.
Congure both switchboards as PARALLEL and
set the switchboard connected underneath the
LS-LS line of the switching device Art. 1424 as
LS-IN; set the device positioned underneath the
LPin-LPin line of switching device Art. 1424 as
LP-IN.
For the PARALLEL switchboard, switching to
NIGHT and the DAY/NIGHT AUTOMATIC function
is not possible (see “I3- DAY/NIGHT AUTOMATIC”,
page 35).
A P should appear on the standby screen of the
two switchboards, indicating that the switchboard
is congured in parallel, in addition to the xed icon
.
3- If there are 2 main or secondary switchboards
serving the same riser, the SERIES conguration
implies that only 1 of the 2 can be operative
(MASTER switchboard), while the other is
deactivated (SLAVE switchboard; see diagram
SBTOP/004PX, page 86).
Congure both switchboards as SERIES and the
active switchboard will, from time to time, be the
one set as MASTER. To change a switchboard
C8.3 -Type of switchboard (Simplebus Top mode)
(available from R.I.006)
from MASTER to SLAVE and vice-versa, see “U21
HOW TO ACTIVATE (MASTER) OR DEACTIVATE
(SLAVE) THE MAIN SWITCHBOARDS”, page 33.
An S should appear on the standby screen of the
two switchboards, indicating that the switchboard
is congured in series, in addition to the xed icon
.
CAUTION!
- if ashes, it is indicating that the 2 switchboards
are not communicating correctly.
- if the icon ! appears, there is a conguration
problem with the 2 switchboards (e.g. both set
as MASTER or SLAVE, LP-IN or LS-IN, or one is
SERIES and the other PARALLEL).
- If, in a Simplebus TOP system (with switching
devices Art. 1424), both main and secondary
switchboards are installed (see diagram
SBTOP/003PX, page 84); for correct system
operation, it will be necessary to activate - on all
switchboards - the setting “C8.7- FUNCTION MAIN
CPS+SEC”, page 42.
- press the MENU key and use the keys to view
the 8-ADVANCED OPTIONS menu, then press 8;
8-ADVANCED
OPTIONS
- use the keys to display the 3-TYPE OF
SWITCHBOARD menu, then press 3;
3- TYPE OF
SWITCHBOARD
- press 2;
1-SECONDARY
*2-MAIN
The switchboard is congured as SINGLE CPS
by default. It is now possible to congure it as
PARALLEL CPS or SERIES CPS.
- to congure it as 2-PARALLEL CPS, press 2;
1-SINGLE CPS
*2-PARALLEL CPS
- to congure it as LS-LN, press 1;
to congure it as LP-LN, press 2;
1- LS-IN
2- LP-IN
- to congure it as SERIES CPS, use the keys to
display the 3-SERIES CPS menu, then press 3;
*3-SERIES CPS
- to congure it as MASTER, press 1;
to congure it as SLAVE, press 2;
1- MASTER
2- SLAVE
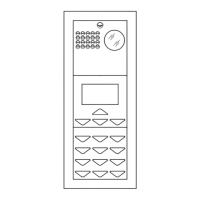
How to configure a main switchboard