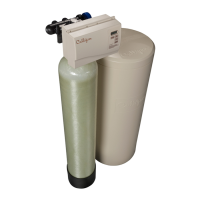
PLACEMENT
Refer to Fig. 1.
• Set the media tank on a solid, level surface near water, drain and electrical facilities. Place the outlet (black
coupling) of the tank on the left.
• Set the brine system on a flat, smooth, solid surface as near the media tank as possible.
MOUNT THE CONTROL VALVE
See Fig. 2.
• Remove and discard the protective covers on the tankcouplings.
• Lubricate the o-rings on the tank couplings with silicon lubricant.
• Place the control on the tank couplings and press down firmly.
• Install the u-clamps on both sides of the control and secure with the screws.
PLUMBING CONNECTIONS
Two methods of connecting the water softener to the plumbing system are available. Shipped with each softener
is a Culligan
®
Cul-Flo-Valv
®
bypass valve. If local conditions warrant, you may use the sweat adaptor kits,
PN 00-3314-44 or 00-3314-45.
NOTICE: The Soft-Minder
®
meter cannot be used with the sweat adaptors.
CAUTION: Close the inlet supply line and relieve system pressure before
cutting into the plumbing! Flooding could result!
FIG. 1
6 CULLIGAN
®
MARK 89 AND 812 WATER CONDITIONER
Installation