116
FTX-N/U, FVXS-N, FDMQ-R Series EDUS091558E
3P500432-1
CAUTION
• Install the indoor unit leveled.
If the indoor unit is inclined and the drain piping side gets
high,itmaycausemalfunctionofoatswitchandresultin
water leakage.
• Attach nuts on the upper and lower side of hanger.
If there is no upper nut and the lower nut is over-tightened,
the hanger and the top plate will deform and cause abnormal
sound.
• Donotinsertmaterialsotherthanthatspeciedinto
the clearance between the hanger and the washer for
hanger bracket (11).
Unless the washers are properly attached, the
suspension bolts may come off from the hanger.
WARNING
The indoor unit must be securely installed on a place
that can withstand the mass.
Ifthestrengthisinsufcient,theindoorunitmayfalldown
and cause injuries.
6. REFRIGERANT PIPING WORK
Refer to the installation manual for the outdoor unit also.
• Carry out insulation of both gas and liquid refrigerant piping
securely. If not insulated, it may cause water leakage. For
gas piping, use insulation material of which heat resistant
temperature is not less than 230°F (110°C).
For use under high humidity, strengthen the insulation
material for refrigerant piping. If not strengthened, the
surface of insulation material may sweat.
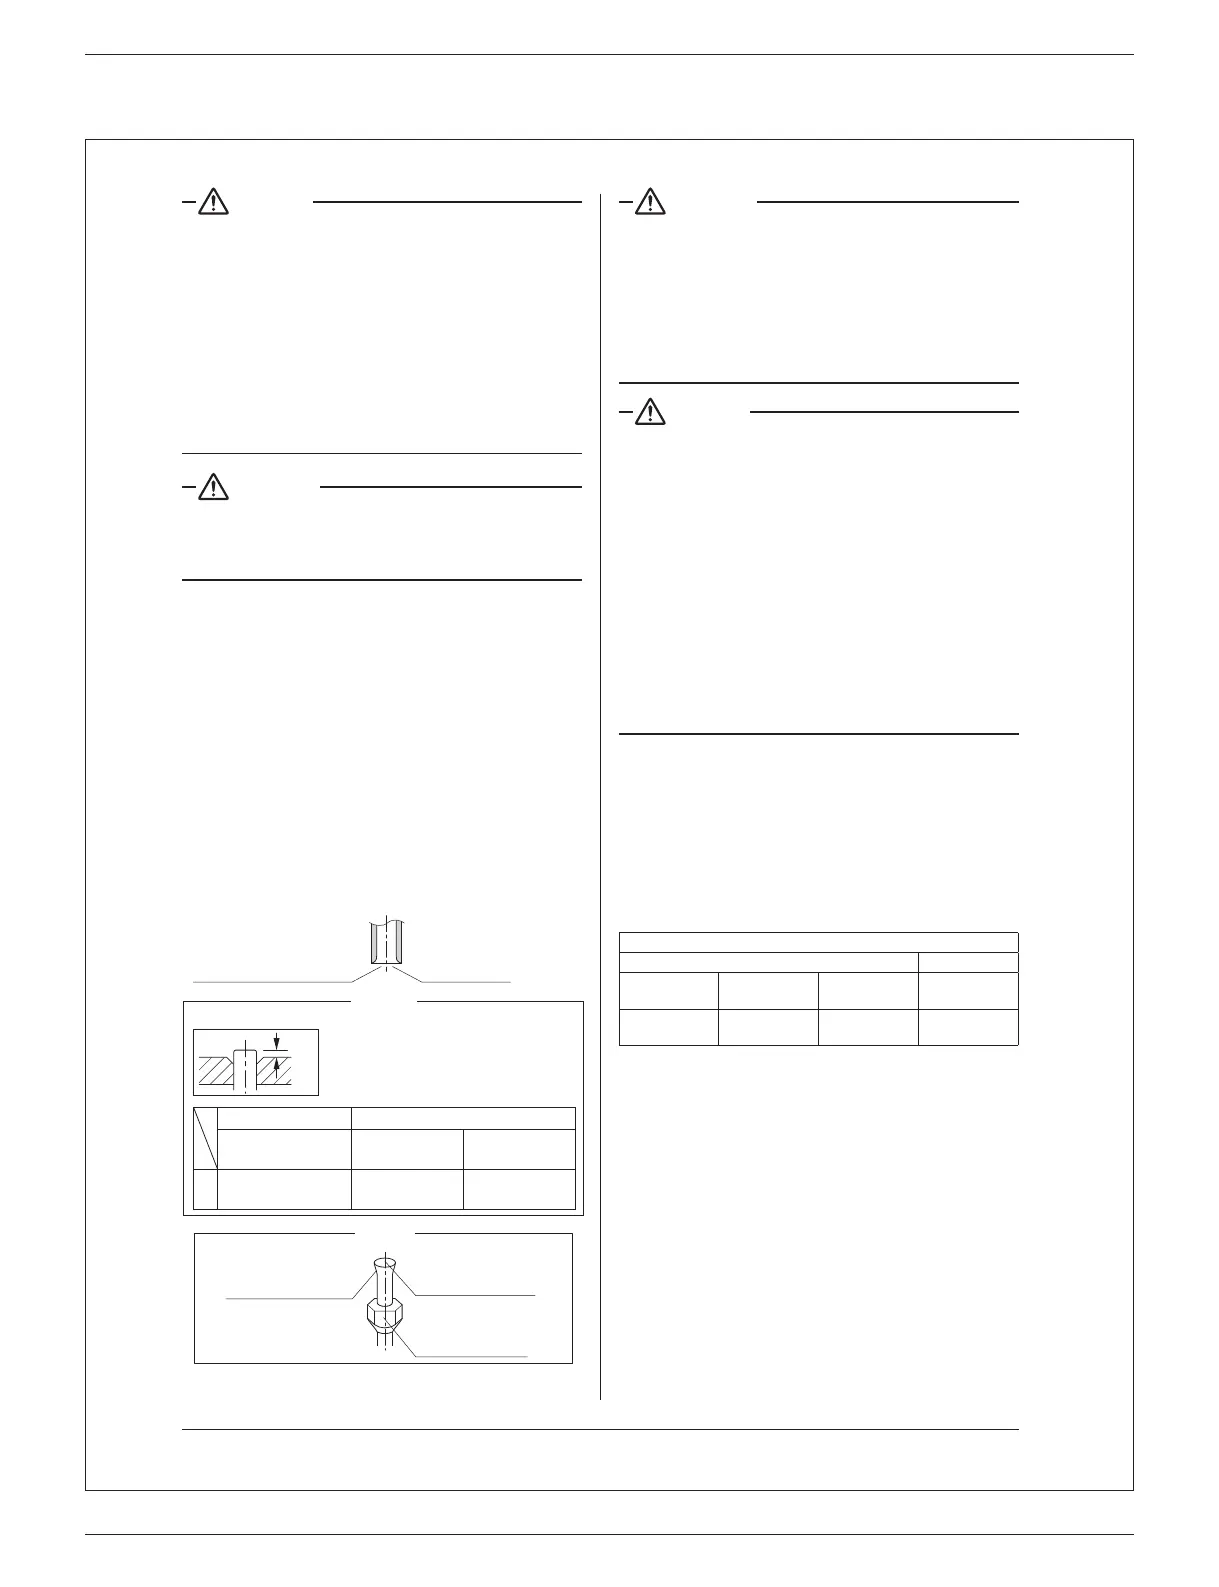
(1) Flaring the pipe end
1. Cut the pipe end with a pipe cutter.
2. Remove burrs with the cut surface facing downward,
sothatthelingsdonotenterthepipe.
3.Putthearenutonthepipe.
4. Flare the pipe.
5.Checkthatthearinghasbeendonecorrectly.
Theare’sinnersurface
mustbeaw-free.
Thepipeendmust
beevenlyaredina
perfectcircle.
Makesurethatthe
arenutistted.
Check
A
Cutexactlyatrightangles. Removeburrs
Setexactlyatthepositionshownbelow.
A
0-0.02in
(0-0.5mm)
0.04-0.06in
(1.0-1.5mm)
0.06-0.08in
(1.5-2.0mm)
Clutch-type
FlaretoolforR410A
Clutch-type
(Rigid-type)
Wing-nuttype
(Imperial-type)
Conventionalaretool
Flaring
Die
WARNING
• Donotapplymineraloiltotheare.
• Prevent mineral oil from getting into the system as
this would reduce the service life of the units.
•
Never use piping which has been used for previous
installations. Only use parts which are delivered with this unit.
• Never install a dryer to this R410A unit in order to
guarantee its service life.
•
The drying material may dissolve and damage the system.
•
Incompletearingmayresultinrefrigerantgasleakage.
CAUTION
•Usethearenutxedtothemainunit.(Thisisto
preventthearenutfromcrackingasaresultof
deterioration over time.)
• Useapipecutterandaresuitableforthetypeof
refrigerant.
• To prevent gas leakage, apply refrigeration oil only to
theinnersurfaceoftheare.(Userefrigerationoilfor
R410A.) (Refer to Fig. 10)
• Useatorquewrenchwhentighteningthearenutsto
preventdamagetothearenutsandgasleakage.
•
Protect the open end of the pipe against dust and moisture.
•
Do not allow anything other than the designated
refrigerant to get mixed into the refrigerant circuit, such
as air, etc. If any refrigerant gas leaks while working on
the unit, ventilate the room thoroughly right away.
•
Useonlythearenutsattachedtotheairconditioner.If
otherarenutsareused,itmaycauserefrigerantleakage.
(2) Refrigerant piping
1. To prevent gas leakage, apply refrigeration machine
oilonlytotheinnersurfaceoftheare.(Use
refrigeration oil for R410A)
2. Alignthecentersofbotharesandtightentheare
nuts 3 or 4 turns by hand, then tighten them fully with
a spanner and a torque wrench.
• Useatorquewrenchwhentighteningthearenuts
topreventdamagetothearenutsandgasleakage.
(Refer to Fig. 9)
Flare nut tightening torque
Gas side Liquid side
3/8 inch
(9.5mm)
1/2 inch
(12.7mm)
5/8 inch
(15.9mm)
1/4 inch
(6.4mm)
24.1-29.4ft•lbf
(32.7-39.9N•m)
36.5-44.5ft•lbf
(49.5-60.3N•m)
45.6-55.6ft•lbf
(61.8-75.4N•m)
10.4-12.7ft•lbf
(14.2-17.2N•m)
7
01_EN_3P500432-1.indd 7 10/24/2017 18:32:33
 Loading...