FTX-N/U, FVXS-N, FDMQ-R Series EDUS091558E
171
3P379970-10C
6
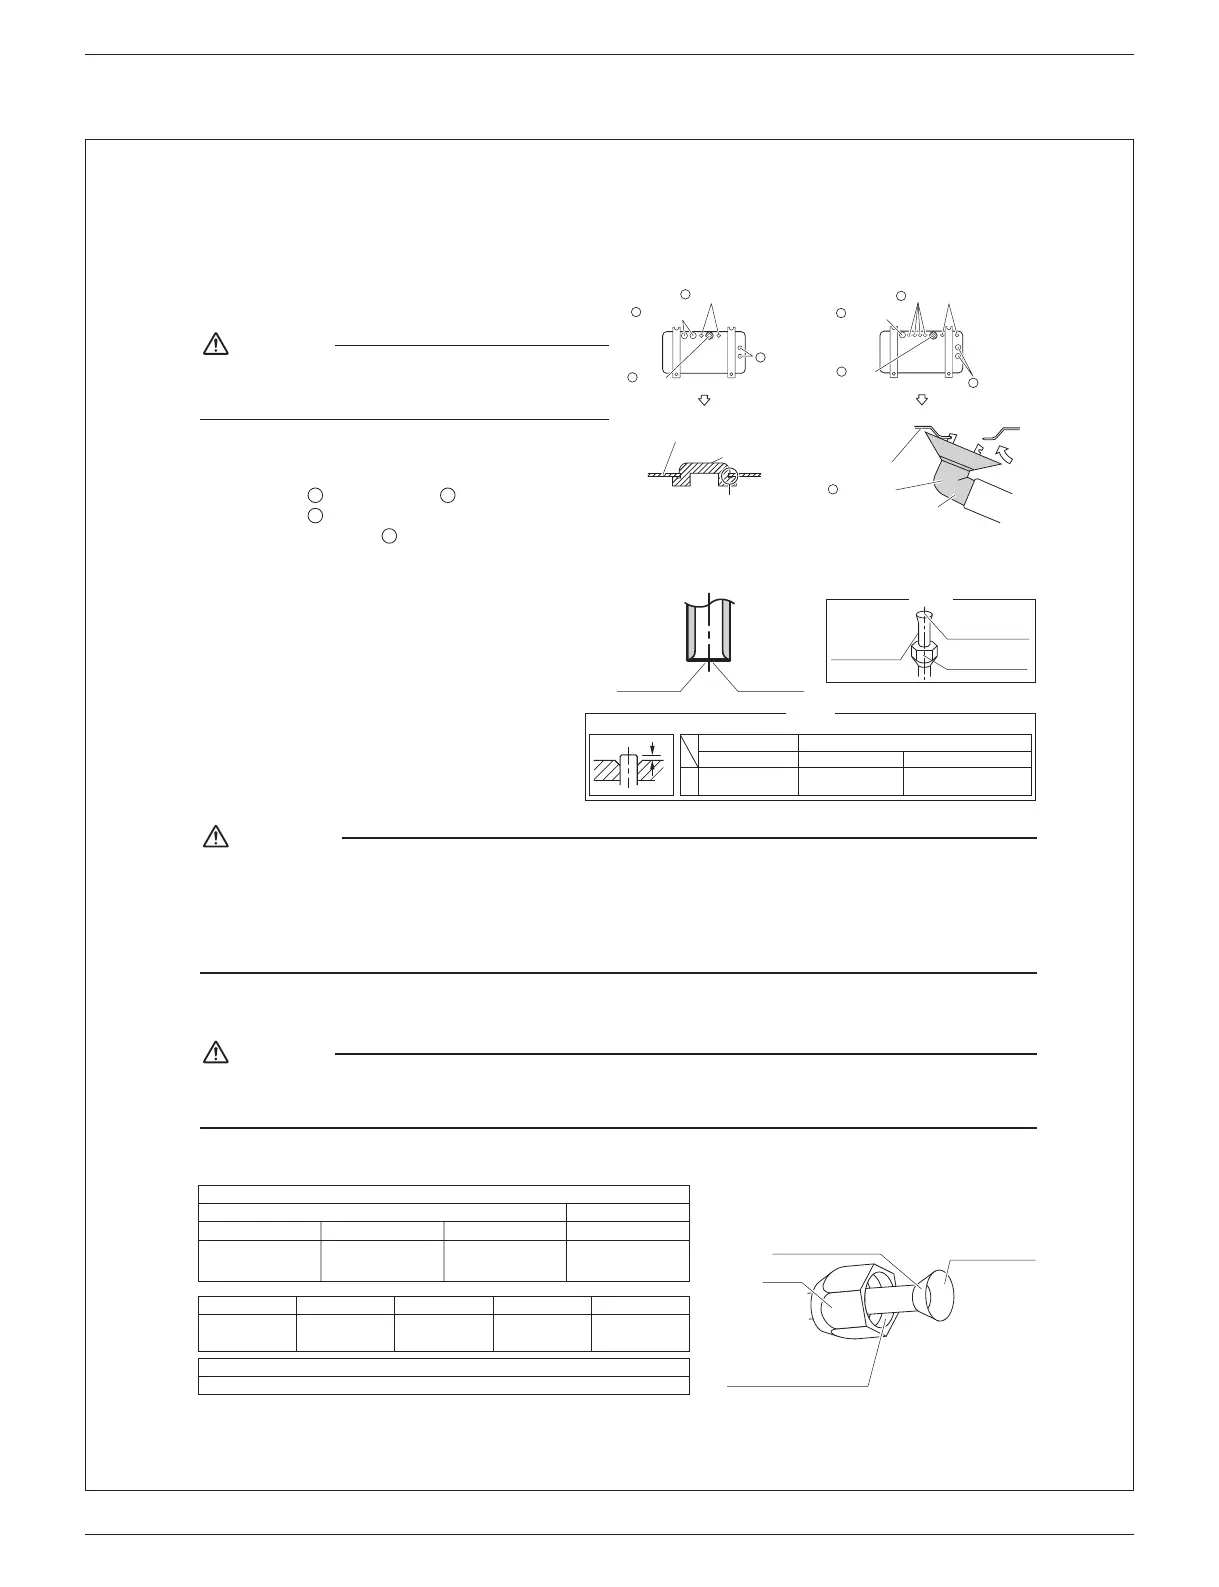
2. Drain work (only for heat pump
models, excluding RXL models)
CAUTION
In cold areas, do not use a drain socket, drain caps (1,2)
and a drain hose with the outdoor unit. (Drain water may
freeze, impairing heating performance.)
• Ifthedrainportiscoveredbyamountingbaseoroor
surface, place additional foot bases of at least 1-1/4
inch (30mm) in height under the outdoor unit’s feet.
1) Attach
C
drain cap (1) and
D
drain cap (2).
2) Attach
B
drain socket.
• When attaching
B
drain socket to the bottom
frame, make sure to connect the drain hose to the
drainsocketrst.
3. Flaring the pipe end
1) Cut the pipe end with a pipe cutter.
2) Remove burrs with the cut surface facing
downward,sothatthelingsdonotenterthe
pipe.
3) Putthearenutonthepipe.
4) Flare the pipe.
5) Checkthatthearinghasbeendonecorrectly.
Check
Theare's
innersurface
mustbe
aw-free.
Thepipeendmust
beevenlyaredin
aperfectcircle.
Makesurethatthe
arenutistted.
Setexactlyatthepositionshownbelow.
Flaring
A
Die
A
0-0.020inch
(0-0.5mm)
Clutch-type
FlaretoolforR410A
0.039-0.059inch
(1.0-1.5mm)
Clutch-type(Rigid-type)
0.059-0.079inch
(1.5-2.0mm)
Wing-nuttype(Imperial-type)
Conventionalaretool
Cutexactlyat
rightangles.
Removeburrs.
WARNING
• Donotapplymineraloiltotheare.
• Prevent mineral oil from getting into the system as this would reduce the service life of the units.
• Never use piping which has been used for previous installations. Only use parts which are delivered with this unit.
• Never install a dryer to this R410A unit in order to guarantee its service life.
• The drying material may dissolve and damage the system.
• Incompletearingmayresultinrefrigerantgasleakage.
4. Refrigerant piping
CAUTION
• Usethearenutxedtothemainunit.(Thisistopreventthearenutfromcrackingasaresultofdeteriorationovertime.)
• Topreventgasleakage,applyrefrigerationoilonlytotheinnersurfaceoftheare.(UserefrigerationoilforR410A.)
• Useatorquewrenchwhentighteningthearenutstopreventdamagetothearenutsandgasleakage.
• Alignthecentersofbotharesandtightenthearenuts3or4turnsbyhand,thentightenthemfullywithaspanneranda
torque wrench.
Do not apply refrigeration
oil to the outer surface.
Flare nut
Apply refrigeration
oil to the inner
surfaceoftheare.
Do not apply refrigeration oil to
thearenuttoavoidtightening
withexcessivetorque.
Apply oil
Flarenuttighteningtorque
Gasside
3/8 inch (9.5mm) 1/2 inch(12.7mm)
24-1/8 – 29-1/2ft•Ibf
(32.7-39.9N•m)
36-1/2 – 44-1/2ft•lbf
(49.5-60.3N•m)
5/8 inch(15.9mm)
45-5/8 – 55-5/8ft•lbf
(61.8-75.4N•m)
10-1/2 – 12-3/4ft•lbf
(14.2-17.2 N•m)
Liquidside
1/4 inch (6.4mm)
Serviceportcaptighteningtorque
8–10-7/8ft•lbf(10.8-14.7N•m)
Widthacrossats
11/16 inch(17mm)
(14.2-17.2N•m)
10-1/2 – 12-5/8ft•lbf
3/4 inch(19mm)
(17.1-20.9N•m)
12-5/8 – 15-3/8ft•lbf
7/8 inch(22mm)
(21.6-27.4N•m)
16 – 20-1/4ft•lbf
1-1/16 inch(27mm)
(48-59.8N•m)
35-3/8 – 44-1/8ft•lbf
Valvecap
tighteningtorque
Bottom frame
Drain cap
Pinch the bottom
frame in.
Drain cap (1)
Drain cap (1)
Air outlet side
C
C
Drain cap (2)
D
Drain
socket
B
Drain cap (1)
Drain cap (2)
D
Drain cap (2)
Air outlet side
B
Drain
socket
C
D
09/12 class 15/18/24 class
Bottom frame
Drain socket
Hose (available commercially,
inner dia. 5/8 ” (16mm))
B
01_EN_3P379970-10C.indd 6 10/18/2019 9:18:00 AM



 To Next Page