7
4. After about a minute, 1, 2, 3 or 4 red squares appear, de-
pending on the hardness of the water.
Setting water hardness
Select the water hardness level on the display according to the
result of the measurement procedure described above, and
press “Ok”.
The water hardness selected will be saved in the machine
settings.
Please note:
The water hardness can be changed directly from the settings
menu (see “6.10 Water hardness”).
Installing the water softener lter
Certain models are tted with a water softener lter (D4). If this
is not the case with your model, you are recommended to pur-
chase one from De’Longhi Customer Services.
1. The appliance prompts for installation of the lter: press
“Start” to proceed (to put the operation o, on the other
hand, press “Later”).
2. Remove the water tank (A9) (g. 2), ll to the MAX line
with fresh drinking water (g. 3) and press "Next".
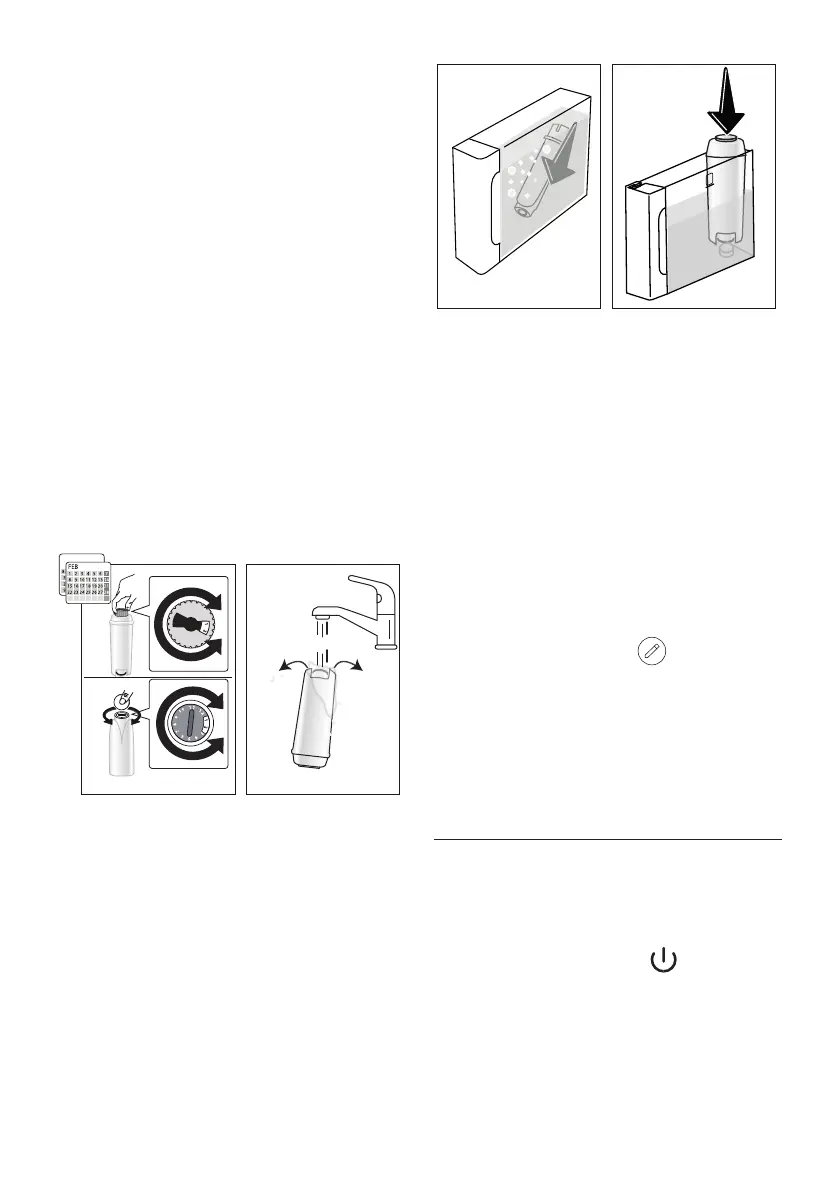
3. Remove the lter from the packaging and turn the date indi-
cator so that it shows the next 2 months (g. 9); Press "Next".
9 10
2
0,5 L
Please note:
The lter lasts about two months assuming normal use of the ma
-
chine; if on the other hand the machine remains idle with the lter
installed, it will not last more than three weeks, at most.
4. To activate the lter, run tap water through the hole in the
centre of the lter until water comes out of the openings at
the side for more than a minute (g. 10); Press "Next".
5. Insert
the lter in the water tank and immerse it completely
for about ten seconds, angling and pressing it lightly so that
the air bubbles can escape (g. 11). Press "Next".
6. Insert the lter in the lter housing
(g. 12) and press it fully
home;
press “Next”
;
11 12
MAX
7. Close
the tank with the lid (A8);
8. Reposition the water tank in the machine and press "Next".
9. Position an empty container of at least 0.5 litres capacity
under the hot water spout (g. 7) and press "Ok" to activate
the lter;
10. The appliance delivers hot water, then stops automatically.
11. The lter is now active and the machine can be used. Remove
the water tank, and rell it with fresh drinking water.
Now that all the technical aspects have been covered, press
“Start” to get to know the machine.
Setting proles
1. Select the number of persons who will be using the ma-
chine. Press "Next".
2. The machine creates a prole automatically for each user:
to customize the prole, press (press the “Change”
or “Prole” button). Having made the desired changes,
press “Save”.
3. Press "Next".
4. Press “Start” to run a video tutorial.
5. At the end of the video, press “Start”: the machine is ready
for use.
4. TURNING THE MACHINE ON
Please note:
• Each time the appliance is turned on, it performs an auto-
matic preheat and rinse cycle which cannot be interrupted.
The appliance is not ready for use until the cycle has been
completed.
1. To turn the appliance on, press (B1)(g. 13): the
appliance will switch on;