ENGLISH
6
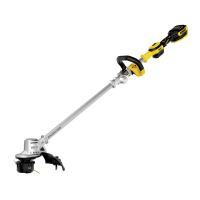
Attaching Guard (Fig.D, E)
WARNING: Never remove the guard.
Damage or personal injury couldresult.
WARNING: NEVER OPERATE
APPLIANCE WITHOUT GUARD FIRMLY IN PLACE. The
guard must always be properly attached on the appliance to
protect theuser.
1. Assemble the guard
9
to the motor housing
5
.
2. Using a crosshead screwdriver, insert the 2guard
screws
19
and tightensecurely.
NOTE: An extended coverage guard is available (sold
separately) for extra coverage if desired. Use replacement
guard Part NumberN776035 for Type 1 units or N890579 for
Type 2, 10, and beyond units.
Attaching the Auxiliary Handle (Fig.A, C)
1. Place the auxiliary handle
4
on top of the handle
base
20
so the upper trimmer pole
15
is betweenthem.
2. Hold the auxiliary handle in place and slide the handle
bolts
21
into the handle from the top, threading them into
the handlebase.
3. Tighten the handle bolts with the supplied hex wrench.
Ensure the handle is securelyattached.
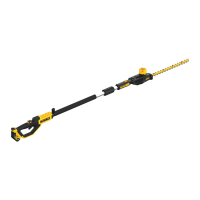
Extending and Folding the Pole (Fig.A, B, P)
WARNING: To reduce the risk of injury,
do not operate the unit while folded. The unit must be fully
extended and the pole clasp secured before the battery is
inserted. Remove battery before folding the unit. Fold unit
completely until it locks inplace.
1. To lock pole into straight use position, first ensure
battery has been removed. Then flip up the locking
lever
6
, rotate pole latch
7
forward, and place the pole
clasp
8
over the clasp catch
18
. Rotate the pole latch
7
backwards until it locks securely into position. Check the
locking lever to make sure it is properly locked inplace.
2. To fold the pole for storage or transportation, first
ensure battery has been re
moved. Then flip up the locking
lever
6
, rotate pole latch
7
forward and lift the pole
clasp
8
up and over the clasp catch
18
. Fold the pole
completely until the guard
9
securely locks into place over
the rear of the battery housing
11
.
Additional Safety Information
WARNING: Never modify the power tool
or any part of it. Damage or personal injury couldresult.
WARNING: ALWAYS use safety glasses.
Everyday eyeglasses are NOT safety glasses. Also use face or
dust mask if operation is dusty. ALWAYS WEAR CERTIFIED
SAFETYEQUIPMENT:
• ANSI Z87.1 eye protection (CAN/CSA Z94.3),
• ANSI S12.6 (S3.19) hearing protection,
• NIOSH/OSHA/MSHA respiratoryprotection.
WARNING: Some dust contains
chemicals known to State of California to cause cancer, birth
defects or other reproductive harm. Some examples of these
chemicals are:
• compounds in fertilizers,
• compounds in insecticides, herbicides andpesticides,
• arsenic and chromium from chemically treatedlumber.
To reduce your exposure to these chemicals, wear approved
safety equipment such as dust masks that are specially
designed to filter out microscopicparticles.
WARNING: Use of this tool can
generate and/or disperse dust, which may cause serious and
permanent respiratory or other injury. Always use NIOSH/
OSHA approved respiratory protection appropriate for the
dust exposure. Direct particles away from face andbody.
WARNING: Always wear proper
personal hearing protection that conforms to ANSI
S12.6 (S3.19) during use. Under some conditions and
duration of use, noise from this product may contribute to
hearingloss.
CAUTION: When not in use, place tool
on its side on a stable surface where it will not cause a
tripping or falling hazard. Some tools with a large battery
pack will stand upright but may be easily knocked over.
• Air vents often cover moving parts and should be
avoided. Loose clothes, jewelry or long hair can be caught in
movingparts.
ASSEMBLY AND ADJUSTMENTS
WARNING: To reduce the risk of
serious personal injury, turn unit off and remove
the battery pack before making any adjustments or
removing/installing attachments or accessories. An
accidental start-up can causeinjury.
The label on your tool may include the following symbols. The
symbols and their definitions are asfollows:
V ......................... volts
Hz .......................hertz
min ..................... minutes
or DC ......direct current
...................... Class I Construction
(grounded)
…/min ..............per minute
BPM .................... beats per minute
IPM ..................... impacts per minute
RPM .................... revolutions per
minute
sfpm ................... surface feet per
minute
SPM .................... strokes per minute
OPM .................... oscillations per
minute
A ......................... amperes
W ........................watts
or AC ...........alternating current
or AC/DC .... alternating or
direct current
...................... Class II
Construction
(double insulated)
n
o
.......................no load speed
n .........................rated speed
......................earthing terminal
.....................safety alert symbol
appliance that cannot be controlled with the switch trigger is
dangerous and must berepaired.
.....................visible radiation
..................... avoid staring at
light
..................... wear respiratory
protection
..................... wear eye
protection
..................... wear hearing
protection
..................... read all
documentation
IPXX .................... IP symbol