Creating HyperModels™
Creating new, unique HyperModels™ is what GeNetX™ is all about. Once the Green and Red Amp
Models and Cabinet types are selected,and the Amp Parameters and Cabinet Tuning have been adjusted,
GeNetX™ technology lets you do something amazing. The characteristics of each Amp and Cabinet
assigned to the Green and Red Channels can actually be combined or “Warped” to create a completely
new Amp HyperModel™. The procedure for Warping the Green and Red Amps together is as follows:
1.Press the Status button until its LED lights yellow.
2.Rotate the Parameter 3 knob to Warp the Green and Red Amps and Cabinets together. Rotating coun-
terclockwise adds more of the Green Channel characteristics, and clockwise adds more of the Red
Channel characteristics.
Saving HyperModels™ (Amp Save)
When you have finished editing the Green and Red Channels, you must save the HyperModel™ for
future use. This HyperModel™ can be saved in one of 9 User HyperModel™ locations. After it has
been saved, it can be used in either the Green or Red Amp Channel.The Amp Save procedure is as
follows:
1.Press the AMP SAVE button. The Amp Save button begins flashing and the display reads NEWAMP.
The N of NEWAMP is flashing indicating that you can name your HyperModel™.
2.Use the DATA WHEEL to select the alpha-numeric character.
3.Use the RHYTHM button to move to the next character (to the right),or the FX MODE button
to select the previous character (to the left).
4.Repeat steps 2 and 3 until the HyperModel™ name appears in the display.
5.Press the AMP SAVE button again to select one of the 9 User HyperModel™ locations. If the
GNX2 has any unused HyperModel™ locations available,the display reads EMPTY U1.The U1 flash-
es indicating that this is the first available location for HyperModel to be stored. If all 9
HyperModel™ locations are full,the GNX2 defaults to the first HyperModel™ location and dis-
plays the name of HyperModel™ stored in the number 1 location.
6.Use the DATA WHEEL to select a User location to save the HyperModel.If all locations have
been used,the display shows the name of the HyperModel™ about to be overwritten.
7.Press the AMP SAVE button again to complete the Amp Save procedure.
Press Exit at any time during the Amp Save procedure to abort the process.
Note:The Amp Save procedure only saves Amp/Cabinet combinations to the User HyperModel™ loca-
tions. It does not store changes or the new HyperModel™ to the selected preset. See page 16 for
information on storing changes to a Preset
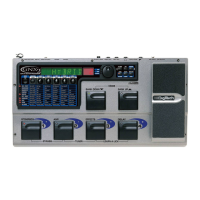
Editing the Effects
The GNX2 contains a comprehensive library of fully programmable,studio quality Effects. The Effects section
is accessed with the Effect Select Up/Down buttons.The Matrix LEDs light one at a time to identify the
selected row of effects . When you have selected the effect row,you have up to 5 Parameters that can be
edited. Each effect row is divided into 6 columns of Parameters.The first column is the on/off control.
Pressing the Status button at the top of the first column turns the effect group on and off. The knobs at the
top of the other 5 columns control the Parameters listed directly beneath the corresponding knob. Each
effect’s parameter is labeled in the Matrix. When a knob is turned,the corresponding parameter name
appears in the green alpha-numeric display and the parameter value displays in the red numeric display.
15
Editing Functions