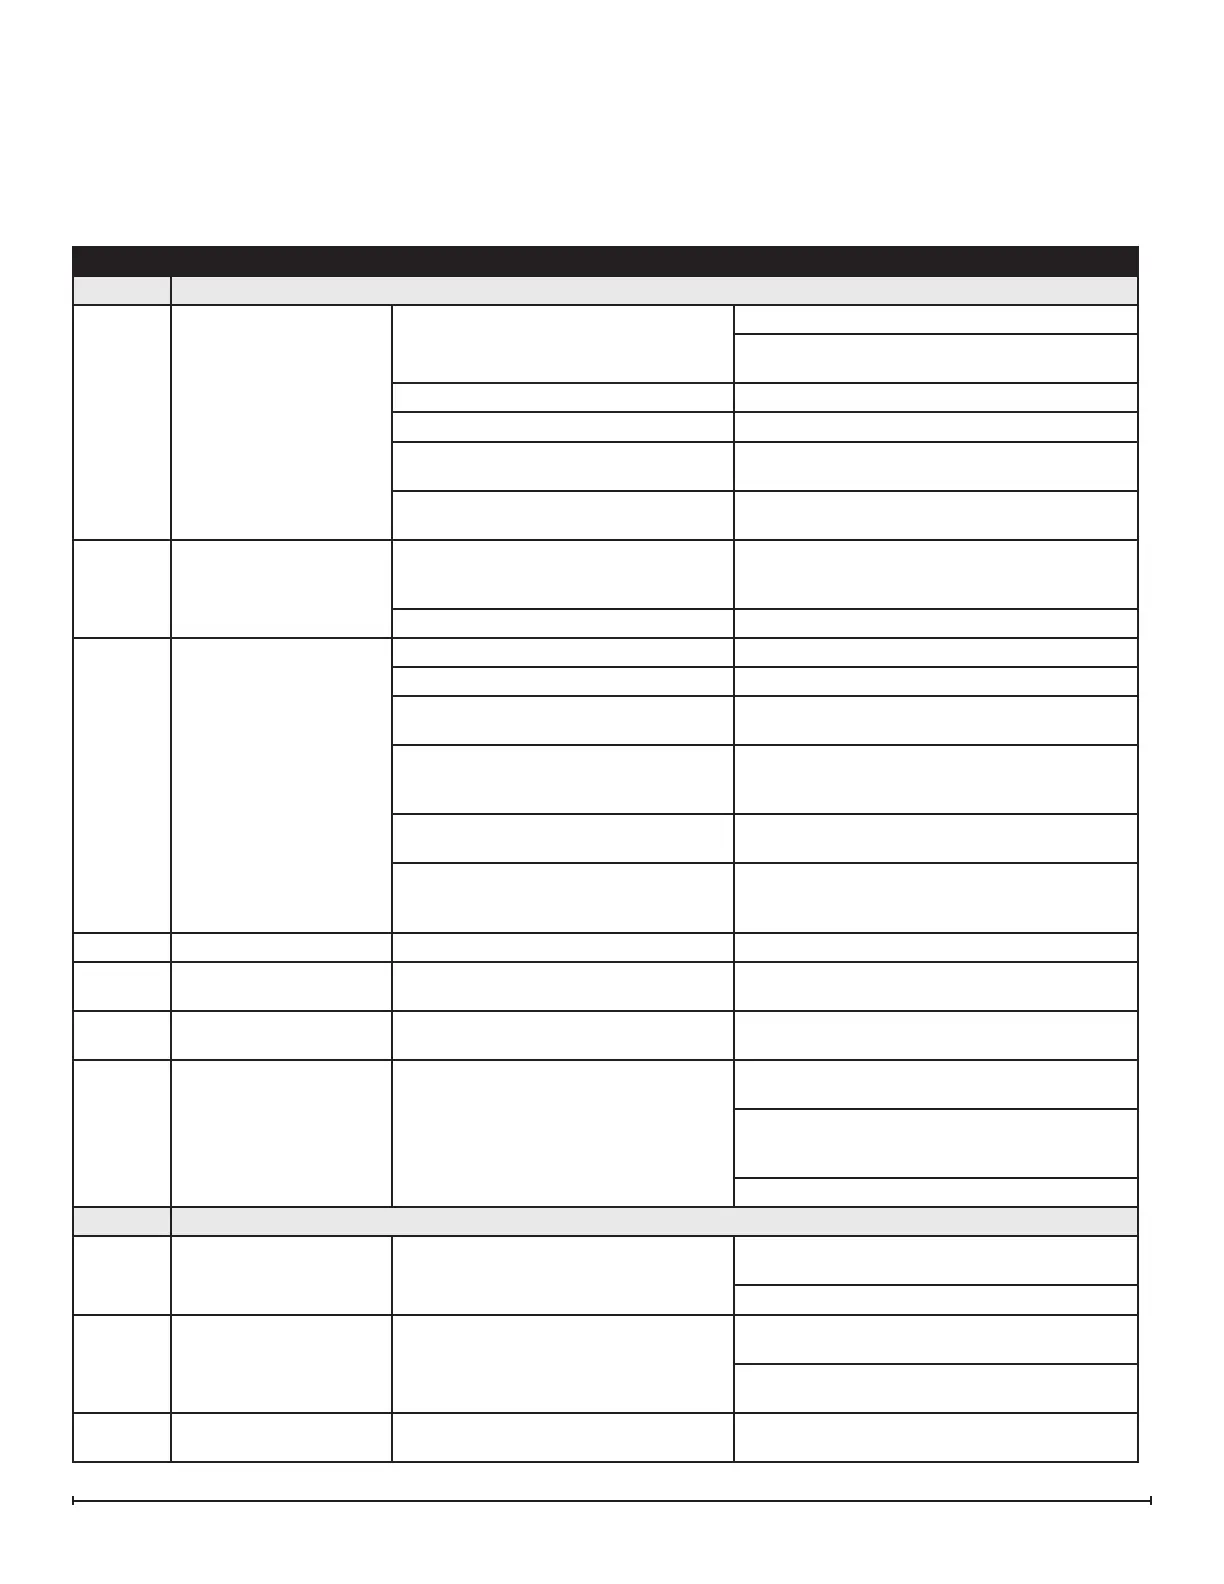
15
SECTION PROBLEM CAUSE SOLUTION
1.0 General
1.1
Fireplace does not turn
on manually (unit does
not beep when switch is
engaged)
No incoming voltage
Check Fuse/Breaker Panel
If multiple units are installed on the same circuit,
ensure they are wired in parallel.
Defective main control board Replace main control board
Defective electronic choke (primary side) Replace electronic choke
Defective power supply (unit may beep
repeatedly to indicate error)
Replace power supply
Defective fuse - typically due to
insucient air intakes
Correct air intake issues, and replace fused wire
harness.
1.2
Only one side of the unit
is operating
Tethered controller not installed correctly
Ensure that connection has clicked into place
and red light is visible. If there is no light, replace
tether.
No power when standby button is pressed Refer to section 1.1 for the secondary side
1.3
Fireplace does not turn
on with the Remote
Control
Improper operation Refer to Operation Section
The batteries in the remote control are dead Install new battery into the remote control
Tethered controller not installed correctly
Ensure that connection has clicked into place
and red light is visible.
Remote not synchronized with the unit
Synchronize remote to unit. Unit will ash on
and o during synchronization, completion will
be indicated with 5 beeps
Remote signal is not being received by
tethered controller
Ensure that tethered controller is in an open
area that can receive signal from remote control
Defective remote control (blue light on
end of remote does not turn on when
buttons are pressed)
Replace remote control
1.4 LED lights not turning on Defective LED light strip Replace LED light strip
1.5
Noise when unit is on
standby
Some buzzing is normal If there is excessive noise, replace power supply
1.6
Unpleasant smell when
unit is used.
Dirty or stale water. Clean the unit as described under Maintenance.
1.7
Water is appearing
around the unit
During normal operation it is expected to
see some condensation of water on the
media tray.
If condensation is present ensure that mist out-
lets are unobstructed
Certain ambient conditions will cause condensa-
tion on the unit and in most cases will only occur
on initial start up of the unit
If there is excessive water, refer to seciton 4.1
2.0 Blinking (error codes)*
2.1
Unit continuously blinks
one time
Water level in the sump is too high
Remove enough water from reservoir so that
level is below maximum level.
If the problem persists, see section 4.5
2.2
Unit continuously blinks
twice
Water level in the sump is too low
Rell the water reservoir so that level is above
the minimum level
If the problem persists, see section 3.7 if using
bottles or section 4.3 if using direct water line
2.3
Unit continuously blinks
three times
Defective level sensor assembly Replace level sensor assembly
Troubleshooting Guide
Before you begin consulting the troubleshooting guide, see Figure 8 to ensure the unit is ready for operation. The water
level must be between the minimum and maximum water level lines, and the tether must be plugged in. When turning the
unit on, ensure that both the power switch has been turned to the ON (I) position and that the standby button has been
pressed.