The Dimplex XLF series electric fireplace is a sophisticated heating appliance designed to provide both warmth and aesthetic appeal to any room. It incorporates advanced Comfort$aver™ technology, which intelligently adjusts fan speed and heater wattage to maintain a desired room temperature efficiently and safely. This technology ensures that once the set point is reached, the fan and heater continue to operate at a low level, preventing significant temperature fluctuations. Should the room temperature rise due to external factors like sunlight or a central furnace, the heater will temporarily turn off and periodically circulate air until heating is required again. A notable feature is the continuous operation of the fan while the heater is active, and a built-in 2-minute cool-down period for the fan after the heat function is turned off, allowing the element to dissipate residual heat safely.
The fireplace offers versatile control options, including both manual controls located on the upper right of the unit and an IR multi-function remote control. For optimal remote operation, it should be pointed towards the front of the unit. The Standby function allows users to turn the unit on and off, with the unit resuming its last settings and displaying the intake temperature for 7 seconds upon activation.
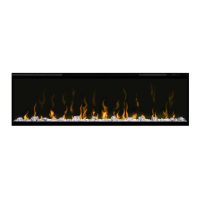
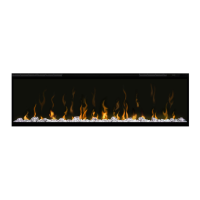
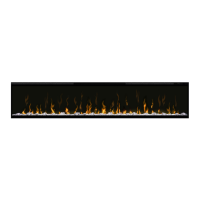
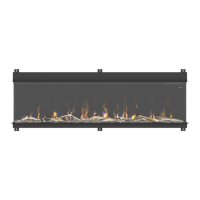
Flame effects can be toggled on and off, adding to the ambiance. The heating function, controlled by a dedicated ON/OFF button, is indicated by an "Sss" icon and a flashing setpoint temperature on the display before turning off. The unit can also operate in a "Heat Only Mode," continuously displaying the "Sss" icon. Users should be aware that a slight, harmless odor may be emitted during initial use as internal heater parts heat up, which is a normal occurrence.
Temperature adjustment is precise, with dedicated buttons for increasing (+) and decreasing (-) the temperature setting. These adjustments are reflected on the display, showing the setpoint temperature and corresponding fan speed changes. The temperature can be set within a range of 5 °C to 37 °C (41 °F to 99 °F). Holding both temperature buttons down for two seconds on the unit allows users to switch between Celsius and Fahrenheit scales.
For energy efficiency, the Eco Operation mode runs the heater in a reduced wattage range, indicated by a specific display icon and a reduced fan speed. The Heat Boost function provides a temporary surge of full-rated wattage heating for up to 20 minutes, adjustable in 5-minute increments, ideal for quickly warming a cold room.
The heater can be disabled if not needed, for example, during warmer seasons. This is achieved by simultaneously pressing and holding the "Sss" and "-" buttons on the unit for two seconds. When disabled, heat-related functions will display "---".
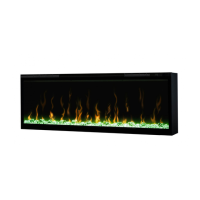
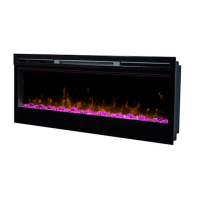
Aesthetic customization is a key feature, with various Color Themes available. These presets cycle through different combinations of flame base and media lighting colors. A unique "prism" theme cycles through a variety of colors, which can be paused on a preferred color by pressing the dedicated button, indicated by a solid circle. When cycling, a rotating circle is displayed. Brightness levels for the lights can also be adjusted, showing "H" (high) or "L" (low) on the display.
The Sleep Timer allows users to set an automatic shut-off for the fireplace, ranging from 30 minutes to 8 hours. The desired time is displayed as it's adjusted, and once activated, the remaining time is shown. The timer can be canceled by repeatedly pressing the button until the display shows nothing.
Safety is paramount, and the unit includes an automatic temperature cutoff switch. If the heater overheats, the unit will shut off and display "Er2" if the standby button is pressed. To reset, the unit must be turned off at the main disconnect panel and allowed to cool for 5 minutes before being turned back on. Continuous resetting indicates a potential issue, requiring technical support.
Remote control battery replacement is straightforward, involving sliding open the battery cover, installing a 3 Volt (CR2032 or CR2025) battery, and closing the cover. Proper recycling or disposal of batteries is advised.
Additional key combinations allow for displaying the software revision by holding the "Sss" and "M" buttons on the unit, and performing a factory reset by holding the "Sss" and "M" buttons until "ooo" is displayed.
Maintenance is crucial for the longevity and safe operation of the fireplace. Before any maintenance or cleaning, it is imperative to disconnect power and allow the heater to cool to prevent electric shock, fire, or injury. Regular inspection, at least yearly, is recommended to prevent dust and dirt accumulation, which can lead to heat buildup and damage.
The partially reflective glass, cleaned at the factory, may accumulate dust during shipping or handling. This can be removed with a clean, dry cloth. Fingerprints or other marks can be cleaned with a damp cloth and then dried with a lint-free cloth to prevent water spots. Abrasive cleaners should not be used to avoid scratching the glass. Painted surfaces of the fireplace should only be cleaned with a damp cloth, again avoiding abrasive cleaners. All servicing beyond basic cleaning and installation should be performed by an authorized service representative.
Servicing the internal components is designed to be accessible from the front of the fireplace even when mounted in the wall. A Philips head screwdriver is the primary tool required. Before any service, the breaker must be turned off at the electrical panel, and if the unit was operating, a 10-minute cool-down period is necessary for lights and heating elements. The front glass assembly is removed by unscrewing two screws, one on each side, located just inside the top front vent opening. The glass assembly should be carefully lifted out and placed in a safe location, as the partially reflective glass is not tempered and can break easily. Decorative acrylic ember-bed pieces should be removed from the media tray and stored in a container. For XLF74 and XLF100 models, a suction cup can assist with removing the partially reflective glass. The glass retaining bracket is then removed by unscrewing 12 screws, working from either end towards the middle.
Component replacement procedures are detailed for various parts. For the Main Control Board, after following preparation steps, the board is located, connections are transferred, screws are removed, the new board is installed, and wires are ensured to be correctly replaced before reassembly. The LED Power Distributor (for XLF74 & 100 models) follows a similar process.
Power Supply Replacement involves locating the power supply, removing securing screws, disconnecting wires from the main control board, running new wiring, reinstalling the bracket, and ensuring all wires are correctly replaced.
Capacitive Controls and Display Replacement requires locating the assembly in the upper right corner, removing securing screws, gently pulling the assembly forward, disconnecting and installing the wire on the new assembly, reinstalling the board, and ensuring correct wire replacement.
Media LED Light Strips Replacement involves removing the plastic media tray (4 screws), lifting it out, removing the front panel (6 screws), locating the specific LED assembly, disconnecting wiring, pinching plastic mounting tabs to remove the old assembly, installing the new one, reattaching wires, and ensuring all wires are correctly replaced.
Flame LED Strips Replacement is more involved, requiring removal of the media tray and front panel, then removing 17 screws along the top of the flame panel. The LED strip is located, wiring disconnected, and the strip removed by pinching mounting tabs. If the new LED strip lacks lenses, they must be transferred from the old strip by carefully prying them off and pressing them onto the new strip. The new assembly is then installed, secured, and wires reattached.
Flicker Assembly Replacement involves removing the media tray and front panel, then 17 screws along the top of the flame panel. The motor is gently pulled away from the flicker rod. Care must be taken to minimize bending of the flicker rod to prevent damage.
Thermistor Replacement involves locating the thermistor in the upper left-hand side, cutting the tie wrap, tracing the cable to the main control board, disconnecting the old thermistor, connecting the new one, rerunning the thermistor back to its bracket, and ensuring correct wire placement.
Heater Assembly Replacement requires removing 10 screws securing the heater assembly retaining bracket, then 4 screws securing the assembly itself. The blower assembly must be supported to prevent damage. Wiring connections are disconnected, noting their original locations, and a flathead screwdriver can assist in prying connectors. The new heater assembly is properly oriented, all wiring connections are made, excess wire is secured with cable ties, and the unit is reassembled.
The troubleshooting guide provides solutions for common issues, ranging from circuit breaker trips and dimming lights to problems with the capacitive controls, remote control, flame effects, and heater operation. It covers issues like improper operation, loose wiring, defective components (control board, power supply, flicker motor, thermistor, LED assemblies), and physical obstructions like dirt and dust. Solutions often involve tracing wiring, checking fuse/breaker panels, replacing defective parts, cleaning components, or referring to the operation section for correct usage. Noise-related issues are also addressed, suggesting checking for straight and properly mounted flicker rods or replacing the flicker motor if necessary.