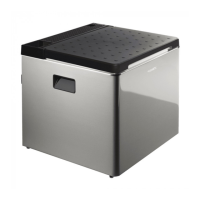
For the maximum cooling level, turn the cooling level controller (1) clockwise as far as it will go.
To decrease the cooling level, turn the cooling level controller ( 1) anticlockwise.
To switch the cooler off, turn the cooling level controller ( 1) anticlockwise as far as it will go.
When the cooler is connected to the DC power socket the cooling level cannot be adjusted.
When the cooler is operated with gas, the required cooling level is set using the cooling level controller for gas
operation (2).
To increase the cooling level, turn the cooling level controller ( 2) clockwise.
For the maximum cooling level, turn the cooling level controller (2) to the maximum position.
To decrease the cooling level, turn the cooling level controller ( 2) anticlockwise.
To switch the cooler off, turn the cooling level controller ( 2) anticlockwise as far as it will go.
6 Operation
NOTICE! Damage hazard
Ensure that the items placed in the cooler are suitable for cooling to the selected temperature.
Ensure that food or liquids in glass containers are not excessively refrigerated. Liquids expand when they
freeze. and can therefore destroy glass containers.
Ensure that your refrigerated container is well ventilated so that any heat created can dissipate. Otherwise
proper functioning cannot be ensured. It is especially important not to cover the air vents.
NOTE
Cool the cooler for about 24 hours before starting your journey using gas or electricity from the mains. This way
your cooler will attain the required cooling level faster when you reach your destination.
The cooling performance can be affected by:
– the ambient temperature
– the amount of food to be conserved
– how often the lid is opened.
A few water drops may form inside the cooler if it has been cooling for a lengthy period. This is normal because
the moisture in the air condenses to water when the temperature in the cooler falls. The cooler is not defective.
Wipe it out with a dry cloth if necessary.
Before starting your new cooler for the first time, clean it inside and outside with a damp cloth for hygienic
reasons (see also chapter “Cleaning and maintenance”).
Press the control element cover (fig.2 3 and fig.3 3) to open it.
To close the control element cover (fig. 2 3 and fig.3 3,), push it towards the lid until it latches.
Fill up the base of the cooling box first when storing drinks, etc.
6.1 Storing food
To avoid food waste, note the following:
 Loading...