CONTACT US AT www.DRpower.com 13
NOTE: Do not engage the Bail Bar (Trimmer Head Control) until after the Engine has started.
Stopping the Engine
1. Move the Throttle Control Lever (Figure 1 on page 6) all the way back past the TURTLE (Slow) position to the STOP position.
NOTE: If you have an Electric-Starting model, please note that the Key does not stop the Engine. You must follow these instructions to
stop the Engine for both Electric and Manual-Starting models.
2. Remove the Key for safety. The Key has a pressure lock that prevents it from vibrating loose during operation. To remove the
Key, push it in and then quickly and firmly pull it out. If the Key becomes difficult to remove, apply SAE 30 Oil into the Keyhole.
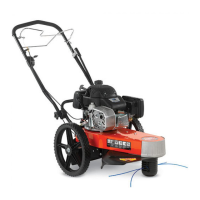
Engaging the Trimmer Head
1. Bring the Bail Bar toward you and grip it together with the Handlebar (Figure 1 on page 6). Keep holding the Bail Bar to the
Handlebar. The Cutting Cords will rotate and will continue to rotate until you release the Bail Bar.
Stopping the Cords from Spinning
1. Release the Bail Bar from the Handlebar. The Trimmer Head will stop spinning while the Engine continues to run.
Engaging the Wheel Drive – PRO-XL SELF-PROPELLED model
NOTE: The SELF-PROPELLED DR TRIMMER/MOWER has a single speed forward Transmission.
1. Gently squeeze the Clutch Lever (Figure 1 on page 6) to engage the Wheel Drive.
2. Release the Clutch Lever to stop the Wheel Drive.
Using the PTA™ (Parallel Trimming Action) - SPRINT and PRO models only
Your DR TRIMMER/MOWER’S PTA feature allows you to move the machine in a straight line while the Trimmer Head is both
pivoted and tilted to the left for better access to fence lines and other obstacles. PTA allows you to trim in difficult areas without
having to pull the machine back and forth.
The following two sections explain how to use the PTA and how to return your Trimmer to Normal operation after using PTA.
When using PTA, you should install the cutting cords in one of the bottom four line plates only. Using the upper line plates may
cause the cords to hit the wheel. For more information, see the DR Trimmer/Mower Cutting Cords on page 15.
Use caution when edging along gravel paths and driveways. Flying debris can cause serious damage and injury.