7.2 Gas pressure / supply-pressure
The burner pressure is set at the factory for the use of
natural gas; see type plate. It is not necessary to check the
burner pressure after installation.
The supply-pressure in house installations should be
checked, as they can vary.
Caution - After conversion to propane, the
burner pressure must be checked and if
necessary adjusted.
- After maintenance work the burner
pressure must be checked, irrespective
of whether you are using natural gas or
propane, and adjusted if necessary.
Proceed as follows; see fig. 10:
• Check the supply-pressure.
• Contact the gas company if the supply-pressure is not
correct.
• If necessary, check the burner pressure; see Appendix 3
for the required burner pressure.
!Caution When checking/adjusting the burner
pressure, the appliance should be in
operation for at least 10 min.
• Adjust the burner pressure, if necessary.
!Tip The adjusting screw is located behind the
cover screw.
7.3 Ignition burner
For igniting the burner, see section 6.2.
!Caution After 5 ignition attempts, the appliance
will enter the lock-out mode.
• Ignite the burner
• Check if the convection fan is working.
• See in Table 3, Diagnosis of malfunctions, if the convection
fan does not work and/or the burner does not ignite.
7.4 Flame picture
• Check the flame picture.
If the flame picture is unacceptable, do the following:
• Check whether the flue gas discharge and/or air supply are
blocked.
• If necessary, remedy the blockage.
7.5 Flue gas discharge / combustion air supply
• Check the flue gas discharge and the combustion air
supply for gastightness.
• Check whether the flue gas discharge and/or combustion
air supply are lying free from, for example, electrical
wiring, the convection housing.
• If a failure occurs, correct it.
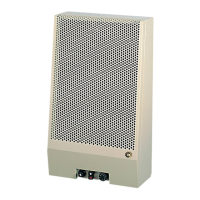
8. Remove / replace the outer casing
The casing is removed as follows:
Caution Avoid damaging the wiring when taking off
the casing.
• Take out the screws at both sides of the casing
(see fig. 4);
• Lift the casing appr. 1 cm and slide/lift the casing to the
front.
Replace in reverse order of the removal procedure.
!Tip If the casing is placed for the first time,
the knock-outs concerned must be
removed first.
!Caution Make sure that the locating bracket fall
into the intended notches.
9. Maintenance
Once a year the appliance should be checked, cleaned and,
if necessary, repaired by a competent installer in the field
of gas heating.
Check that the appliance is operating correctly and safely.
!Caution - Close the gas tap;
- Switch off the all-pole switch;
- Remove the main fuse
during maintenance
work;
- Check the gastightness after repair.
9.1 Maintenance instructions
Perform maintenance work as described below:
• Remove the casing, see section 8.
• Clean the filters as follows:
- Suck/blow the filter clean.
If the filter is not sufficiently clean, you must
- Unscrew the 4 screws;
- Remove the filter;
- Flush the filter with water and clean it with a soft brush.
• Perform the procedure above for both filters.
• Check the fans for contamination and clean, if necessary.
• Check if the fans are operating correctly and replace them
if necessary; see section 9.2.
• Inspect the flue gas discharge / combustion air supply
system and, if necessary, replace the flexible flue gas
discharge tube.
• If necessary, clean the burner and the injector. For
removing the burner, see section 9.2.1.
• Perform a check as described in chapter 7.
9.2 Replacing parts
Below you will see how the various parts can be replaced.
• Remove the casing, for this see section 8.
INSTRUCTIONS FOR INSTALLATION
!
!
!
Kamara
13
English