55
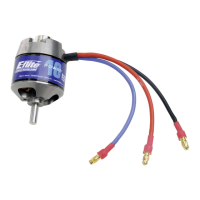
• To complete installation and wiring hook-up of the brushless ESC, connect the remaining JST male connector of
the battery power lead Y-harness to the female JST connector of the 3-in-1 control unit. Be sure to then secure
the battery power leads of the brushless ESC and 3-in-1 so that they cannot come into contact with the gears or
any other moving parts, and so that you can readily access the remaining JST female connector for connecting
the battery pack.
Now that you have completed installation of the optional brushless power system, it will be necessary to check
that the ESC is set properly to ensure maximum performance, and that the motor is operating in the correct
direction. Before proceeding with these checks, however, unplug the tail motor wires from the 3-in-1 control unit
making note of their direction and polarity for proper re-installation after the checks are complete. Also, remove
the main rotor blades and mounting bolts/nuts from the main blade grips to help ensure safety. Then, follow these
steps (if using the E-flite
®
20-Amp ESC):
• Turn the transmitter on first and advance the throttle stick to full power. Then, after placing your hand on the
rotor head and securing the helicopter so that it will not be able to move and that you can quickly disconnect
the battery if power to the motor is applied, plug the battery into the battery lead Y-harness connected to the
3-in-1 control unit and brushless ESC. You should then hear the beep to signal power up of the brushless ESC,
followed by an additional beep to indicate that the ESC has entered the programming mode.
Note: Exercise extreme caution and care when programming the brushless ESC with the motor pinion
gear meshed properly to the main gear. Although the ESC is equipped with safe power-on software
and should not apply power to the motor, you must still be very careful. If, at any time, power to the
motor is applied and the rotor head begins to spin, unplug the battery immediately to prevent any
damage to the model and electronics, or even personal injury.
• Follow the instructions included with the ESC to set the programming for the brake and voltage cutoff to the
following:
Voltage Cutoff – Auto Li-Po ON
Note: With the voltage cutoff programming set to Auto Li-Po ON, a soft cutoff of motor power (usually noticeable
as a quick “pulsing” of motor power under load) will occur when the voltage of the 3-cell Li-Po battery pack
reaches 9V under load. This is generally preferred in most cases, however, you can disable the Auto Li-Po soft
cutoff entirely by setting the voltage cutoff programming to Auto Ni-Cd/Ni-MH ON. In this mode, soft cutoff of
motor power will not occur until approximately 5.0V under load, even when using a 3-cell Li-Po battery pack for
power. However, this means you must exercise extreme care to prevent over-discharging the Li-Po battery pack
during flight.
Brake – OFF
Note: It is extremely important that the motor brake programming of the ESC is disabled in order to
prevent damage to the main gear and other components.
Once you have confirmed that the ESC’s programming for the voltage cutoff and braking is correct,
disconnect the battery from the power leads. You will now need to also confirm that the motor is operating
in the correct direction.
• Turn the transmitter on first and lower the throttle stick and trim completely. Then, plug the battery into
the battery lead Y-harness connected to the 3-in-1 control unit and brushless ESC. You should then almost
immediately hear beeps from the brushless ESC to indicate that it is armed and ready for use.
Note: The brushless ESC will almost always arm before the 3-in-1 control unit. This is extremely
important to remember because the main motor will then run if the throttle stick is advanced, even if
the 3-in-1 has yet to arm. Be certain to exercise extreme caution when waiting for the 3-in-1 control
unit to arm, especially if the brushless ESC has already been armed.
 Loading...