Page 13-2
www.eaton.com
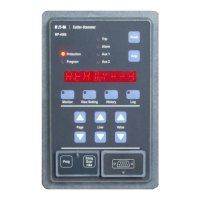
MP-4000
IB02602002E
13.2.3 Mounting the MP-4000 Drawout Relay
1. Remove the Drawout Inner Chassis from the outer case.
2. Place the outer case ush against the backside of the panel so
that the case studs project through their respective holes. Figure
13.2 shows the panel mounting diagram.
3. The plastic outer ange is seated on the front of the panel. It
is attached to the top, center, and bottom studs that protrude
through the panel with the #10-32 hex nuts and lock washers
included with the relay.
NOTE: Use only the supplied narrow-prole nuts. Standard-width
10-32 hex nuts interfere with the insertion of the inner chassis.
4. The relay inner chassis can now be inserted into the case and
checked for proper seating into the latching mechanism.
13.2.4 Mounting the URTD Module
There are no provisions for mounting the URTD module on the MP-
4000 Drawout Case. The URTD module must be mounted remotely
from the MP-4000 Drawout Case.
The URTD module has both an electrical and ber optic communica-
tion interface to the MP-4000 relay. The electrical connections are
made through the terminal blocks. The ber optic cable is run through
the opening in the back of the outer case and connected directly to the
inner chassis before it is fully inserted. Refer to Subsection 13.3.1.
13.2.5 Mounting the PONI Communications Module
The MP-4000 Drawout Relay must be ordered with the communica-
tions module as it is integral to the inner chassis construction and
wired through the terminal connectors.
The communications address is set via switches accessible on the
inner chassis.
13.3 Wiring and Setup
WARNING
ENSURE THAT THE INCOMING AC POWER SOURCES
ARE DISCONNECTED BEFORE PERFORMING ANY
WORK ON THE MP-4000 PROTECTIVE RELAY OR ITS
ASSOCIATED EQUIPMENT. FAILURE TO OBSERVE THIS
PRACTICE COULD RESULT IN SERIOUS INJURY, DEATH,
AND/OR EQUIPMENT DAMAGE.
The following material supplements the information in Subsection 6.1.
Figures 13.3 through 13.9 show the typical connection and wiring
diagrams for the MP-4000 Drawout. Note the following:
1. Direct wire connections to the terminal blocks must be sizes #14
AWG to #10 AWG (2.5 mm
2
to 6.0 mm
2
). The appropriate sized
spade and ring lugs should also be used to accommodate the
wires.
2. In each terminal block, wire the lower tier terminals before the
upper tier terminals.
3. All contacts are shown in the de-energized position.
NOTE: Each output relay may be congured for Mode 1 or Mode 2 op-
eration. In Mode 2, the relay is energized when control power
is applied to the MP-4000. For Mode 2 operation, the contacts
are normally in the opposite state from that shown. Refer to
Subsection 13.4.
4. The INCOM communications LED can be seen through a hole in
the outer case on the left side.
NOTE: All wiring must conform to applicable federal, state, and local
codes.
13.3.1 Fiber Optic Installation
The URTD ber optic cable connects directly to the inner chassis. The
installation procedure is as follows:
1. Remove the relay inner chassis from the outer case assembly.
2. Route the ber optic cable through the grommeted hole in the
back of the outer case (see Figure 13.3).
3. The ber should be long enough to extend 2 to 3 in. (50.8 to 76.2
mm) out of the front of the case.
4. Carefully hold the ber to the left inner side of the case and insert
the relay inner chassis half-way into the case.
5. Connect the ber cable to the ber optic connector on the relay
inner chassis. The ber plug on the cable has a latching mecha-
nism that locks the ber cable into the ber outlet.
6. Carefully push the relay inner chassis the rest of the way into the
case until the quick-release latches engage.
NOTE: Be careful not to kink or bend the ber cable when inserting
the relay inner chassis.
13.3.2 Fiber Cable Disconnection
To remove the relay inner chassis from the case when the ber cable
is used, perform the following procedure:
1. Unlatch the inner chassis from the case and remove it half-way
out.
2. Disconnect the ber cable by squeezing the connector latch and
gently pull the ber plug from the ber socket.
NOTE: Failure to disconnect the ber cable from the relay inner chas-
sis may result in damage to the ber and, possibly, to the ber
socket.
3. Continue to remove the relay inner chassis.
13.4 Application Considerations
13.4.1 Mode 1 and Mode 2 Output Contacts
The outputs of the MP-4000 relay can be congured in either Mode 1
or Mode 2 operation. Refer to Subsections 5.12.1 and 6.2.3 for more
information on the functionality of modes 1 and 2.
13.4.2 Continuous Motor Operation
The MP-4000 normally closed trip contact has been provided with a
shorting contact to allow for continuous motor operation when the in-
ner chassis is removed. The trip relay must be set for Mode 1 opera-
tion (refer to Subsection 5.12.1).
 Loading...