4. OPERATION
4.1 Details of control panel
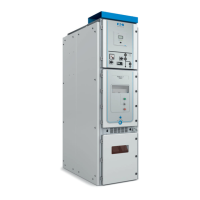
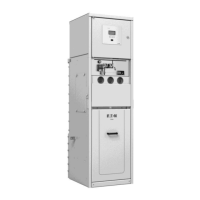
The Xiria unit is equipped with two types of control panel,
one for the load-break switch panel and one for the circuit-
breaker panel.
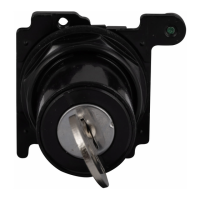
Figure 4-1 provides a summary of the control units on
the control panels.
1. Earthed position interlock for padlock max. 12 mm.
2. Padlock facility for off pushbutton
3. Off pushbutton with anti-reflex flap
4. Electrical closing pushbutton for motor control
(option)
5. Switch position indicator
6. Switch control point
7. Switch function indicator
8. Selector control knob
9. Change-over switch control point
10. Change-over switch position indicator
11. Trip indicator CB (option)
12. Ammeter CB (option)
13. Cable side voltage detector
14. Short-circuit indicator LBS (option)
15. Inspection window
16. Moisture indicator
17. Door interlock
4.2 Manual switching
4.2.1 Switching operating position on/off
In the operating position the cable is connected to the main
busbar of the unit. Here, the switch (5) is ON and the
change-over switch (8) is in the busbar position.
Initial position:
In the neutral position (see Figure 4-2):
the switch is OFF, see switch (4) position indicator;
the change-over switch is in earthed position, see
change-over switch (9) position indicator;
The selector (7) is in the central position.
This initial position has been selected to ensure that all
switching operations are described. If the change-over
switch is already in the busbar position, for instance during
switching on, switching with this change-over switch is
omitted.
Procedure for switching on the operating position
1. Turn the selector (7) clockwise until the control point of
the change-over switch (8) is revealed.
2. Place the operating handle with the arrow pointing
down in the control point of the change-over switch
(8). Switch the change-over switch to the busbar
position by turning the handle anti-clockwise as far as
it will go, i.e. to approximately 190
0
. Additional
resistance will be noticeable towards the end of this
rotation. The handle cannot be removed until busbar
position of the change-over switch has been reached.
 Loading...