Eclipse T500 Actuator, V1, Instruction Manual 902, 12/7/2009
7
In this section you will find the information and instructions
that you need to install the actuator.
Ŷ Installation and maintenance must conform with
the National Electrical Code and all other national
and local codes and authorities having
jurisdiction. The actuator must be installed by a
qualified technician.
Handling
1. Make sure that the area is clean.
2. Protect the actuator from the weather, damage, dirt
and moisture.
3. Protect the actuator from excessive temperatures and
humidity.
4. Take care not to hit or drop the actuator.
Storage
1. Make sure that the actuator is clean and in good
condition.
2. After you have made sure that everything is present
and in good condition, keep the actuator in the original
package as long as possible.
3. Store the actuator in a cool, clean, dry room.
Approval of Components Electrical Wiring
All of the electrical wiring must comply with one of the
following standards:
• NFPA Standards 70
• EN60204-1
• the electrical wiring must be acceptable to the local
authority having jurisdiction
Where to get the standards:
The NFPA Standards are available from:
National Fire Protection Agency
Batterymarch Park
Quincy, MA 02269
Information on the EN standards, and where to get the
standards is available from:
CENELEC
Avenue Marnix 17
B-1000 Brussels, Belgium
Checklist Before Installation
Access
Make sure that you install the actuator in such a way that
you have easy access to it for inspection and
maintenance. Ensure that the cover has enough
clearance to be easily removed.
Environment
Make sure that the local environment matches the original
operating specifications. Check the following items:
• voltage, frequency and stability of the electrical
power
• humidity, altitude and temperature of air
• presence of damaging corrosive gases in the air
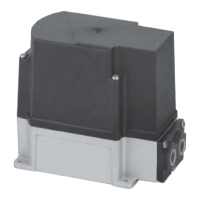
Actuator Mounting
Depending on your application, please keep the following
in mind when mounting the actuator:
• The actuator housing has seven possible mounting
holes, as shown in Figure 3.1.
- The outer set of four holes “A” are clear for
inserting bolts up to size M5 or #10.
- The inner set of three holes “B” are drilled to a
depth of 9.8mm (0.39") to accept tapping screws
size M5 or #10-32.
- A 6mm wide by 7mm long by 6mm deep hole “C”
is provided for brackets designed with a stop pin.
• Mounting this actuator depends on the application;
contact Eclipse for available mounting kits.
• When mounting the actuator, be certain that the
actuator’s drive shaft is properly aligned with the
other shaft to which it will be coupled to avoid undue
lateral stress.
• The standard drive shaft is round with a Woodruff
key for a coupling, as shown on page 17. Some
models may have a square shaft.
• Provide support for the weight of conduit or cables
into the actuator.
• Ensure clearance for cover removal.
CAUTION
Installation
3