- 11 -
STEP 2
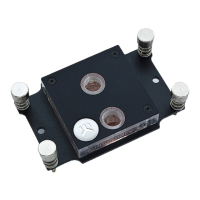
Unscrew the four M4 screws in a counter-clockwise direction from the
bottom of the water block, using the enclosed 2.5mm Allen key to detach
the copper base and access the jet plate. After replacing the jet plate,
please reassemble the water block, as shown in the STEP 1 image. Pay
special attention to the insert orientation relative to the copper base and
water block top.
Before reassembly of the water block, the preformed
gasket (o-ring) must be placed into the gap between the
mounting plate and the water block top.
Gradually tighten the four screws and alternate between them until each is
tightened down. Don’t overdo with force applied.
Jet Plate
Water Block Top
STEP 2
INSTALLING THE WATER BLOCK
LGA-2011 M3
Thumb Screw
LGA-2011 M3
Thumb Screw
LGA20113/2066* SOCKET MOTHERBOARDS
STEP 1
Prepare the foil bag with the mounting mechanism that is enclosed
with the CPU water block.
Install four (4) specific LGA-20xx M3 thumb screws into four M3
threaded stubs on the LGA-20xx socket. The screws are to be
installed using no tools (i.e., pliers).
It is recommended to remove the motherboard from the
chassis before proceeding with the CPU water block
installation due to space constraints in various PC cases!
STEP 1
 Loading...