5041A2E4
16
range you need, to get the right dial with the right multiplier or direct reading
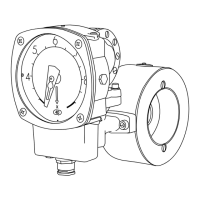
scale. When you order, you will get the Control Unit with the diaphragm hou-
sing included. Make sure you order the right material in the diaphragm hou-
sing and the soft rubber parts (diaphragm, o-rings and diaphragm lever) and
you will get the Control Unit already tested and calibrated and ready to fit
onto the Pipe Section, without any on-site adjustments or calibration. All
Eletta DP Flow Monitors are working with the same differential pressure wit-
hin their specific range (Pls. see section 1.1).
If you have a Pipe Section designated; -GL or GSS (-FSS), start with ma-
king sure that there is no pressure in the system, as these Pipe Sections do
not have any internal shut-off valves for isolating them from process pressure.
Turn the electric power supply off and then disconnect the cables from the
micro switch electric terminal. If you have a Pipe Section designated; -FA you
will find the included shut-off valves under the brass elbow, which connects
the Control Unit to the Pipe Section.
Turn them counter-wise until you feel the end position and this shuts off the
pressure up to the Control Unit and you can easily remove this. If you have a
Pipe Section designated; -FSS, there is an option to buy this with a shut-off
manifold, but it will not come as a standard.
On the -GL Pipe Section; loosen the four (4) hexagon screws that hold the
diaphragm housing (do not remove the blue housing at any time) to the Pipe
Section. Replace the flow direction selector (3.4.1 and 3.4.2) if damaged, or
if other material is required. Install the new Control Unit and tighten the four
(4) hexagon screws firmly again.
On the -GSS Pipe Section; loosen the two (2) hexagon screws that hold the
diaphragm housing and replace the O-rings to the right material, if necessary.
Install the new Control Unit and tighten the two (2) screws firmly again.
On the -FA Pipe Section:
untighten the four (4) screws which hold the diaphragm housing.
Replace the flow direction selector (3.4.1 and 3.4.2) if damaged, or if other
material is required to the pipe section. Install the new Control Unit and
tighten the four (4) screws firmly again.
On the -FSS Pipe Section; If you have a Monitor that has a shut-off manifold,
you can close the two (2) valves to get the diaphragm housing non-pressuri-
zed. Otherwise, start with checking that there is no pressure in the pipe system
and up to the diaphragm housing. Loosen the two screws that hold the dia-
phragm housing and replace the O-rings to the right material, if necessary.
2
2
As an option we have a manifold with shut-off valves, this enables you to
dismount the control unit from the pipe-section during full operation.
Start with making sure that there is no pressure in the system. Turn the
electric power supply off and then disconnect the cables from the micro switch
electric terminal.
reading scale. When you order, you will get the Control Unit with the diaphragm
housing included. Make sure you order the right material in the diaphragm hou-
sing and the soft rubber parts (diaphragm, o-rings and diaphragm lever) and you
will get the Control Unit already tested and calibrated and ready to fit onto the
Pipe Section, without any on-site adjustments or calibration. All Eletta DP Flow
Monitors are working with the same differential pressure within their specific
range (Pls. see section 1.1).
On the -FA Pipe Section: untighten the four (4) screws which hold the
diaphragm housing.Replace the ow direction selector (3.4.1 and 3.4.2) if
damaged, or if other material is required to the pipe section. Install the new
Control Unit and tighten the four (4) screws rmly again.
On the -FSS Pipe Section; Loosen the two screws that hold the diaphragm
housing and replace the O-rings to the right material, if necessary. Install the
new Control Unit and tighten the two (2) screws rmly again.
Connect the electrical cables according to your new Control Unit’s possibilities
and for detailed information regarding wiring, please see section 2.7”Electrical
installation”.