3
-Pressingandholdingthisbuttondownfor2seconds
Exitstheprogrammingmodewithoutsavingany
changes.
Hold Button –Usethisbuttontotemporarily(press
once) or permanently (press twice) change of the
floor temperature settings.
Settings Button –Usethisbuttontoaccessthe
SettingsmenutochangetheTime,Day,°Cor°F,
5/2dayor7day,BacklightandFloorTypes(Tileor
Wood) settings of the thermostat.
GFCI Test Button –Usethisbuttontosimulatea
ground fault, test the GFCI circuitry and activate the
GFCI fault light. When a ground fault is detected,
the GFCI test button will be illuminated in red color.
GFCI Reset – Resets a simulated or repaired GFCI
fault, and deactivates GFCI fault light.
Up/Down Button –Usedduringprogramming
to move values up or down (if held down for
2 seconds, values will change rapidly).
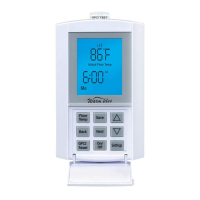
B. LCD Explanation
Wake – The time in the morning when you want the
floor to start warming up, about one hour before
you wake-up.
Leave – The time when you leave for work or school,
and want the floor to start cooling down to save
energy.
Return – The time in the afternoon when you want
the floor to start warming up to a comfortable
temperature, about one hour before you return
home.
Sleep – The time at night you want the floor to start
cooling down to save energy.
Auto–AutomaticMode.Indicatesthethermostatis
operating with one of the automatic temperature
adjusting programs, the floor temperature is
adjusted according to programmed instructions.
Either5/2Day,or
7Daywillalsobeshownonthedisplaywhenin
automatic mode.
5/2 Day – Indicates the thermostat is operating in
the5/2Dayprogramselectionwithintheautomatic
mode,withseparateprogrammingforMonday
throughFriday(5day),andSaturdayandSunday(2
day).
7 Day – Indicates the thermostat is operating in the
7Dayprogramselectionwithintheautomaticmode.
Sensor – Flashes when the Floor Sensor is
malfunctioning.
Set Temp – Indicates the adjusted floor temperature
duringthesettingoftheAutoModes.
Actual Floor Temp – The floor temperature readings
may be represented in either F or C. The operating
floor temperature range is from 60 F (16 C) to 104 F
(40 C). The displayed floor temperature range is
from 32 F (0 C) to 120 F (49 C). The thermostat only
functions in the operating floor temperature range
(from60F/16Cto104F/40C).
Each Individual “S” segment will be growing
from small to large which indicates that the
floor heating is energized.
Min – Indicates the value of time in “minutes” for the
LCDbacklight-turns“On”fortwominutesonly.
When all five “sSSSS” segments flash slowly, this
indicates that the floor heating is in 3 minutes
standby cycle.
Tile or Wood Mode – TheselectionoftheTile/Wood
modeistolimitthemaximumfloortemperature
dependingonthesurfacetype.Themaximum
floortemperaturefortileissetto40°C(104°F).The
maximumfloortemperatureforwoodissetto30°C
(86°F).
C. Energizing the Thermostat
When power is first connected to the thermostat or
afteranextendedpoweroutage,theLCDDIsplay
will show display segments with backlight on for 10
seconds as per Figure 7 shown. The display will then
flash“Hour(12:00)”,“PM”,and“Mo”segmentsas
Figure 2
Heating Cable
Sensor Wire
Figure 3
Figure 4
 Loading...