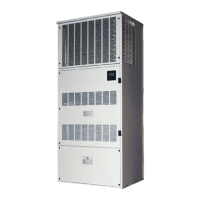
The Liebert PEX Condenser is a critical cooling solution designed for high availability in both room and row configurations, offering next-generation efficiency and reliability. This user manual, version V1.0, dated May 27, 2010, provides comprehensive details for its operation and maintenance.
Function Description
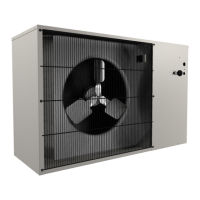
The Liebert PEX Condenser is an integral component of a refrigeration system, designed to dissipate heat from the refrigerant to the ambient air. It operates as either a single circuit or dual circuit unit, matching the single refrigeration system of an indoor unit or two separate refrigeration systems, respectively. The condenser includes a heat exchanger, fan, fan speed controller, and pressure sensor, all working in concert to ensure efficient heat rejection. The fan speed controller is crucial for maintaining optimal performance by adjusting fan speed based on system requirements, contributing to energy efficiency and stable operation.
Important Technical Specifications
The condenser is available in 17 models, categorized by single or dual circuit configurations.
- Single circuit models: LS12, LS18, LSF24, LSF32, LSF38, LSF42, LSF52, LSF62, LSF72, LSF76, LSF85.
- Dual circuit models: LDF42, LDF52, LDF62, LDF72, LDF76, LDF85.
Mechanical Parameters:
The units vary in weight from 80 kg (LSF12) to 220 kg (LSF76, LDF76, LDF85) and dimensions (L x W x H). For instance, the LSF12 has dimensions of 924mm (L) x 599mm (W) x 689mm (H), while larger models like LSF76 and LDF76 measure 2074mm (L) x 1273mm (W) x 695mm (H). Fan numbers range from 1 to 2 depending on the model.
Mounting Base Dimensions:
For horizontal installation, mounting base dimensions vary. For example, LSF12 and LSF18 require 676 x 837 x 53 mm, while LSF76 and LDF85 require 2126 x 1120 x 53 mm. Installation holes are long and flat, recommended for M10 × 20 bolts.
For vertical installation, the mounting base dimensions are specified by a dimension 'a'. For LSF12, LSF18, 'a' is 630 mm, and for LSF76, LDF76, LSF85, LDF85, 'a' is 2280 mm. It is recommended to use M10 × 20 bolts for mounting. Additionally, the condenser must be installed on a rack during vertical installation, and cushions should be installed between the condenser and the rack for vibration reduction.
Parameters of Operating Environment:
- Installation position: The standard equivalent distance between the indoor unit and the condenser is 30m. Vertical difference (ΔH) should be ≤ 5m. Installation mode can be horizontal or vertical.
- Ambient temperature: Outdoor temperature range is -20 °C to +45 °C. Low temperature accessories are required if the temperature is between -35 °C and -20 °C.
- Ambient relative humidity: Outdoor humidity should be 5%RH to 95%RH.
- Operation power: 400V ± 10%, 50Hz.
- Altitude: ≤ 1000m. Derating is required if the altitude exceeds 1000m.
- Protection level: Electrical control box: IP55; unit: IP20; fan motor: IP54.
- Corrosion resistance: Condenser fins have a corrosion resistant coating designed to provide maximum life expectancy. The high performance coating has been tested for 2000 hours exposure to a 5% neutral salt spray test in accordance with ASTM B117 without impact to the coating.
Parameters of Storage Environment:
- Storage environment: Clean indoor environment with good ventilation and no dust.
- Ambient temperature: -40 °C to +70 °C.
- Ambient relative humidity: 5%RH to 85%RH.
- Storage time: The total storage time should not exceed 6 months. Otherwise, performance needs to be re-calibrated.
Electrical Specifications (FLA - Full Load Amps):
- LSF12: 0.79 A
- LSF18: 1.05 A
- LSF24: 1.65 A
- LSF32: 2.05 A
- LSF38, LSF42, LSF52, LDF42: 2.4 A
- LSF62, LSF72, LDF52, LDF62: 3.3 A
- LSF76, LSF85, LDF76, LDF85: 4.8 A
Usage Features
Installation:
- Moving and Unpacking: The condenser can be moved using a forklift or a crane. For forklift use, the tines should be inserted as shown in Figure 2-1 (single fan condenser) or Figure 2-2 (double fan condenser). For crane lifting, cables should be passed through slots at the bottom of the pallet. Care must be taken to avoid damaging pipes and system leakage. Unpacking involves removing the timber frame package and foam to preserve the protection cardboard of fins.
- Installation Notes: The condenser must be placed horizontally, and the installation legs should complete the installation of legs while the condenser is located vertically. When moving, avoid distortion and system leakage. The installation location should allow for smooth airflow and prevent obstructions from the indoor unit. The horizontal installation is recommended to reduce noise. The condenser should be installed away from residential areas (≥ 15m). The waterproof layer and local regulations on the roof of the building must be considered. The condenser should be positioned higher than the indoor unit for normal oil return. Installation arrows on the condenser indicate the correct installation direction.
- Space Requirements: A minimum of 4000mm clearance is required around the condenser air outlet, and 600mm service spaces are required on the four sides of the condenser.
- Piping: Protect copper pipes from heat sources, isolate copper pipes from structures or other obstacles, and use rigid supports. Avoid dust, water, vapor, and irrelevant objects from entering copper pipes. Use good quality, silver-based solder for all brazed connections. Purge all pipes with nitrogen during brazing to prevent oxidation. Identify pipe sizes and installation height according to the "Installing Unit Pipes in Liebert PEX Series Air Conditioner User Manual".
- Electrical Connections: Identify power supply cables and start/stop signal cables. The power supply cables and compressor signal cables enter the electrical control box through the waterproof joint. The external power cable whose inner diameter is Φ10mm. After connecting, apply waterproof sealant to ensure good waterproof performance. The phase sequence of three-phase AC input (L1, L2, L3) must be correct. The fan speed controller will generate the phase loss alarm if not correct. For single circuit condensers, the two condenser start/stop signal cables should be paralleled at the terminal block of the indoor unit. For dual circuit condensers, the four condenser start/stop signal cables should be connected directly.
- Charging Refrigerant and Adding Cooling Oil: Refer to "Installing Unit Pipes in Liebert PEX Series Air Conditioner User Manual" for charging refrigerant and adding cooling oil.
Fan Speed Controller (HMI - Human Machine Interface):
The fan speed controller is the human-machine interface (HMI) for the condenser. It displays the maximum pressure logo and the larger of condensing pressure 1 and condensing pressure 2. The pressure value is displayed as 88.8 on the LCD. The HMI provides access to various menus for monitoring and configuration.
- Initial Interface: Displays pressure sensor status (installed/not installed/disabled).
- Main Menu Interface: Allows navigation through analog main menu, current alarm main menu, historical alarm main menu, and configuration main menu.
- Analog Main Menu Interface: Displays real-time values for pressure 1, pressure 2, ambient temperature, SCR temperature, and output percentage.
- Current Alarm Main Menu Interface: Displays current alarms with their corresponding IDs (e.g., phase loss alarm, fan 1 over temperature, SCR temperature sensor failure).
- Historical Alarm Main Menu Interface: Displays historical alarms.
- Configuration Data Main Menu Interface: Allows setting parameters like pressure set point, minimum voltage, maximum voltage, fan number, and sensor type. Access to this menu is restricted to maintenance personnel.
Maintenance Features
General Maintenance:
- Maintenance should be done by technicians.
- Except for commissioning items, all maintenance must be carried out with power-on, during maintenance, the power of the indoor unit and the air switch of the condenser must be cut off.
Refrigeration System:
- Piping: Check that refrigeration pipes are firmly fixed, not vibrating, and that there are no oil on the accessories of all refrigeration pipes. Make sure pipes do not leak.
- Heat Exchanger: Clean the fin of the heat exchanger regularly. Clean the fin with compressed air or fin detergent if airflow is blocked. Ensure airflow is good when the compressed air is used. Check for damaged fins and maintain them in time. Avoid snow accumulation around the condenser in winter.
- Fan: Check that the fan runs normally. Check for abnormal noise, vibration, and bearing failure.
Fan Speed Controller:
- Check that the fan speed controller board operates normally. If not, replace it as illustrated in the manual.
- The positions of the bolt installation holes on the fan speed controller could be different on actual product.
- The fan speed controller is inside the electrical control box. To access it, rotate the isolation switch to 'OFF', and then remove the cover plate of the electrical control box. Remove the cover plate of the electrical control box before removing the fan speed controller board. The board is fixed by seven bolts. The heat sink is clipped to the floor of the electrical control box.
Troubleshooting:
The manual provides a table of alarm troubleshooting, outlining alarm IDs, names, causes, and corresponding troubleshooting steps.
- Phase loss alarm (A00): Cause is reversed input connection. Troubleshooting involves checking the input order of wire and replacing the fan speed controller board.
- SCR over temperature (A01): Cause is that the fan cannot run normally or a hardware fault. Troubleshooting involves checking that the fan runs normally and replacing the fan speed controller board.
- Fan 1 over temperature, Fan 2 over temperature (A02, A03): Cause is AC contactor wiring fault, fan hardware fault, or fan speed controller board hardware fault. Troubleshooting involves checking wiring of AC contactor, checking the auxiliary contact state of AC contactor, and replacing the fan speed controller board.
- Pressure sensor failure (A04): Cause is that the pressure sensor is not installed or its terminal connection is poor, or jumper caps are not used to short terminals J17 and J18, or pressure sensor failure. Troubleshooting involves checking wiring of pressure sensor, installing the jumper cap, and replacing the pressure sensor.
- EEPROM read fault (A05): Cause is fan speed controller board hardware fault. Troubleshooting involves replacing the fan speed controller board.
- SCR temperature sensor failure (A06): Cause is SCR temperature sensor is not installed or its terminal connection is poor, or SCR temperature sensor failure. Troubleshooting involves checking wiring of SCR temperature sensor (J8 SCRTemp), and replacing the SCR temperature sensor.
- Abnormal frequency (A07): Cause is power supply voltage is wrong or fan speed controller has a hardware fault. Troubleshooting involves replacing the fan speed controller board.