28
Recommended rotational speed
Material Speed stages
Hardwood (e.g. Beech) 4 – 6
Softwood (e.g. Pine) 5 – 6
Chipboard 3 – 5
Plastic 2 – 3
Aluminium 1 – 4
NOTE: Above values are for guidance only and may vary according to
the actual workpiece.
03
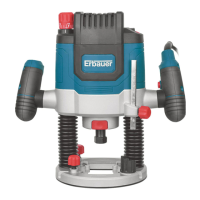
Cutting depth setting
WARNING! Always switch the product off and disconnect it from power
supply before making any adjustments!
Coarse adjustment (Fig. J and K)
1. Place the product with the pre-tted router bit upright on the workpiece with its
back side to the operator.
2. Release the xing lever (19) by turning clockwise and raise the motor housing by
the spring force of the two pillars to its highest position. (Fig. J, step 1)
WARNING! Be aware of the spring force in the pillars and put one hand
on the top of the router when releasing the xing lever (19) to avoid
unintended jumping-up of the router.
3. Turn the adjustment knob (3) anti-clockwise until the stop to align the indicator (18)
with the lower scale mark (Fig. J, step 2).
4. Turn the product around with its front side to the operator.
5. Loosen the xing screw for depth stop (8), slide the depth stop (7) upward, set the
step buffer (10) to its lowest position for the depth stop (7) and let the depth stop
(7) drop to the step buffer (10) freely (Fig. K).
6. Lower the motor housing slowly by applying pressure on both main handles (1)
until the router bit touches the surface of the workpiece. Hold both main handles
(1) in position and lock the xing lever (19) with the nger of the left hand.
7. Ensure that depth stop (7) stands on the step buffer (10) correctly and read the
indicated value on the scale (7a). Reduce the desired cutting depth to the read
value and lift the depth stop (7) accordingly.
8. Tighten the xing screw for depth stop (8) to x the depth stop (7) in position.
EXAMPLE! The indicated value is 60 mm (6 on the scale (7a)), the
desired cutting depth 5 mm. The target setting value is 55 mm. Pull the
depth stop (7) upward until 55 mm is indicated.
NOTE: It is recommended to perform a trial cut in a piece of test wood to
double check the cutting depth.
Fine adjustment (Fig. J, L)
Use the adjustment knob (3) for precise setting of cutting depth. The adjustment can
be done both in locking and releasing position of xing lever (19).
Turning of adjustment knob (3) can perform ne adjustment of cutting depth according
following information:
1 mark on scale wheel (2) = 0.1 mm
1 turn of scale wheel (2) = 2.0 mm
1 mark on the scale (17) = 8 mm
Total adjustment range = 0-16 mm
1. Align the “0” mark on the scale wheel (2) with the xed indicator on the motor
housing by turning the scale wheel (2) without touching the adjustment knob (3).
2. Rotate adjustment knob (3) clockwise to increase the cutting depth while the scale
wheel (2) turns with the adjustment knob (3) synchronously.
3. Rotate adjustment knob (3) anticlockwise to decrease the cutting depth while the
scale wheel (2) turns with the adjustment knob (3) synchronously.
NOTE: After setting the cutting depth, the position of the reset-mark on
the depth stop should not be changed any more so that the currently
adjusted setting can always be read off the scale.
2100W router MNL_ER2100_TPS_GB_V02_20180608.indd 28 6/8/18 19:22