31
Operation
01
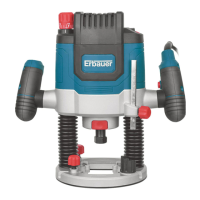
General routing (Fig. M)
WARNING!
Always wear a dust mask to protect yourself against hazards resulting
NOTE:
different routing functions using waste material.
Even if you are familiar with this product, always make a trial cut on waste
material to test the adjusted speed, routing depth and chosen router bit.
1. Ensure the workpiece is free of obstacles like nails or screws before operation.
Remove them if required.
2. Always attach the desired router bit and a dust extraction device.
3.
work piece in desired positon before switch it on.
4. Always wait until the power tool has reached its full speed before cutting. Never
switch the power tool on when a bit is in contact with the workpiece as this can
lead to damage, kick-back or injury.
5. Press the router downward slowly and gently in desired position and running router
the router gently and evenly over the workpiece.
6. Move the product with a slow and even speed. Pay attention to the direction of
feeding as instructed below.
7. Always keep the balance of the router to avoid falling to the non-supported side.
8. Bring the product to a stop at the end of the cut, release the on/off switch and wait
until the router bit has come to a complete stop before removing the product from
the workpiece.
2100W router MNL_ER2100_TPS_GB_V02_20180608.indd 31 6/8/18 19:22
Since excessive cutting may cause overload of the motor or difficulty in
controlling the tool, the depth of cut should not be more than 15 mm at a
pass when cutting grooves with an 8 mm diameter bit.
When cutting grooves with a 20 mm diameter bit, the depth of cut should
not be more than 5 mm at a pass.
For extra-deep grooving operations, make two or three passes with
progressively deeper bit settings.