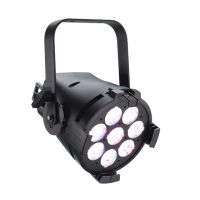
ETC Installation Guide
ColorSource PAR v1.5
ColorSource PAR v1.5 Page 4 of 12 ETC
Setting up the fixture
1: Plug power cord into the powerCON In connector on the rear of the
fixture.
2: Make any power-thru cable connections prior to applying a power
source.
3: Plug power cord into power source.
Powering up
1: Press the Mode button once to wake the display. The display shows
the DMX address.
2: Press the Mode button a second time to access the Presets/Sequences
menu.
Adjusting the tilt
The fixture can be tilted up and down and rotated (panned) as needed.
1: Loosen, but do not remove the yoke locking knob.
2: Tilt the fixture to the desired angle.
3: Tighten the yoke locking knob.
User interface
The user interface allows you to set the start address of the fixture, access the
stand-alone presets and sequences, and set the DMX control mode.
• The DMX address will blink when no DMX is present and a preset or
sequence is not active. The inactivity time-out is disabled while in a
data loss state.
• After 5 seconds of inactivity when DMX is present, the display goes
dark.
Note:
The ColorSource PAR is not self terminating. You must
terminate the last fixture in line with a 120 ohm resistor.
XLR terminators are not available from ETC.
To purchase an RJ45 terminator, please contact your
ETC customer service representative and request part
number N4086.