Do you have a question about the Evenflo NurtureMax and is the answer not in the manual?
Specifies weight and height limits for rear-facing use and head position.
Provides guidelines for using the restraint with preterm or low birth weight infants.
Highlights risks of injury or death from improper installation or use of the restraint.
Emphasizes the danger of leaving a child alone in the restraint.
Warns against using a damaged, broken, or previously crashed restraint.
Discourages using unapproved padding or accessories with the restraint.
Ensures handle is locked and restraint is secured even when unoccupied.
Warns against placing rear-facing seats on front seats with active airbags.
Provides guidance on using the restraint with vehicle side airbags.
Recommends rear seating positions, particularly the center rear, for children.
Advises checking fit and installation for specific vehicle locations and seat types.
Lists vehicle types where the restraint system cannot be used.
Ensures vehicle belts lock properly and do not loosen after tightening.
Warns against restraint movement and prohibits specific seat belt types.
Prohibits use with door-mounted, automatic-moving, and certain lap belts.
Addresses lap/shoulder belts, inflatable belts, and locking mechanisms.
Emphasizes harness fit and securing the restraint even when unoccupied.
Covers armrests, headrests, and seat back conditions.
Details safe vehicle belt systems for restraint installation.
Notes LATCH/UAS can be used instead of vehicle belts.
Explains tightening procedures for various belt types.
Defines LATCH/UAS acronyms and anchor locations in vehicles.
Provides guidance for center seat installation using inner anchor bars.
States LATCH/UAS offers easier installation but both are safe.
Prohibits using LATCH/UAS and vehicle belts together.
Emphasizes reading vehicle manual and proper connector attachment.
Instructs on securely storing unused lower anchor connectors.
Warns against restraint movement over 2.5 cm with LATCH/UAS.
Warns of strangling risk from loose or partially buckled harness straps.
Advises checking restraint surfaces for heat in hot weather.
Discourages bulky clothing that hinders harness tightening.
Stresses following all installation instructions from manuals.
Specifies handle positions 1 or 3 for vehicle travel.
Prohibits placing restraint on soft surfaces or near edges.
Restraint certified for passenger vehicles, buses, trucks, and aircraft.
Advises checking with airlines for restraint requirements.
Instructs users to register their restraint for safety recalls.
Provides contact information for US recall inquiries.
Instructs Canadian users to register for safety recall notifications.
Provides contact information for Canadian recall inquiries.
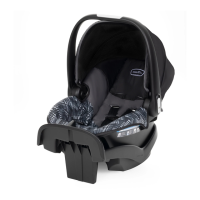
Identifies key parts of the infant car seat from the front.
Identifies key parts of the infant car seat from the back.
Illustrates the bottom of the convenience base and its features.
Step-by-step instructions for removing lower anchor connectors.
Guidance on properly storing the lower anchor connectors when not in use.
Instructions on how to adjust the carrier handle to different positions.
Specifies allowed positions (1 or 3) for travel and carrying.
Describes usage of handle in Position 1 for carrying and travel.
Highlights that Position 2 should NEVER be used for carrying or travel.
Describes usage of handle in Position 3 for travel or removing from carrier.
Lists weight and height requirements for using the base.
Specifies harness straps should be at or below the shoulder.
Ensures child's head is at least 2.5 cm below the seat back.
Confirms system is for securing base to vehicle lower anchor bars only.
Prohibits attaching two connectors to one bar and using belts simultaneously.
Instructs to store unused straps to prevent strangulation.
Mandates the child restraint MUST face the rear of the vehicle.
Guides routing straps through openings and attaching hooks to anchor bars.
Instructs to use full weight to push base into seat and tighten strap.
Warns against using restraint if it moves more than 2.5 cm.
Guides adjusting the base to ensure the level line is parallel to the ground.
Ensures the carrier is firmly locked into the convenience base.
Prohibits using vehicle seat belts with lower anchors simultaneously.
Mandates the child restraint MUST face the rear of the vehicle.
Guides routing the seat belt through openings and buckling it.
Mentions ELR belts may switch to locking mode; locking clip may not be needed.
Instructs to pull shoulder belt tightly and push down on base to remove slack.
Warns against using restraint if it moves more than 2.5 cm.
Guides adjusting the base to ensure the level line is parallel to the ground.
Guides tilting feet down, aligning with base hook, and locking.
Ensures plungers are visible through windows for secure installation.
Instructs to check carrier is firmly locked by lifting the back.
Verifies the base remains level with the ground after carrier installation.
Use towel/blanket to ensure infant's head reclines comfortably.
Always place handle in Position 1 or 3 when traveling.
Step-by-step guide to release the carrier using the base release lever.
Confirms base is securely installed via lower anchors or seat belt.
Verifies locking clip installation and base levelness.
Checks harness straps, buckle tongues, and chest clip for proper fit.
Reviews base movement, levelness, and handle position.
Lists weight and height requirements for installation without the base.
Specifies harness strap and head position relative to seat back.
Mandates rear-facing and proper seat belt locking for installation.
Guides placing the restraint rear-facing and adjusting for level.
Details routing the seat belt through the carrier's belt guides.
Mentions using a locking clip if needed for ELR belts.
Instructs to tighten the seat belt as much as possible using full weight.
Warns against using restraint if it moves more than 2.5 cm.
Use towel/blanket to adjust restraint level if needed.
Guides adjusting the handle to Position 1 (Carry/Travel).
Confirms child's back and bottom are flat against the carrier.
Checks harness straps, buckle tongues, and chest clip for proper fit.
Verifies carrier is securely installed with seat belt and level.
Reviews restraint movement and handle position.
Provides instructions on placing the baby and ensuring proper fit.
Ensures harness straps start as close as possible to, but never above, shoulders.
Guides inserting buckle tongues until an audible click is heard.
Ensures buckle strap is snug but not under the child's bottom.
Aligns chest clip at armpit level and snaps it together.
Instructs to tighten harness straps to remove slack; no pinching allowed.
Presses red buckle release and removes buckle tongues.
Pushes release button and pulls chest clip apart.
Instructs to push down on adjuster hinge and pull straps to loosen.
Presses harness release button and pulls straps to loosen.
Slides one harness strap off the splitter plate.
Pulls harness strap through the front of the child restraint.
Inserts harness strap into the new slot, ensuring correct routing.
Ensures harness strap is installed completely on the splitter plate.
Tightens harness straps using the front adjustment strap.
Explains adjusting buckle strap to be close to, but not under, child's bottom.
Describes buckle strap placement in Newborn Mode (see page 41).
Describes buckle strap placement in the Rear Slot.
Describes buckle strap placement in the Middle Slot.
Describes buckle strap placement in the Front Slot.
Loosens harness straps and moves buckle strap anchor out of the way.
Inserts anchor into closest slot, ensuring it lies flat and is securely fastened.
Places anchor through rear slot then middle slot for Newborn Mode.
Provides chart for suggested waist strap positioning based on child size.
Loosens harness straps to reposition waist straps from outer to inner slots.
Pushes the buckle strap through the slot in the seat pad.
Unhooks front seat pad, removes outer anchor, and pushes it up through slot.
Pushes anchor down through inner slot, then feeds it through outer slot.
Mandates use for vehicles prior to 1996 with ELR and sliding latch plates.
Guides threading the seat belt through the base and buckling it.
Instructs to push down on base and pull belt to remove slack.
Holds belts together behind buckle tongue before unbuckling.
Threads locking clip onto seat belt and slides it into place.
Buckles seat belt with the locking clip in place.
Warns to remove clip when not used with restraint to ensure proper adult restraint.
Prohibits using restraint as a sleeping environment or unattended.
Warns against placing on soft surfaces, near edges, or in shopping carts.
Emphasizes fully restraining the child even when carrier is used outside vehicle.
Guides pushing down and rotating handle to Position 1 (Carry/Travel).
Warns against carrying the infant carrier on your hip.
Instructs to carry at your side with handle firmly locked.
Guides attaching canopy strips into holders on each side of the restraint.
Disconnects canopy from seat pad using hook and loop connector.
Unhooks three hook connectors from the seat shell at the rear.
Pulls fabric slots from tabs near the handle.
Unhooks two elastic loops from tabs at the front of the seat.
Unhooks harness straps from the splitter plate at the bottom of the seat.
Pulls straps and buckle through fabric slots to remove the seat cover.
Pulls harness, adjuster, and buckle through fabric slots of seat cover.
Reconnects harness straps to the splitter plate at the bottom of the seat.
Reconnects two elastic loops to the tabs at the front of the seat.
Pulls fabric slots onto tabs near the handle.
Reconnects three hook connectors to the seat shell at the rear.
Reattaches canopy hook and loop connectors to the seat pad.
Provides FAA guidance on child restraint use based on weight during air travel.
Highlights the safety of using a restraint during turbulence over an adult lap.
Mandates using the internal harness when installing the child restraint in aircraft.
Ensures the aircraft seat is in a fully upright position before installation.
Prohibits using the convenience base when installing child restraint in aircraft.
Guides placing the restraint rear-facing and routing the aircraft seat belt.
Routes the aircraft seat belt through the belt slots on the carrier.
Fastens the aircraft seat belt securely.
Tightens belt, checks for movement, and re-installs if necessary.
Guides adjusting handle to Position 1 (Carry/Travel).
Do not lubricate or immerse LATCH/UAS connectors, buckle, or parts in water.
Wipe plastic/metal with mild soap and water; avoid abrasives/solvents.
Wipe harness with mild soap and water; allow to air dry.
Machine wash seat pad cold, delicate cycle; tumble dry low.
Remove and clean pad before storage to protect from elements.
Order online at www.evenflo.com or contact Evenflo for parts.
Look for sku/part number 6401000 for an additional base.
Encourages proper disposal; most components are recyclable.
Warns to discontinue use after expiration or if involved in a crash.
Store instructions in the carrier behind the seat pad.
Record model number and date of manufacture for future reference.
Covers defects in material or workmanship for 90 days from purchase.
Details repair/replacement, exclusive remedy, and required proof of purchase.
Disclaims implied warranties and liability for incidental/consequential damages.