OPERATING INSTRUCTIONS
GENERAL INSTRUCTIONS
A fairly protected location is desirable for pleasant and ecient cooking. Set up the
barbeque in a safe place. Try to keep the barbeque sheltered from strong winds as this
will drastically alter cooking eciency. If this is unavoidable, position the length of the
barbeque to be parallel in the direction of the wind. Keep the barbeque level. Check
frequently that the charcoal stays ignited (this does not necessarily mean a ame is
visible), and that are ups are not occurring. Make sure the minimum distances of the
barbeque to any wall or combustible surface are met, and that when not using the
pedestal, the supporting surface can withstand the heat. When using the pedestal, take
care that the ground is level and no combustible material is close by.
WARNING! This barbeque will become very hot, do not move during operation. For
more specic information (including set-up illustrations and diagrams) and up to
date cooking instructions, please visit the Everdure by Heston Blumenthal website at
www.everdurebyheston.com.
FUEL TYPE AND CONSUMPTION
This barbeque is designed to cook with lump charcoal. The heat produced and
consumption time may vary dramatically depending on the type of fuel used, and the
prevailing weather conditions. Please see the Quick User Guide for more information on
charcoal ignition and cooking. Do not use accelerants for fuel ignition or fuels impregnated
with accelerants in this appliance as they may cause damage to the appliance or injury.
Place enough charcoal into the fuel compartment according to the instruction manual.
Light the charcoal using the FAST FLAME IGNITION SYSTEM
TM
. The charcoal will then
burn for a period with ames. When burning is established, spread the fuel evenly. Make
sure that the cooking grid is fully located into the grill supports, then you can enjoy your
barbequing. Do not cook before the fuel has a coating of ash.
After cooking, the remaining charcoal should be allowed to burn o naturally (this should be
taken into account when planning the cooking times). Once nished, the ash and remaining
fuel should be removed and placed into a non-ammable container (a metal bucket is ideal), a
small amount of water added (just in case there is still any heat left in the waste) and disposed
of safely as per local council rules. Note that protection from heat should always be used.
CHROME OPEN GRILL
The cooking surface for this barbeque is a chromed open grill, which can be fully removed
or levered up from either side to add additional charcoal. The grill should be positioned
so that the hinges are facing down (they will allocate in two notches at the front and
rear of the charcoal chamber). Take care that food cooked is wider than the gaps in the
grill or positioned lengthways so it doesn’t fall through. Over time, the surface of the
grill will discolour with the heat of the fuel (this is a normal process and not a fault). It is
recommended that the grill is placed on the barbeque after the charcoal has ignited and
any adjustment on the fuel distribution has been done. If needed please remove the grills
for greater clearance. After use, allow the grill to cool and then clean. After cleaning, coat
with a little cooking oil to minimise any rusting.
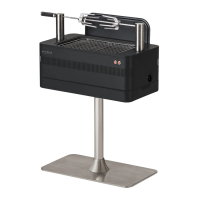
ROTISCOPE TECHNOLOGY™
Rotiscope Technology
TM
is the patent pending built-in rotisserie system of the barbeque.
The maximum rated capacity of the motor is 15kg. Please check the dimensions of the
meat are suitable for the product before purchasing.
The rotisserie rod and Cliplock Forks
TM
are stored in the compartment at the front of the
left hand side panel. Lift the storage door up, remove the Cliplock Forks
TM
(take care of
the sharp points of the fork ngers) and pull the rod out from the storage compartment
(this is enclosed so the rod will not interfere with the electrical wiring). Note: If the
barbeque has been in operation, the rotisserie parts may be hot – remove before cooking
or use heat proof gloves. The handle of the rotisserie rod must rst be extended by
rotating the handle anti-clockwise until the thread releases, extending the handle fully and
tightening in place by rotating anti-clockwise again. To t food onto the rotisserie, rst slide
a Cliplock Fork
TM
(base rst) onto the rod, and lock o by pressing down the small fork
lever. Push the food onto the rotisserie rod and onto the Cliplock Fork
TM
. Push the second
set of Cliplock Forks
TM
onto the rod and into the other end of the food, and lock in position
by pressing down the small fork lever.
To extend the rotisserie poles, rst press and release them so the inner section pops out
from the barbeque. Pull the poles up and rotate clockwise to allocate the poles in one of
the 3 height settings. The pole to the right contains the rotisserie motor. Take the rotisserie
rod with the food attached and place the pointed end in the motor hole at the top of the
right hand side pole. Lever the handle side of the rod down into the slot of the left hand
pole (take care the slot in the rod allocates to the keyway) and close the pole cover. Turn
 Loading...