3.UpgradingLSM-VIA
Upgrade Process
The LSM-VIA upgrade is executed in two steps:
1. Upgrading LSM-VIA on the workstation
This first step installs the LSM-VIA application and the VIA Licensing Manager.
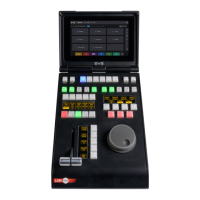
2. Upgrading the LSM-VIA Remote Panel connected to the LSM-VIA workstation
This second step is performed automatically when you switch on the Remote Panel and associate it
with the upgraded LSM-VIA application. It first checks the Operating System version on the Remote
Panel, then it checks the version of LSM-VIA on the Remote Panel.
Considerations
• You do not need to remove the previous version before upgrading.
• When an OS upgrade is required on the LSM-VIA Remote Panel, which rarely occurs, this is
automatically performed before the upgrade of the LSM-VIA version during step 2.
• After upgrading LSM-VIA, the parameters defined in the LSM-VIA configuration tool are kept. See
section "Configuring LSM-VIA" on page 18.
Step 1 - Installing / Upgrading LSM-VIA Application on the Workstation
1. Copy the installer archive on the XClient-VIA:
LSM_VIA_Installer-<LSM-VIA version number>.tar.gz
where <LSM-VIA version number> is the full version number of LSM-VIA included in the package.
This can be done in one of the following ways:
◦ a USB key (formatted in FAT32)
◦ TeamViewer
◦ FTPtransfer (e.g. FileZilla)
The full path of the RPMfile (RPMfilename and folder name) may not include any space
character.
2. Unzip the file.
3. Double-click the extracted file:
LSM_VIA_Installer-<LSM-VIA version number>-x86_64.AppImage
INSTALLATION AND CONFIGURATION MANUAL
LSM-VIA |3. Upgrading LSM-VIA| 9
 Loading...