9 1310 14
11 12
8382
4
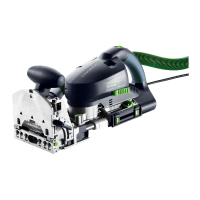
In our example, the centre shelf and side part are flush at the
front and are clamped accordingly. Adjust the angle of the
joining machine to 0° and the routing depth to 15 mm. Then
route the first domino hole with the narrow hole width with
the stop pin in the horizontal side part.
For the other domino holes, switch the hole width to the slot
and mark out the domino positions with a simple scribe mark
on the horizontal centre shelf. Then place the joining machine
on the scribe mark. Use the markings placed on the bottom
of the joining machine by positioning the centre marking on
the machine at the scribe mark on the shelf.
Switch the routing depth to 25 mm and route the domino
holes in the centre shelf, again using the stop pin for the first
routed hole (narrow hole width).
Place the top side part to one side. Position the centre shelf at
the marked point and fold it over towards the right or left, so
that the top or bottom edge of the centre shelf is aligned with
the corresponding marking. Clamp both workpieces (centre
shelf and side part).
TIP If the centre shelf will be reset at the end, keep this
in mind even when clamping.
2016_FES_DOMINO_Book_GB-en.indb 82 03.03.16 12:13
 Loading...