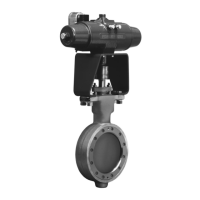
Type 1051 & 1052 Styles H & J
17
CAUTION
Refer to table 7 for bolting torques for
actuator bolts and cap screws. Exceed-
ing any torque requirement may impair
the safe operation of the actuator.
2. Proceed as appropriate:
For Type 1051 actuators,
a. Coat the thread of the cap screw (key 9) and
the tapered end of the diaphragm rod (key 10) with
Lubriplate
(3)
MAG-1 or equivalent lubricant (key
76).
b. Assemble the diaphragm rod, spring seat (key
13), spring (key 11), and diaphragm plate (key 4),
and secure with the cap screw (key 9). Tightening
the cap screw will compress the spring. Be certain
the tapered end of the diaphragm rod is seated in
the corresponding hole in the diaphragm plate, that
the spring is seated in the spring seat, and that the
cap screw is tightened to the torque specified in
table 7.
c. Install the hex nut (key 58), turn buckle (key 57),
hex nut (key 16), and rod end bearing (key 17) onto
the diaphragm rod.
d. Be certain the travel stops (key 8) are located
as shown in figure 9.
e. Install the diaphragm plate and attached parts
into the actuator.
f. Be sure the warning nameplate (key 56) is in
place. Install the diaphragm (key 3) and the upper
diaphragm casing (key 1). Install the cap screws
and hex nuts (keys 5 and 6). Tighten the cap
screws evenly in a crisscross pattern to compress
the spring and secure the upper diaphragm casing.
Tighten these cap screws to the torques shown in
table 7.
For Type 1052 actuators,
a. Proceed as appropriate:
D For actuator designs without a set screw in the
spring barrel (key 12), if the adjustor and attached
parts were removed, first clean and then lubricate the
upper threads of the adjustor (key 74) with lubriplate
MAG-1 or equivalent lubricant (key 76) as shown in
figure 11. Install the lower bearing seat (key 73), the
thrust bearing (key 71), the thrust bearing races (key
72), and the spring seat (key 13) onto the adjustor.
Then, first clean and then coat the lower end of the
adjustor with Loctite 271 or equivalent thread-locking
Figure 9. T
ravel Stop Orientation
A2534-1/IL
compound (key 77) as shown in figure 11, and install
the entire assembly into the spring barrel (key 12). Let
the adjustor stand undisturbed for at least two hours
after installation to allow the thread-locking compound
to cure.
CAUTION
When applying lubricant to the upper
threads and thread-locking compound
to the lower threads of the adjustor, do
not overlap the coat of lubricant with
the coat of thread-locking compound
since this will adversely affect the per-
formance quality of both substances.
D For actuator designs with a set screw (key 75), if
the adjustor (key 74) and attached parts were re-
moved, lubricate the threads of the adjustor with Lubri-
plate MAG-1 or equivalent lubricant (key 76). Install
the lower bearing seat (key 73), the thrust bearing
(key 71), the thrust bearing races (key 72), and the
spring seat (key 13) onto the adjustor. Install this as-
2. Trademark of Fiske Brothers Refining Co.

 Loading...