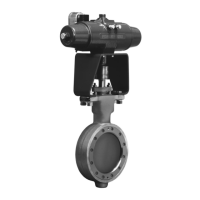
Type 1051 & 1052 Styles H & J
22
figure 15) may need replacement or possibly the clos-
ing cap, (key 187, figure 15) is not tight. To tighten the
closing cap, apply a good grade of thread sealant to
the closing cap threads.
For ease of operation, the stem (key 133, figures 13,
14, and 15) threads may need an occasional applica-
tion of Lubriplate MAG-1 or equivalent lubricant. A
grease fitting (key 169, figures 13 and 14) is provided
for this purpose in the size 70. The size 70 may also
need to have the thrust bearing (key 175, figures 13
and 14) packed with Lubriplate MAG-1 or equivalent
lubricant. Travel stops for the smaller casings can be
lubricated between the stem and pusher (key 135, fig-
ures 13 and 14) with Lubriplate MAG-1 or equivalent
lubricant.
The following disassembly procedures are separated
where appropriate between the top-mounted hand-
wheel and adjustable up travel stop assemblies (fig-
ures 13 and 14) and the adjustable down travel stop
assembly (figure 15).
1. Bypass the control valve, reduce loading pressure
to atmospheric, and remove the tubing or pipe from
the body (key 142, figures 13, 14, and 15).
WARNING
To avoid personal injury from the pre-
compressed spring force thrusting the
upper diaphragm casing (key 1, figures
10 and 11) away from the actuator, either
relieve Type 1052 spring compression,
or carefully remove Type 1051 casing
cap screws by following the instructions
that are referenced in the steps below
before removing the casing.
2. Relieve all actuator spring compression by follow-
ing the procedures presented in the disassembly por-
tion of the actuator maintenance section. Then, rotate
either the handwheel (key 51, figure 13) or the travel
stop stem (key 133, figures 14 and 15) counterclock-
wise until the handwheel or travel stop assembly is no
longer compressing the spring.
3. Proceed as appropriate:
For Top-Mounted Handwheels and
Adjustable Up Travel Stops
a. Remove the upper diaphragm casing (key 1,
figures 10 and 11) by following steps 1, 3, 6, 7, 9,
11, and 12 of the Disassembly portion of the Actua-
tor maintenance section.
b. Remove the cap screws (key 141, figures 13
and 14, and separate the assembly from the upper
casing.
c. Loosen the locknut (key 137, figure 13) or re-
move the closing cap (key 187, figure 14).
d. Turn the stem (key 133, figures 13 and 14)
clockwise out of the body. On handwheel assem-
blies, the cotter pen and slotted nut (keys 247 and
54, figure 13) will have to be removed so that the
handwheel (key 51, figure 13) and locknut can be
taken off the stem first.
e. Remove and inspect the O-rings (keys 138 and
139, figures 13 and 14); replace them if necessary.
f. To complete disassembly for sizes 30, 40 and
60, drive out the groove pin (key 140, figures 13
and 14), and slide the pusher (key 135, figures 13
and 14) off the stem. The pusher of a size 70 unit is
held to the stem by a retaining screw (key 174, fig-
ures 13 and 14). Removing the retaining screw and
pusher exposes the thrust bearing (key 175, figures
13 and 14) for inspection.
For Adjustable Down Travel Stops
Refer to figure 15 for appropriate key numbers unless
otherwise stated.
a. Remove the closing cap (key 187), and unscrew
the jam nut and hex nut (keys 189 and 63 for size
30, 40, and 70 actuators; or keys 189 and 54 for
size 60 actuators) off the stem (key 133).
b. Remove the upper diaphragm casing (key 1,
figures 10 and 11) and travel stop body (key 142)
by following steps 1, 3, 6, 7, 9, 11, and 12 of the
Disassembly portion of the Actuator maintenance
section.
c. Unscrew cap screws (key 141), and remove the
body from the diaphragm case.
d. Check the condition of the O-ring (key 139), and
replace it if necessary.
e. Loosen the hex nut (key 54), and then unscrew
the travel stop stem (key 133) out of the actuator
stem. The lower diaphragm plate (key 82) can now
be removed and the rest of the actuator disas-
sembled.
4. Reassemble in the reverse order of the disassem-
bly steps being sure to apply lubricant as previously
mentioned and as shown by the lubrication boxes (key
241) in figures 13 and 14. For size 70 handwheels or
up travel stop assemblies, coat the threads of the re-
taining screws (key 174, figures 13 and 14) with Loc-
tite 271 or equivalent thread-locking compound (key
242).
5. Readjust the spring to obtain the appropriate travel
stop restriction by following the procedures presented

 Loading...