Lit. No. 68660/68661, Rev. 04 17 January 15, 2014
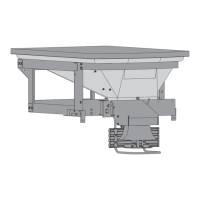
DRIVE BELT REPLACEMENT
1. Disconnect the electrical plug between the
spreader and truck.
2. Remove the motor cap assembly.
3. Loosen the four Phillips head screws that fasten
the motor mount to the drive support.
4. Slide the motor toward the drive shaft.
5. Remove the belt and replace with a new one.
6. Slide the motor mount away from the drive
shaft until the proper tension of the drive belt is
achieved. After tightening the belt should easily
deect 3/8".
7. Tighten the four Phillips head screws and replace
the motor cap.
CAUTION
Overtightening the belt may result in damage
to the motor or bearings.
Phillips Head Screws
Belt deflects
approx. 3/8"
MAINTENANCE
POSTSEASON MAINTENANCE
Before storing the unit for the off‑season, taking a few
minutes to do the following will extend the service life
of your spreader:
1. Thoroughly clean the unit inside and out.
2. Apply dielectric grease to all electrical connections
to prevent corrosion.
3. Grease the drive shaft bearings.
4. Oil or paint all bare metal surfaces.
5. Place the lid on the hopper body of the unit and
secure the latch.
6. Store the unit in an upright position; stabilize it
with supports if necessary. If the unit is stored
outdoors, cover the unit and place it on blocks to
avoid ground moisture.
CAUTION
Disconnect electric power at spreader
electrical wiring harness connection and tag
out if required before servicing or performing
maintenance.
CAUTION
Disconnect electric power at spreader
electrical wiring harness connection and tag
out if required before servicing or performing
maintenance.