6
OPERATION
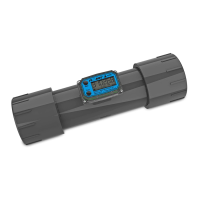
Verify Accuracy
Before use, check the turbine’s accu-
racy and verify calibration.
1. Make sure there is no air in the sys-
tem.
2. Measure an exact known volume
into an accurate container.
3. Verify the volume against the
readout or recording equipment.
Note: If necessary, use a correction
factor to figure final volume.
For best results, accuracy should be
verified periodically as part of a routine
maintenance schedule.
MAINTENANCE
Removing the Turbine
During turbine removal, liquid may
spill. Follow the liquid manufac-
turer’s safety precautions for
cleanup of minor spills.
1. Drain all liquid from the turbine.
Wear protective clothing as neces-
sary.
2. Disconnect both ends of the tur-
bine. For threaded connections,
loosen both ends of the turbine us-
ing a wrench only on the turbine’s
wrench flats.
3. If the turbine is not immediately in-
stalled again, cap lines as neces-
sary.
Cleaning the Turbine
During use, the turbine should be kept
full of liquid to ensure that drying does
not occur inside the turbine. If drying or
caking should occur, the rotor will stick
or drag, affecting accuracy. To deter-
mine if the rotor is stuck or dragging,
gently blow air through the meter and
listen for the quiet whir of the rotor.
Never blow compressed air through
the meter. It could damage the rotor.
1. Remove the turbine from the sys-
tem following the directions below.
2. Carefully clean residue off all parts.
Remove internal parts as detailed
above. Note orientation carefully for
correct assembly. Internal parts can
be soaked for 10 to 15 minutes in
compatible cleaning solutions.
3. Use a soft brush or small probe to
carefully remove residue from the
rotor.
Follow the liquid manufacturer’s in-
structions for the disposal of con-
taminated cleaning solvents.
3. When the rotor turns freely, assem-
ble and install it again following the in-
structions above.
4. Check accuracy after cleaning. See
Diagram 3 for example of bucket test
method.