True RMS Multimeter
Basic Maintenance
13
Reassembling the Meter Case
To reassemble the Meter case, do the following:
1. Verify that the rotary switch is in the
OFF position.
2. Reinsert the circuit board by placing it into the case top with the LCD showing
through the window. Carefully replace the two Phillips-head screws that connect the
circuit board to the case top.
Caution
Do not over-torque the two Phillips-head screws when you
reconnect the circuit board to the case top. Doing so may
create shielding problems and cause the Meter to give incorrect
readings.
3. Hold the Meter face down and place the case bottom on the case top. Make sure the
backlight cable located on the back of the LCD assembly is not caught between the
case halves.
4. Reinstall the four screws and the battery door.
5. Secure the battery door by turning the fasteners 1/4-turn clockwise.
6. Go to the “Performance Test” section in this document, and perform the procedures
described.
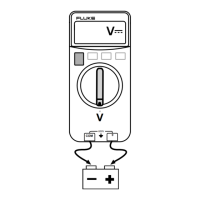
Testing Fuses (F1 and F2)
Before measuring current, test the appropriate fuse as shown in Figure 2. If the tests give
readings other than those shown, have the Meter serviced.
WWarning
To avoid electrical shock or personal injury, remove the test
leads and any input signals before replacing the battery or
fuses. To prevent damage or injury, install ONLY specified
replacement fuses with the amperage, voltage, and speed
ratings shown in the specifications.

 Loading...