4
Start of cycle
Gas pre-flow time
Current rise via up-slope
Current drop via
down-slope
Gas post-flow time
End of welding
Crater-fill current I
E
Pull back torch trigger and hold it down
Release the torch trigger
Release the torch trigger
Arc ignition with start arc I
S
Welding with pre-set
main current I
H
Fig. 4 Functional sequence in 4-step operating mode - without intermediate
lowering
Pull back torch trigger and hold it down
I
S
I
H
I
E
I
t
Push trigger forward and hold it
Release the torch trigger
Release the torch trigger
Fig. 4a Functional sequence in 4-step operating mode - Variant I - with
intermediate lowering
Pull back and hold down the torch trigger once again
I
S
I
H
I
E
I
t
Pull back torch trigger and hold it down
Release the torch trigger
I
E
I
H
Start of cycle
Gas pre-flow time
Current rise via up-slope
Current drop via
down-slope
Gas post-flow time
End of welding
Crater-fill current I
E
Arc ignition with start arc I
S
Welding with pre-set
main current I
H
Current rise via up-slope
Current drop via
down-slope
Welding with pre-set
main current I
H
Crater-fill current I
E
3. Pull back and hold trigger again
l Welding current drops via the downslope set on dial to
the value set for the crater-fill current I
E
on dial
l LED lights up
4. Release trigger
l Arc goes out
l Internally pre-set gas post-flow time elapses
Important!
l Current reduction with no interruption to welding is only
possible when the main current is activated
l If the torch trigger is accidentally pushed forward in open
circuit, no ignition cycle takes place
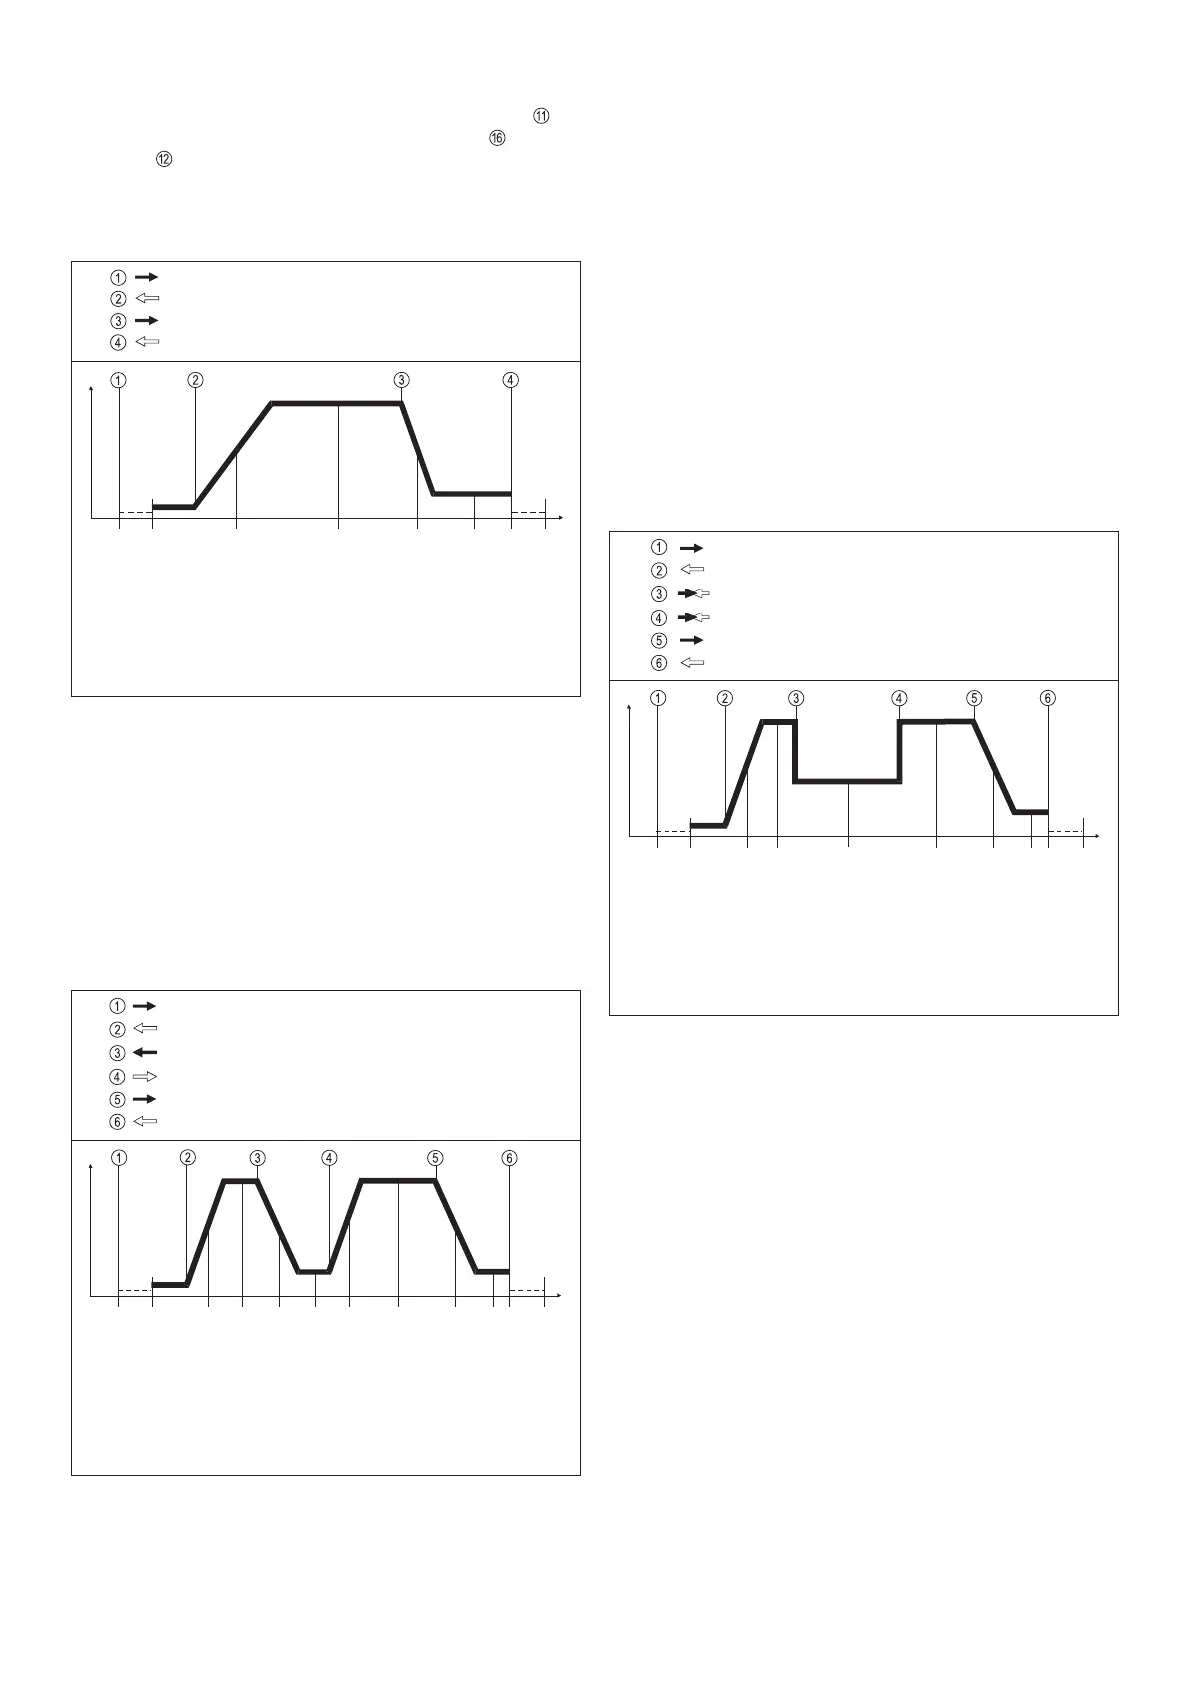
Special 4-step mode - Variant I (Fig.5)
l Enables the 4-step mode to be activated from TIG torch
triggers without the double-pushbutton function
l Intermediate lowering to the reduced current I
3
(for details of
how to set this, see "Working with the program-levels")
- Welding current can be lowered from the main current to
the reduced current I
3
and
back, without interrupting the
welding sequence
l In the "PRESETTINGS LEVEL___" program level (see
"Working with the program-levels"), Parameter I3, the redu-
ced current I3 can be set as a percentage of the main current
I
H
l In the "PRESETTINGS LEVEL___" (see "Working with the
program-levels"), TIG parameters, SFS must be set to 1
4-step mode - with intermediate lowering (Fig.4a)
l Activated from TIG torch trigger with double-pushbutton
function
l Intermediate lowering to the reduced current I
E:
Welding current can be lowered from the main current to the
reduced current I
E
and back, without interrupting the weld-ing
sequence
l In the "PRESETTINGS LEVEL___" (see "Working with the
program-levels"), TIG parameters, SFS must be set to OFF
Special 4-step mode - Variant II / III / IV / V (Fig.5a/b/c/d)
l Enables the 4-step mode to be activated from TIG torch
triggers with the double-push button function
l In the "PRESETTINGS LEVEL___" (see "Working with the
program-levels"), TIG parameters,
SFS must be set to
- "2" for Variant 2
- "3" for Variant 3
- "4" for Variant 4
- "5" for Variant 5
briefly press the torch trigger (forward)
briefly press the torch trigger (forward)
Release the torch trigger
Fig. 5 Functional sequence in special 4-step mode - Variant I
Pull back torch trigger and hold it down
I
S
I
H
I
3
I
t
Pull back torch trigger and hold it down
Release the torch trigger
I
E
I
H
Start of cycle
Gas pre-flow time
Current rise via up-slope
Gas post-flow time
End of welding
Welding with pre-set
lowering current I
3
(Setup)
Arc ignition with start arc I
S
Welding with pre-set
main current I
H
Current drop via
down-slope
Welding with pre-set
main current I
H
Crater-fill current I
E
Diagram showing intermediate lowering
 Loading...


