-
-
-19--19-
8.2.1. - MONTHLY REVISION8.2.1. - MONTHLY REVISION
GENERAL REVISION OF INSTALLATIONGENERAL REVISION OF INSTALLATION
AcActiti on on to to carcarry ry ouout t TooTools ls In tIn the evenhe even t ot of df defecefectt
11
Observe if there are leaks in theObserve if there are leaks in the
installation.installation.
Close the Close the correspondincorresponding general shutoffg general shutoff
valve, empty the pipe and replacevalve, empty the pipe and replace
deteriorated element.deteriorated element.
22
Observe Observe if if there there are are cracks cracks in in flexible flexible pipe pipe Visual Visual Close Close the the correspondincorresponding g general general shutoffshutoff
valve, empty the pipe and replace flexiblevalve, empty the pipe and replace flexible
pipe.pipe.
33
Close the general shutoff valve withClose the general shutoff valve with
padlock and empty the pipe slowly.padlock and empty the pipe slowly.
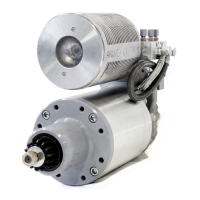
44
Observe Observe wear wear in in flanks flanks of of the the drive drive pinion pinion Visual Visual Remove Remove lock lock nut, nut, fit fit new new pinion pinion andand
replace the nut with replace the nut with the correspondingthe corresponding
torque (point 4.1)torque (point 4.1)
55
Observe cracks or marks of the driveObserve cracks or marks of the drive
pinionpinion
Visual Visual Remove Remove lock lock nut, nut, fit fit new new pinion pinion andand
replace the nut with replace the nut with the correspondingthe corresponding
torque (point 4.1)torque (point 4.1)
66
Rotate Rotate the the pinion pinion manually manually Carry Carry out out starter starter internal internal inspectioninspection
77
Verify Verify tightness tightness of of front front securing securing screws screws TorqueTorque
wrenchwrench
Set torque as per point 4.1Set torque as per point 4.1
88
Verify Verify tightness tightness of of pinion pinion securing securing nut nut TorqueTorque
wrenchwrench
Set torque as per point 4.1Set torque as per point 4.1
99
Verify Verify state state of of wiring wiring Visual Visual Replace Replace wiring wiring and and protect protect itit
appropriatelyappropriately
10 10 Verify Verify electrically electrically controlled controlled valve valve securing securing Visual Visual Retighten Retighten screwsscrews
11 11 Open Open general general shutoff shutoff valvevalve
8.2.2. - ANNUAL REVISION
8.2.2. - ANNUAL REVISION
-GENERAL REVISION: CHANGE OF SETS -GENERAL REVISION: CHANGE OF SETS OF GASKETSOF GASKETS
Be sure to have at hand a set of seals ref. Be sure to have at hand a set of seals ref. 52904015290401
GENERAL REVISION: CHANGE OF SETS OF GASKETSGENERAL REVISION: CHANGE OF SETS OF GASKETS
AcActiti on on to to carcarry ry ouout t TooTools ls In tIn the evenhe even t ot of df defecefectt
11
Close the general shutoff valve withClose the general shutoff valve with
padlock and empty the pipe.padlock and empty the pipe.
2 2 Loosen Loosen the the 4 4 nuts nuts 01. 01. Set Set key key 10 10 Change Change the the gasket gasket 0202
3 3 Loosen Loosen the the 4 4 screws screws 03. 03. Allen Allen key key 6 6 Change Change the the gasket gasket 0404
4 4 Withdraw Withdraw main main valve valve unit unit 05 05 ManualManual
55
Remove special nut 06Remove special nut 06
Remove nut 09Remove nut 09
Set key 8Set key 8
Set key 7Set key 7
Change cup-shaped gasket 07Change cup-shaped gasket 07
Change gasket 08,09,10,24Change gasket 08,09,10,24
6 6 Mount Mount nut nut 09 09 and and washer washer key key 08 08 and and 0707
77
Place main valve in its housing andPlace main valve in its housing and
position with the pinposition with the pin
ManualManual
88
Loosen plug 11Loosen plug 11
Loosen membrane 12Loosen membrane 12
Set key 12Set key 12
Manual Manual Change Change membrane membrane 1212
9 9 Mount Mount plug plug 11 11 with with sealant sealant Set Set key key 1212
1010
Remove screw 15Remove screw 15
Remove subassemblyRemove subassembly
Allen Allen key key 4 4 Change Change gaskets gaskets 16, 16, 17 17 and and 1818
11 11 Connect Connect feeding feeding sleevesleeve