each display, making each page different on each display. When
you change the layout of a page in one display, the changes
appear on only that display. When you change the name and
symbol of the layout, those changes appear on all displays in
the station, to maintain a consistent appearance.
Adding an Item to Favorites
You can add items such as a chart, combo screen, or gauge to
the Favorites category.
NOTE: If your home screen has been customized by the boat
manufacturer, you cannot add an item to the Favorites category.
1
From the home screen, select a category from the right.
2
Hold a button on the left.
The item is added to the Favorites home screen category.
To remove an item you have added to the Favorites category,
open the Favorites category, select Menu > Remove Favorite,
and select the item to remove.
Customizing the Home Screen
1
Open the home screen category to customize.
2
Select Menu.
3
Select an option:
• To rearrange an item, select Rearrange, and select the
new location.
• To add an item to the Favorites category, select Add to
Favorites, and select the item.
• To change the home screen background image, select
Background, and select an image (Recommended
Background Image Dimensions, page 4).
Customizing Pages
Customizing the Layout of a SmartMode or
Combination Page
You can customize the layout and data shown in the
combination pages and SmartMode layouts. When you change
the layout of a page in a display you are interacting with, the
change appears only on that display, except for the SmartMode
name and symbol. When you change the SmartMode name or
symbol for the layout, the new name or symbol appears on all
displays in the station.
1
Open a page to customize.
2
Select Menu.
3
Select Edit Layout or Edit Combo.
4
Select an option:
• To change the name, select Name or Name & Symbol >
Name, enter a new name, and select Done.
• To change the SmartMode symbol, select Name &
Symbol > Symbol, and select a new symbol.
• To change the number of functions shown and the layout
of the screen, select Layout, and select an option.
• To change the function of a portion of the screen, select
the window to change, and select a function from the list
on the right.
• To change how the screens are split, drag the arrows to a
new location.
• To change the data shown on the page and additional
data bars, select Overlays, and select an option.
TIP: While viewing a screen with data overlay, hold an
overlay box to quickly change the data in it.
• To assign a preset to a portion of the SmartMode screen,
select Presets > Include, and select a preset from the list
on the right.
Changing the Background Image
1
From the home screen, select Menu > Background.
TIP: You can also adjust this setting from Settings > System
> Sounds and Display > Background.
2
Select an image.
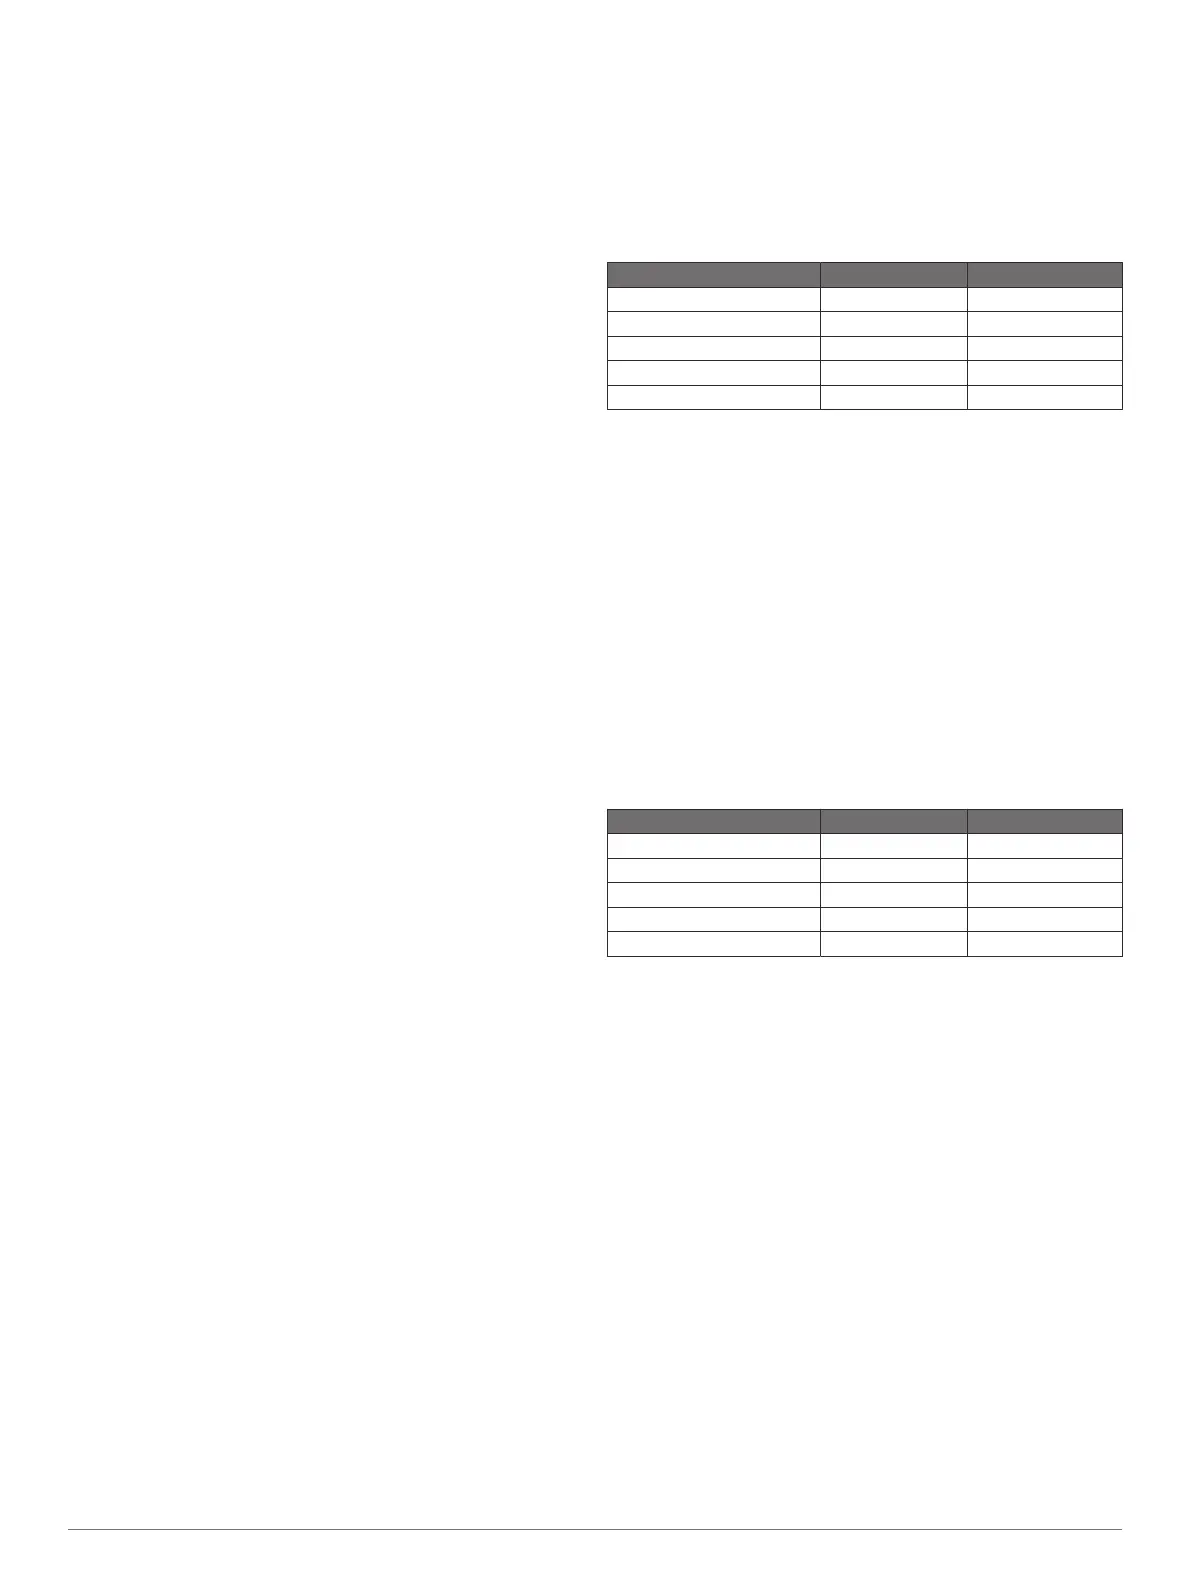
Recommended Background Image Dimensions
For the best fit for the background image, use an image that has
the following dimensions, in pixels.
Display resolution Image width Image height
WVGA 800 430
WSVGA 1024 535
WXGA 1380 723
HD 1920 991
WUXGA 1920 1111
Customizing the Startup Screen
You personalize the image that is displayed when the
chartplotter is turning on. For the best fit, the image should be
50 MB or less and conform to the recommended dimensions
(Recommended Startup Image Dimensions, page 4).
1
Insert a memory card that contains the image you want to
use.
2
Select Settings > System > Sounds and Display > Startup
Image > Select Image.
3
Select the memory card slot.
4
Select the image.
5
Select Set as Startup Image.
The new image is shown then turning on the chartplotter.
Recommended Startup Image Dimensions
For the best fit for the startup images, use an image that has the
following dimensions, in pixels.
Display resolution Image width Image height
WVGA 680 200
WSVGA 880 270
WXGA 1080 350
HD 1240 450
WUXGA 1700 650
Adding a SmartMode Layout
You can add SmartMode layouts to suit your needs. Each
customization made to one SmartMode layout for the home
screen in a station appears on all displays in the station.
1
From the home screen, select SmartMode™ > Menu > Add
Layout.
2
Select an option:
• To change the name, select Name & Symbol > Name,
enter a new name, and select Done.
• To change the SmartMode symbol, select Name &
Symbol > Symbol, and select a new symbol.
• To change the number of functions shown and the layout
of the screen, select Layout, and select an option.
• To change the function of a portion of the screen, select
the window to change, and select a function from the list
on the right.
• To change how the screens are split, drag the arrows to a
new location.
• To change the data shown on the page and additional
data bars, select Overlays, and select an option.
• To assign a preset to a portion of the SmartMode screen,
select Presets > Include, and select a preset from the list
on the right.
4 Customizing the Chartplotter