36
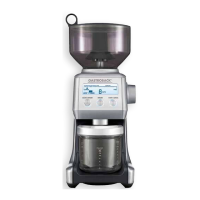
4. Fill coffee beans into the bean hopper; 450 g at the maximum.
Tip: The bean hopper can be removed while still containing coffee beans. For this turn the
bean hopper lock counter-clockwise and lift the bean hopper upwards and out. The locking
system closes the bottom outlet of the bean hopper.
5. Place the lid on top of the bean hopper.
6. Plug the power cord into mains power outlet.
Operating your Design Coffee Grinder Advanced Pro
1. Turn the GRIND SIZE dial for selecting your grind size.
For each coffee style, Espresso, Percolator, Filter and Plunger, the grind size will differ.
Within each coffee style there is a range of settings. Experiment with different grind settings
to achieve the brew that suits your taste best. (See: ´Customising the Pre-Settings` and ´Tips for
Best Results`)
Tip: You will find further information on the grind size required for your coffee machine in the
operating instructions of your coffee machine.
2. Select the required amount of grinds by pressing the AMOUNT button.
Repeatedly press the AMOUNT button until the desired number of cups/shots is displayed.
(See ´Coffee Preparation Chart in section Tips for Best Results`) When the maximum number
is reached, the display switches back to 1.
– For Espresso, 8 shots are possible at the maximum.
– For all other types of preparation, 12 cups are feasible.
In automatic mode, your Design Coffee Grinder Advanced Pro will automatically adjust the
actually prepared amount depending on the preselected grind size.
Tip: You can increase the selected amount even during operation by pressing the AMOUNT
button. In automatic mode, the appliance will always provide the amount, currently selected
and displayed on the screen.
3. Place a suitable vessel as near as possible under the grind outlet.
You may use any vessel fitting under the grind outlet. If necessary, hold the vessel with your
hand during operation.
• When using filter bags or Portafilter, you may fill the filter basket or Portafilter directly
without any need to transfer the ground coffee from another receptacle.
• Portafilter possibly fit in one of the supplied cradles. (See: ´Grinding into Portafilter`)
• If you wish to store some coffee powder for later use, you should use the supplied grinds
container. See ´Filling the Grinds Container` for further instructions. However, any other fitting
container will do. Do not store ground coffee for a too long period of time in the container,
to avoid loss of quality.
4. Start and stop the grinding operation. You can do this in 2 ways.
•AutomaticMode: Press and immediately release either the START/CANCEL button or
Portafilter button once to activate the automatic mode. This way, grinding will automatically
stop when the calculated amount is prepared. However, you can stop the process prematurely
by pressing the START/CANCEL button again.
•ManualGrinding: Press and hold either the START/CANCEL button or the Portafilter
button for as long as you wish to operate the grinder. The grinding will stop as soon as you
release the START/CANCEL button or Portafilter button.