42
Cleaning the Appliance
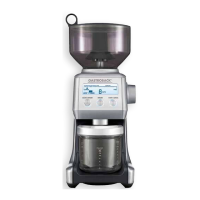
1. Wash all removable parts in warm dishwater. These are: grind catch tray, bean hopper and
bean hopper lid and, when used, the cradle or grind container and grind container lid.
2. Rinse with clear tap water and dry thoroughly.
3. Use the supplied cleaning brush or any other clean, hard and dry brush to clean the milling
works, burr sleeve, and grind outlet.
4. Wipe the exterior of the appliance with a soft damp cloth. Thereafter, polish with a dry
cloth.
5. Thereafter leave all parts dry naturally for at least 1 hour, where they are out of reach of
young children. You may dry the milling works and outlet of the bean hopper using a hair
dryer.
6. Reassemble the appliance after cleaning as described below.
Reassembling the Appliance
It is good advice to reassemble the appliance after cleaning. Thus you avoid damage to the
parts of the appliance and the parts cannot get lost. Always ensure that the parts of the appli-
ance are completely dry, before reassembling.
Important: Before re-assembling the appliance, ensure that all parts are clean and comple-
tely dry. This is crucial especially for the milling works, burr sleeve, and bean hopper. Other-
wise, moisture could get into the milling works and coffee powder could stick to the surfaces
and block the milling works.
1. Insert the grind catch tray into the base of the appliance. The grind catch tray is secured via
a magnet. It is correctly in place, when on a level with the exterior of the power base.
2. Assemble the burr sleeve.
For this, grasp the burr sleeve at the shackle and insert it in the milling works with the red
arrow pointing to ALIGN. Then turn the burr sleeve clockwise until the red arrow points to
LOCK. Doing so, you will distinctly feel resistance.
Important: For proper operation, it is crucial to assemble and lock the burr sleeve correctly.
Ensure that the red arrow on the brim of the burr sleeve faces to the LOCK designation. The
burr sleeve must be tightly fixed in place.
3. Ensure that the bean hopper lock is in UNLOCK position. It is best to turn the bean hopper
lock back and forth once for checking its position.
4. Place the bean hopper with the bean hopper lock in UNLOCK position on the milling works.
Turn the bean hopper slowly until it settles down on the milling works. Turn the bean hopper
lock into the LOCK position. Now, the bean hopper must have a stable and tight stand on
the appliance and may not tilt or wobble.
5. Cover the bean hopper with the bean hopper lid.
Tip: It is best to keep the bean hopper lid closed, even when the appliance is not in use, to
avoid dust getting into the bean hopper.