Do you have a question about the Getinge SafeStep and is the answer not in the manual?
Precautions related to the operating environment and electrostatic discharge.
Guidelines for safely handling the unit during use, storage, and transportation.
Information on battery types, usage, and disposal for the unit.
Caution regarding the use of excessive force on unit keypad buttons.
Warning about computer equipment connected to the RS232 connector.
Warning that internal parts are not serviceable by the operator.
Guidance on proper disposal of the product according to WEEE Directive.
General requirements for the Getinge SafeStep ATP Monitor unit.
Safety standards the unit has been designed to meet.
Electromagnetic compatibility standards the unit complies with.
Statement of compliance with relevant directives and standards.
Highlights the main features and capabilities of the Getinge SafeStep ATP Monitor.
Information on obtaining unit accessories and consumables from Getinge.
Explains the bioluminescent chemistry used for ATP measurement.
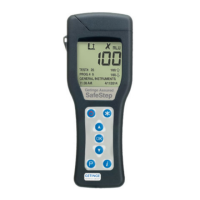
Details the external front and rear features of the ATP monitor unit.
Explains the functions of the different buttons on the unit's keypad.
Describes the layout of the liquid crystal display and its icons.
Instructions on how to insert and fit the correct types of batteries into the unit.
Steps to power on the unit and what to expect during the start-up process.
Explains the meaning of the low battery icon and when to replace batteries.
Describes the automatic self-calibration process the unit performs on startup.
Instructions on how to properly power down the ATP monitor unit.
Details the unit's automatic power-saving standby mode and its settings.
Explains the warning symbol for low memory and its implications.
Information on how the unit stores and manages programmable test locations.
Step-by-step guide for performing a sample measurement using the unit.
Instructions on how to retest a failed measurement result.
Details how to configure the unit's standby mode settings.
Explains how to adjust the LCD display's bold text setting.
Instructions on configuring the unit to save or not save test results.
Details on how to set up and manage user IDs for test results.
Instructions for configuring program test points and pass/fail thresholds.
Guidance on establishing appropriate ATP pass/fail limits for measurements.
How to access and view previously stored test results on the unit.
How to analyze test results and view statistics or failed tests.
Instructions for clearing the stored test results memory from the unit.
Guide for setting the unit's internal clock and date, including format options.
How to manually adjust the LCD screen contrast for optimal viewing.
Configuration for the unit's quick boot feature for faster startup.
Disclaimers and terms of use for the software and computer equipment.
Specifies the minimum system requirements for installing the software.
Step-by-step instructions for installing the Getinge SafeStep ATP Monitoring software.
Overview of the main functions available within the software.
Procedure for logging in and registering a new handheld device with the software.
Details on uploading, downloading, and reporting test results data.
Instructions for cleaning the exterior casework of the ATP monitor unit.
Guidance on when and how to replace the unit's batteries.
Steps for cleaning or replacing the unit's protective sample pocket.
Lists different beep types and their possible causes and required actions.
Common symptoms, their possible causes, and operator actions.
Explains unit error codes, their meanings, and initial troubleshooting steps.
Specifies the warranty period provided for the ATP monitor unit.
Details specific exclusions that may void the unit's warranty.
| Brand | Getinge |
|---|---|
| Model | SafeStep |
| Category | Measuring Instruments |
| Language | English |