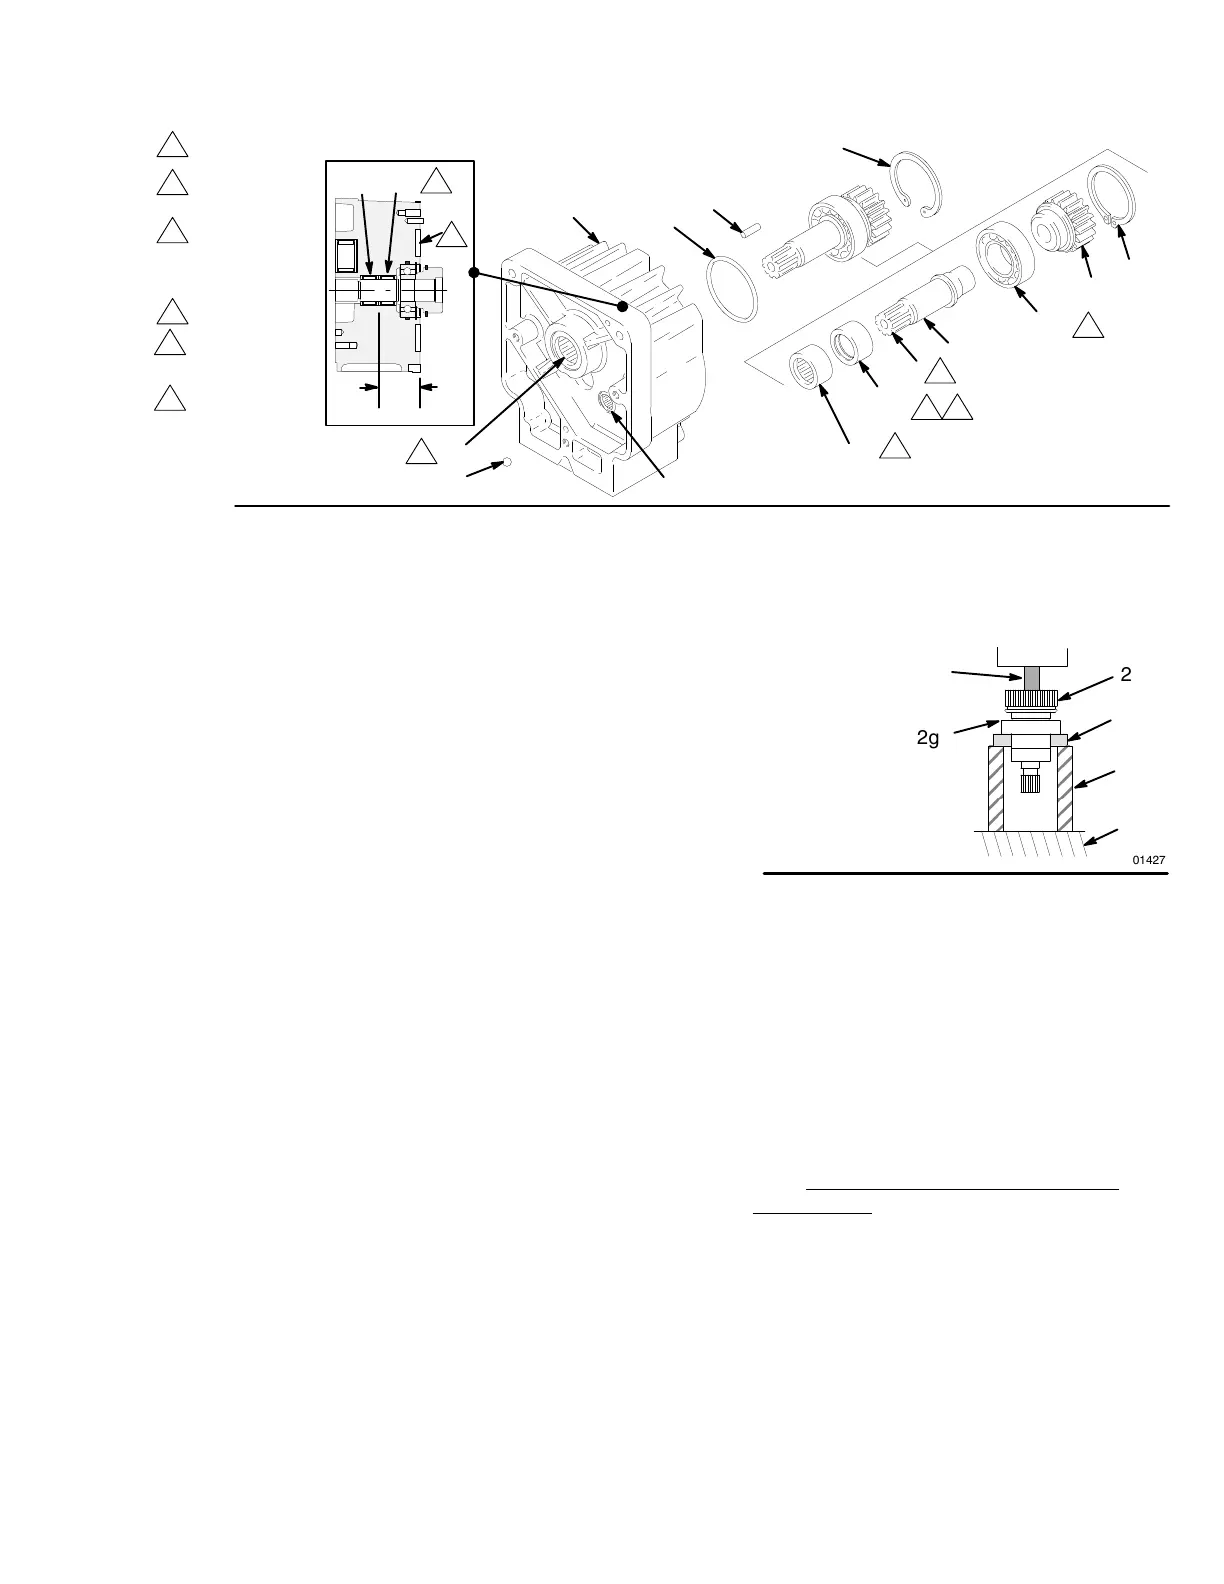
Pinion
Housing
Fig.
15
2c
Detail A
2k
2a
2b
2j
2h
2g
2f
2n
Lubricate
inner and
outer diameters
Lubricate teeth
Lubricate exterior
2m
2m
Directional
arrow on roller
clutch must
face the small
bearing (2n)
06005
1
3
4
2
1
2
3
4
5
6
Press fit
small
bearing (2n)
and clutch
roller (s) here
Back of pinion
housing
5
6
1.53
2n
2d
2e
2p
4
4
Repairing the Pinion (Fig. 13)
NOTE: Use
a hydraulic press if you purchase the pin
-
ion parts individually
. Otherwise, use Repair Kit No.
223–189, which includes the shaft and bearings pre–
assembled and lubricated.
If
using Repair Kit 223–189
,
follow Steps 1
to 7, below
.
1. Remove
the small ring (2j) from the hub (2h) and
the large ring (2k) from the bearing recess of the
housing (2a).
2.
Push on front of the shaft (2f) to force the bearing
and hub assembly out of the housing (2a).
3.
Press the small bearing (2n) and roller clutch (2m)
out of the pinion housing (2a). Remove the new
bearing and roller clutch from the shaft of the kit
and press it into the housing to the dimension
shown. Directional arrow of roller clutch (2m) must
face bearing (2n). See Detail A.
4.
Inspect o-ring (2p) and replace if necessary
.
5.
Install the shaft assembly
, pushing it to the shoul
-
der of the housing (2a).
6.
Install rings (2k and 2j). Ring (2k) must be installed
with bevel facing back of pinion housing.
7.
Go to
Reassembly
, page 29, Step 7, or continue
on page 24.
If you purchased parts separately
, follow steps 1 to
9, below
. Disassemble only as far as needed for the
parts being replaced.
NOTE:
The old bearing (2g) will be damaged as it is
removed. Have one on hand if you need to remove it
for any reason. Always replace bearing 2g if installing
a new hub 2h.
1. T
o replace small bearing (2n) or roller clutch (2m),
press the old one out of the pinion housing (2a).
2.
Remove the small ring (2j) from the hub (2h). Re
-
move the snap ring (2k) from the bearing recess of
the housing (2a).
KEY
A Round
steel bar to
push on shaft (2f)
B
Hydraulic press
C
Steel bar stock
DT
wo steel blocks
E
Press platform
Fig.
16
01427
2g
2h
A
B
C
D
E
3.
Push on the front of the shaft (2f) to force the
bearing and hub assembly out of the housing (2a).
4.
Using a hydraulic press,
place pieces of steel
bar stock on the inner race of the large bearing
(2g) and press the shaft through the hub and bear
-
ing. See Fig. 16.
5.
Apply lubricant to the parts as shown in Fig. 15.
6.
Press fit the following parts:
D
Small bearing (2n) and then the roller clutch
(2m), with the directional arrow facing the
small bearing
, into the rear of the housing (2a).
See Detail A in Fig. 15.
D
Large bearing (2g) to shoulder of shaft (2f).
D
Hub (2h) onto the shaft (2f) all the way to the
large bearing (2g).
7.
Install the shaft assembly
, pushing it to the shoul
-
der of the housing (2a).
8.
Install the rings (2k and 2j).
9.
Skip ahead to
Reassembly
, page 34, Step 8, or
continue on page 28.