26 / 44
16570.16572_Alpha150Q/170Q/220Q_V1
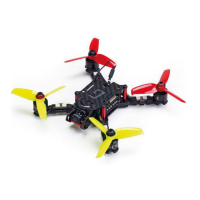
Installing the propellers
CAUTION
Risk of injury by rotating propellers in case the motors start.
Always unplug the connector to the battery before working on
the propellers.
Install the propellers as shown in the picture on the left. Be sure to
attach the right propeller to each motor. The propellers are marked
accordingly. If only one propeller is put on wrong, the copter is not
able to fly.
On the two, seen from above, running counterclockwise motors left
front (1) and right rear (3) you have to install the propellers marked
with an "R".
On the two, seen from above, clockwise running motors right front
(2) and left rear (4) you have to install the propellers marked with an
"L".
Another orientation option is: The outer propeller blades of the two
front propellers must be directed obliquely backwards at the top and
the two rear propellers diagonally forward at the top.
First flight
For the first flight, select a large, free flight surface with not too hard
ground. At least initially always start, fly and land in attitude mode
because the copter is easier to control. Familiarize yourself with the
flight behaviour of your copter before you switch to the Rate mode
for the first time. Proceed carefully and responsibly.
Commissioning the copter step-by-step
1. Switch on transmitter.
2. Activate the Motor Stop function by switching the corresponding
switch.
3. Start the copter by plugging in the battery.
‖ After commissioning of the copter, its position stabilization is
immediately active, but not yet initialized.
4. Place the copter horizontally on a suitable surface for about 3 sec
after switching on.
‖ The calibration process can only be performed when the
receiver is absolutely still. Always wait until the calibration
process has finished before starting to fly the model.
1R
2L
3R
4L