Pos. Symbol Description
12
Operating mode for the pump:
• On: The pump has been switched on
manually.
• Off: The pump has been switched off
manually.
• Auto: The pump is running automatically
based on settings.
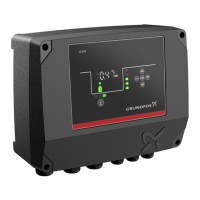
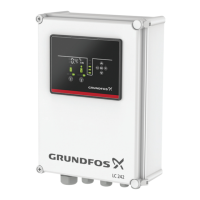
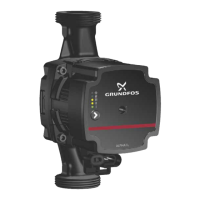
13 Display The display shows the pump status.
14
Setpoint
5.00 bar
Operaring mode
Normal
Actual controlled value
4.90 bar
Control mode
Const. pressure
Status Settings Assist
1 2 3
56789
Lock symbol:
If the symbol is lit, the control unit is locked from
making changes.
15
Alarm and warning symbol:
Red: Alarm
Yellow: Warning
The control unit enables manual setting and monitoring of the
system.
6. Setting the product
Make sure that all settings are entered according to the
pump and system requirements to avoid malfunction.
6.1 Setting the application type with Grundfos GO
Remote
1. Go to Settings > Level control > Application type.
2. Select the type.
• Fill
Related information
3.3 Startup wizard on the operating panel
6.2 Setting the sensor type
6.2.1 Setting the sensor type with Grundfos GO Remote
1. Go to Settings > Level control > Sensor type.
2. Select the type.
• Analog sensors
• Digital sensors
6.2.2
Setting the sensor type with the operating panel
1. Press and hold OK until S-1 or S-2 starts flashing.
2. Select the sensor type using the Up and Down buttons.
• S-1: Analog sensors
• S-2: Digital sensors.
3. Press OK to confirm the setting.
4. Continuously press OK to confirm all other settings and to exit
the setup.
6.3
Setting the start level
6.3.1 Setting the start level with Grundfos GO Remote
The settings apply to analog sensors. For digital sensors, the
setting is automatically activated.
1. Go to Settings > Level control > Start level P1.
2. Set the start level for pump 1.
6.3.2
Setting the start level with the operating panel
The settings apply to analog sensors. For digital sensors, the
setting is automatically activated.
1. Press and hold OK until the display and dry running start
flashing.
2. Continuously press OK until the indicator light for the start level
for pump 1 starts flashing.
3. Set the start level for pump 1 by using the
Up and Down
buttons.
4. Continuously press OK until the display stops flashing.
The settings have now been stored.
6.4 Setting the stop level
6.4.1 Setting the stop level with Grundfos GO Remote
The settings apply to analog sensors. For digital sensors, the
setting is automatically activated.
1. Go to Settings > Level control > Stop level
2. Set the stop level.
If you are using the same level for start and stop,
remember to set a stop delay. This will prevent the
pump from starting and stopping too frequently.
6.4.2 Setting the stop level with the operating panel
The settings apply to analog sensors. For digital sensors, the
setting is automatically activated.
1. Press and hold OK until the display starts flashing.
2. Press OK once.
The current stop level is indicated on the display.
3. Set the stop level using the Up and Down buttons.
4. Continuously press OK to confirm all other settings and to exit
the setup.
If you are using the same level for the start and stop
level, remember to set a stop delay. This will prevent
the pump from starting and stopping too frequently.
6.5 Setting the high level
6.5.1 Setting the high level with Grundfos GO Remote
For analog sensors:
1. Go to Settings > Level control > High level.
2. Set the high level.
For digital sensors:
1. Select which terminal to configure.
6.5.2
Setting the high level with the operating panel
The settings apply to analog sensors
1. Press and hold OK until the display starts flashing.
2. Press OK four times. The current high level is indicated on the
display.
3. Set the high level using the Up and Down button.
For digital sensors, enable or disable the setting.
1. Press OK once to complete the setting.
6.5.3
After-run delay, high level
If the water level reaches the high level switch, due to either a
defective analog or digital level switch, the pump is only controlled
by the high level switch. To avoid too many starts and stops, an
after-run delay can be set which allows the pump to partly empty
the pit. The after-run delay should be set so that the pump stops at
the normal stop level to avoid dry running.
In case of an error, the product reports error 165 (Signal
fault) or error 205 (Level switch inconsistency) on the
display or in Grundfos GO Remote.
6.5.3.1 Setting the after-run delay, high level
1. Go to Settings > Level control > After-run delay, high level.
2. Select Enable or Disable.
3. Set a delay time.
Related information
8.20 Code 165 (Signal fault)
8.23 Code 205 (Level switch inconsistency)
14
English (GB)

 Loading...